Husqvarna HVT52 Owners Manual - Page 4
Maintenance, Trimmer, Fault, Finding, Hints
 |
View all Husqvarna HVT52 manuals
Add to My Manuals
Save this manual to your list of manuals |
Page 4 highlights
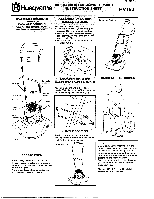
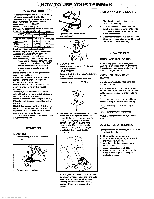
MAINTENANCE OF YOUR TRIMMER ON COMPLETION OF TANNING Clean grass from under deok. Remove any leaves or grass cuttings from around the engine coring fire, carburettorand i' mpeller air openings. AIR FILTER MAINTENANCE • Never run the engine without a filter or with a dirty filter. This will greatly reduce engine efficiency and lead to engine damage. • Your trimmer is fitted with a turbo filter the maintenance for which is as follows:- When the engine performance drops (e.g. difficult starting or loss of revs) check the air cleaner. 1. Remove the two screws (4). Take off the filter cover (1). 2. Remove the two filters (5) and (6). Clean inside the filter cover thoroughly. 3. Shake or tap the thick filter (5) to remove any dirt or dust. 4. Replace the thin filter (6) if it is contaminated with dust. DO NOT OIL THE FILTERS. 5. Install the thick fitter (5) in the filter cover (1). Place the thin filter (6) on top. DO NOT CREASE THE FILTERS. 6. Clean the filter body (7) with a small brush. Replace the filter cover (1) and the two screws (4). 7. DO NOT REMOVE the cap (2) or screws (3) unless there is visual evidence of grass or dirt. 3 7 N 2 6 1 4 SPARK PLUG An oily or carboned spark plug makes starting difficult and decreases the efficiency of the engine. Periodically remove the spark plug and clean and adjust when necessary. Gap setting 0.30" (0.8 mm). Do not remove spark plug when engine is hot. Do not sand blast the spark plug to clean it. CARE For trouble-free trimming next season, make sure that your trimmer is serviced immeciately after the last cut of the year, as follows:When the engine is cold, drain all fuel from the tank and then run the engine until it stops. (Fuel left in the machine becomes stale and causes difficult starting). Thoroughlycleanall sternal parts of the trimmer. Clean air filter (see air filter maintenance). Inspect, clean and replace spark plug. Do not replace spark plug lead. Check and replace cutting lines. Store the trimmer in a dry, damp-proof secure area out of the reach of children. CARE The cutting line is sharp, wear gloves and take care when handling it. Check the cutting line frequently during use and on completion of trimming. Removing the Cutting Line Switch machine off and disconnect spark plug lead. Push the line towards the centre of the cutting disc and carefully remove. See Fig 1. Fig. 1 Renewing the Cutting Line Holding the line with thumb and forefinger and using other thumb as a guide, curve around centre portion of the cutting disc (as illustrated in Fig 2) and thread through the hole on the rim of the cutting disc. Fig. 2 Carefully pull the line into place as illustrated in Fig. 3. Fig. 3 At al times the amount of line extencing beyond the edged disc should be of an even length. If there is a variation of more than half an inch between the four lengths of line replace immediately with four full new lengths. Important- Only*four cuttinglinesat any one time HEIGHT ADJUSTIVENT Fig A 1. Loosen bdt(1), usinga 9'16AF socket. Remove bolt(1), cuttingdisc(2)andsower(3)(rifted). 2. Carefuly remove impeller from engine shaft 3 Selectrequiredheight of cut,(SeeFigsB, C,D& E) and replace any outing Ines requied, ensuring that citing the is fitted on correct side of cutting dec. • Important- Cutting line must be on the side of the ciao acing the grass when fitted. 4. Replace impeller ontoengine shaft ensuring that it's correctly located. Replace spacer(4)(f fitted), outing disc(2)andbolt(1). 5. Secure aswambly with bolt (1), making sure complete assembly is tight (if in doubt contact your servte dealer). Fig B r . Highest height of cut Fig C Fig D Fig E Lowest height of cut FAULT FINDING HINTS DIFfICULT TO START POOR FLOTATION OR EXCESSIVE VIBRATION Check that the start/stop switch is n the Staff position. Ensure fuel tark cap airvent screw is open. Fuel rnkture may be stale (e.g. long time sere trimmer was used). Renew with fresh mixture. Check that cared amount of 2 stroke dl is being used n the fuel rnklure. Checkthat the cuttingdiscis securelylightened ENGINE OVERHEATING Check flow of air over cylinder. Remove all grass and dirt Check correct fuel mbdure. LACK OFPOWER Check correct fuel mixture is used. Ensure underside of deck is dean. Air filtermayneedcleaning (seeair fitter maintenance). Ensure exhaust port on silencer does not have excessive build-up of carton. Remove discAmpeller and clean thoroughly between vanes. Husqvarna Check that the cutting disc is securely fastened and undamaged. Tighten all edema] bolts and screws. Check crankshaft - it may have bent. WARRANTY A full warranty statement is detailed on the service literature, and with the Tecumseh engine literature supplied with this product. 9006 Ponrneter Wooas Drive . 0nariorte NC 26216. 1-600.GET-SAWS . Dealer Locator 1-90-0HUSKY 62. Web Site WVA,husqvarna corn. Dealer Web Srt• www h.ectvarna sennoe born The policy al continuous improvement moans that specrlioebons may be arena wrtnout poor notice 1987 Husqvarn6 HVT40 Operator Manual Part
-
 1
1 -
 2
2 -
 3
3 -
 4
4
 |
 |
