Husqvarna L 221AK Owner Manual - Page 20
Équipement De SÉcuritÉ De La Machine, Maintenance
 |
View all Husqvarna L 221AK manuals
Add to My Manuals
Save this manual to your list of manuals |
Page 20 highlights
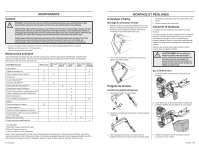
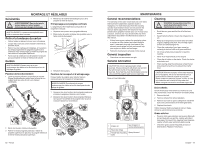
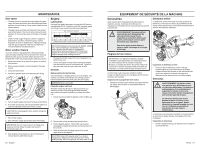
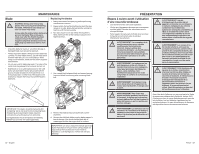
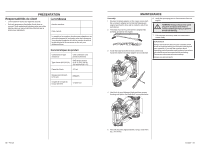
MAINTENANCE Gear cases • To keep your drive system working properly, the gear cases and area around the drive should be kept clean and free of trash build-up. Clean under the drive cover twice a season. • The gear cases are filled with lubricant to the proper level at the factory. The only time the lubricant needs attention is if service has been performed on the gear case. • Under normal usage the grass catcher is subject to deterioration and wear. Check the grass catcher frequently for wear or deterioration. Replace the bag only with grass bags that meet the manufacturer's recommendations and specifications. Water washout feature Your lawn mower is equipped with a fitting that allows quick and easy cleaning of the underside of the housing. Note that water, grass and other debris will drain from beneath the mower housing during the washout process. 1 Move the machine to an area of cut grass or another hard surface. 2 Remove grass catcher or mulch plug from the lawn mower. 3 Close the back shield. 4 Connect a garden hose to the washout port fitting. Engine Lubrication Use only high quality detergent oil rated with API service classification SG-SL. Select the oil's SAE viscosity grade according to your expected operating temperature. SAE VISCOSITY GRADES 5W-30 SAE 30 F -20 0 30 32 40 60 80 100 C -30 -20 -10 0 10 20 30 40 TEMPERATURE RANGE ANTICIPATED BEFORE NEXT OIL CHANGE CAUTION! Although multi-viscosity oils (5W30, 10W30 etc.) improve starting in cold weather, these multi-viscosity oils will result in increased oil consumption when used above 32qF. Check your engine oil level more frequently to avoid possible engine damage from running low on oil. • Change the oil after every 25 hours of operation or at least once a year. • Check the engine oil level before starting the engine and after each 5 hours of continuous use. Tighten oil plug securely each time you check the oil level. Oil level Before starting for the first time Your lawnmower is shipped without oil in the engine. You receive a container of oil with the unit. Slowly pour the entire container down the oil fill spout into the engine. IMPORTANT! Do not overfill! Check the engine's oil level The lawn mower should stand on flat ground when you check the oil level. Ensure the ignition lead has been removed from the spark plug before you open the oil filler cap. 1 Check the oil level with the dipstick on the oil filler cap. 5 Turn on water supply and check for leaks at the fitting. 6 If no leaks are present, start engine and let engine run until the underside of the lawn mower is clean. CAUTION! Do not engage the drive system during the washout process. 7 Turn off the engine. 8 Shut off water supply and remove hose from fitting. IMPORTANT! Do not remove hose from fitting while engine is running. Water in engine can result in shortened engine life. 9 Start engine and let engine run for a full minute to remove excess water from mower. 20 - English 2 Remove the oil cap and wipe the dipstick clean. 3 Put the dipstick back in. The oil filler cap must be completely screwed down to give a correct picture of the oil level. 4 If the oil level is low, fill using engine oil up to the upper level on the dipstick. CAUTION! Initial oil fill requires only 15 oz. due to residual oil in engine from the manufacturers 100% quality testing. When changing oil you may need 18 oz. ÉQUIPEMENT DE SÉCURITÉ DE LA MACHINE Généralités Cette section décrit l'équipement de sécurité de la machine, son but, et la façon d'en effectuer les inspections et l'entretien afin de s'assurer qu'il fonctionne correctement. Déflecteur arrière Le déflecteur arrière, fixé entre les roues arrière de la tondeuse, est fourni pour réduire la possibilité que des objets soient éjectés vers l'arrière de la tondeuse dans la position de coupe de l'opérateur. ! AVERTISSEMENT! Ne jamais utiliser une machine dont l'équipement de sécurité est défectueux! Si une inspection de la machine détecte une panne, communiquer avec un agent d'entretien pour réparation. Pour éviter que le moteur démarre, retirer le câble d'allumage de la bougie d'allumage. Poignée de frein moteur IMPORTANT! Les règlements fédéraux exigent l'installation d'un dispositif de commande du moteur sur cette tondeuse afin de réduire le risque de blessure au contact des lames. Ne jamais essayer de contourner la fonction du dispositif de commande de l'opérateur. La lame tourne lorsque le moteur tourne. Le frein moteur est conçu pour arrêter le moteur. Lorsqu'on relâche la prise sur la poignée de frein moteur, le moteur doit s'arrêter. Inspection de la poignée de frein moteur • Démarrer le moteur, puis relâcher la poignée de frein. Le moteur doit s'arrêter et l'entraînement doit se désengager. Inspection du déflecteur arrière • S'assurer que le déflecteur arrière n'est pas endommagé et qu'il ne présente pas de défauts visibles tels que des fissures ou des ressorts brisés qui forcent la porte à se fermer. Remplacer le déflecteur ou les ressorts s'ils sont endommagés. Silencieux ! AVERTISSEMENT! Ne jamais utiliser une machine sans silencieux ou avec un silencieux défectueux. Un silencieux endommagé peut considérablement augmenter le niveau de bruit et le risque d'incendie. Garder l'équipement anti-incendie à portée de main. Le silencieux devient très chaud pendant et après utilisation. C'est également le cas au ralenti. Rester conscient du risque d'incendie, surtout lors de l'utilisation à proximité de substances et/ou de vapeurs inflammables. Le silencieux est conçu pour maintenir le niveau de bruit au minimum et diriger les gaz d'échappement loin de l'utilisateur. Inspection du silencieux • Vérifier régulièrement que le silencieux est complet et correctement fixé. French - 61
-
 1
1 -
2
-
3
-
4
-
5
-
6
-
7
-
8
-
9
-
10
-
11
-
12
-
13
-
14
-
 15
15 -
 16
16 -
 17
17 -
 18
18 -
 19
19 -
 20
20 -
 21
21 -
 22
22 -
 23
23 -
 24
24 -
 25
25 -
26
-
27
-
28
-
29
-
30
-
31
-
32
-
33
-
34
-
35
-
36
-
37
-
38
-
39
-
40
 |
 |