Husqvarna MZ 52 Owners Manual - Page 48
Transmission Purging, Drain old oil filters of all free-flowing oil prior
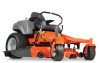 |
View all Husqvarna MZ 52 manuals
Add to My Manuals
Save this manual to your list of manuals |
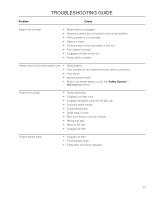
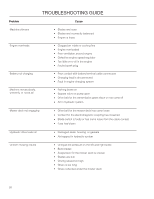
Page 48 highlights
LUBRICATION 3. After the oil has drained, wipe the filter base surface and apply a film of new oil to the gasket of the replacement filter. Drain old oil filters of all free-flowing oil prior to disposal. Place used oil in appropriate containers and dispose of it in accordance with laws in your area. 4. Install the new filter by hand, turning it threequarters to one full turn after the filter gasket contacts the filter base surface. 5. Reinstall the filter guard. Torque screws to 65 in/lbs. each. 6. Repeat steps on the opposite side. 7. Drain old oil filters of all free flowing oil prior to disposal. Place used oil in appropriate containers and dispose of it in accordance with laws in your area. 8. Remove the top port plug (see illustration) from the left side and right side of the transaxles prior to filling with oil. This will allow the transaxles to vent during oil fill. 9. Remove the cap from the transaxles' expansion tank located on the vehicle frame. 10. Fill with 20W50 motor oil until oil just appears at the bottom of each transaxles' top port (approximately 2 quarts per transaxle, 4 quarts total). Install the top port plug into each transaxle as the oil level reaches the port. 11. Install and torque the top port plugs to 180 in./lbs. 12. Continue to fill the transaxles through the expansion tank until the FULL COLD line is reached (this will take approximately 23 additional ounces). 13. Reinstall the expansion tank cap by hand. Be careful to not overtighten. Transmission Purging Due to the effects air has on efficiency in hydrostatic drive applications, it is critical to purge the system. These purge procedures should be implemented any time a hydrostatic system has been opened to facilitate maintenance or any additional oil has been added to the system. Resulting symptoms in hydrostatic systems may be: • Noisy operation. • Lack of power or drive after short term operation. • High operation temperature and excessive expansion of oil. • Shortened component life. Before starting, make sure the oil tank is at the proper oil level. If not, fill to the specifications outlined above. The following procedures are best performed with the vehicle drive wheels off the ground, then repeated under normal operating conditions. See Moving Machine By Hand in the Operation section for bypass linkage adjustments. • Disengage the brake if activated. • With the bypass linkage open and the engine running at fast idle, slowly move the directional control in both forward and reverse directions (5 or 6 times). As air is purged from the unit, the oil level will drop. • With the bypass linkage closed and the engine running, slowly move the directional control in both forward and reverse directions (5 to 6 times). Check the oil level and add oil as required after stopping the engine. • It may be necessary to repeat Steps 2 and 3 until all the air is completely purged from the system. When the hydraulic drive operates at normal noise levels and moves smoothly forward and reverse at normal speeds, the hydraulic drive is considered purged. • After the vehicle has been used two times, the oil level should be checked while the oil is cold and adjusted accordingly. 48
-
 1
1 -
2
-
3
-
4
-
5
-
6
-
7
-
8
-
9
-
10
-
11
-
12
-
13
-
14
-
15
-
16
-
17
-
18
-
19
-
20
-
21
-
22
-
23
-
24
-
25
-
26
-
27
-
28
-
29
-
30
-
31
-
32
-
33
-
34
-
35
-
36
-
37
-
38
-
39
-
40
-
41
-
42
-
 43
43 -
 44
44 -
 45
45 -
 46
46 -
 47
47 -
 48
48 -
 49
49 -
 50
50 -
 51
51 -
 52
52 -
 53
53 -
54
-
55
-
56
-
57
-
58
-
59
-
60
-
61
-
62
-
63
-
64
 |
 |
