Husqvarna XT722FE Owners Manual - Page 11
Lubrication, To Change Engine Oil See Fig. 12, Air Filter See Fig. 13, Muffler, Spark Plug - lawn mower 3 in 1
 |
View all Husqvarna XT722FE manuals
Add to My Manuals
Save this manual to your list of manuals |
Page 11 highlights
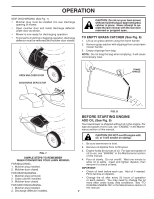
MAINTENANCE ENGINE LUBRICATION Use only high quality detergent oil rated with API service classification SG-SL. Select the oil's SAE viscosity grade according to your expected operating temperature. TO CLEAN AIR FILTER 1. Remove cover. 2. Carefully remove cartridge. 3. Clean by gently tapping on a flat surface. If very dirty, replace cartridge. CAUTION: Petroleum solvents, such as kerosene, are not to be used to clean cartridge. They may cause deterioration of the cartridge. Do not oil cartridge. Do not use pressurized air to clean or dry cartridge. 4. Install cartridge, then replace cover. Change the oil after every 25 hours of operation or at least once a year if the lawn mower is not used for 25 hours in one year. Check the crankcase oil level before starting the engine and after each five (5) hours of continuous use. Tighten oil plug securely each time you check the oil level. CARTRIDGE SLOT TO CHANGE ENGINE OIL (See Fig. 12) NOTE: Before tipping lawn mower to drain oil, empty fuel tank by running engine until fuel tank is empty. 1. Disconnect spark plug wire from spark plug and place wire where it cannot come in contact with plug. 2. Remove engine oil cap; lay aside on a clean surface. 3. Tip lawn mower on its side as shown and drain oil into a suitable container. Rock lawn mower back and forth to remove any oil trapped inside of engine. COVER BACK PLATE FIG. 13 MUFFLER Inspect and replace corroded muffler as it could create a fire hazard and/or damage. CONTAINER FIG. 12 4. Wipe off any spilled oil from mower or side of engine. 5. Slowly pour oil down the oil fill spout, stopping every few ounces to check the oil level with the dipstick. 6. Stop adding oil when you reach the FULL mark on the dipstick. Wait a minute to allow oil to settle. 7. Continue adding small amounts of oil, rechecking the dipstick until oil level settles at FULL. DO NOT overfill, or engine will smoke heavily from the muffler on startup. 8. Alwaysbesuretoretightendipstickbeforestartingengine. 9. Reconnect spark plug wire to spark plug. SPARK PLUG Replace spark plug at the beginning of each mowing season or after every 100 hours of operation, whichever occurs first. Spark plug type and gap setting are shown in the "PRODUCT SPECIFIC ATIONS" section of this manual. IN-LINE FUEL FILTER (See Fig. 14) The fuel filter should be replaced once each season. If fuel filter becomes clogged, obstructing fuel flow to carburetor, replacement is required. 1. With engine cool, remove filter and plug fuel line sections. 2. Place new fuel filter in position in fuel line with arrow pointing towards carburetor. 3. Be sure there are no fuel line leaks and clamps are properly positioned. 4. Immediately wipe up any spilled gasoline. CLAMP CLAMP AIR FILTER (See Fig. 13) Your engine will not run properly and may be damaged by using a dirty air filter. Replace the air filter every 100 hours of operation or every season, whichever occurs first. Service air cleaner more often under dusty conditions. 11 FUEL FILTER FIG. 14
-
 1
1 -
2
-
3
-
4
-
5
-
 6
6 -
 7
7 -
 8
8 -
 9
9 -
 10
10 -
 11
11 -
 12
12 -
 13
13 -
 14
14 -
 15
15 -
 16
16
 |
 |
