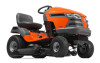
Husqvarna YTH18K46 Owners Manual - Page 16
Transaxle Cooling, Clean Air Screen, Air Filter, Lubrication, Engine Cooling System, Engine Oil - 46 )
 |
View all Husqvarna YTH18K46 manuals
Add to My Manuals
Save this manual to your list of manuals |
Page 16 highlights
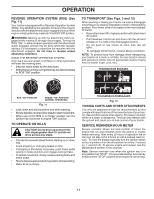
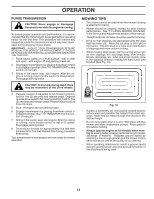
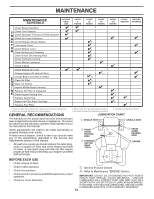
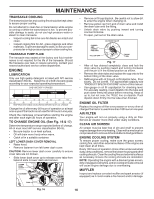
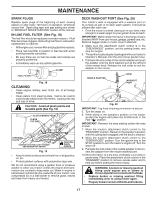
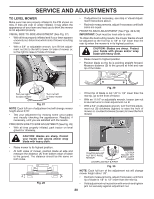
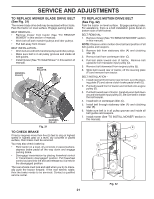
MAINTENANCE TRANSAXLE COOLING The transmission fan and cooling fins should be kept clean to assure proper cooling. Do not attempt to clean fan or transmission while engine is running or while the transmission is hot. To prevent possible damage to seals, do not use high pressure water or steam to clean transaxle. • Inspect cooling fan to be sure fan blades are intact and clean. • Inspect cooling fins for dirt, grass clippings and other materials. To prevent damage to seals, do not use compressed air or high pressure sprayer to clean cooling fins. TRANSAXLE PUMP FLUID The transaxle was sealed at the factory and fluid maintenance is not required for the life of the transaxle. Should the transaxle ever leak or require servicing, contact your nearest authorized service center/department. ENGINE LUBRICATION Only use high quality detergent oil rated with API service classification SG-SL. Select the oil's SAE viscosity grade according to your expected operating temperature. SAE VISCOSITY GRADES 5W-30 10W30 F -20 0 30 32 40 60 80 100 C -30 -20 -10 0 10 20 30 40 TEMPERATURE RANGE ANTICIPATED BEFORE NEXT OIL CHANGE Change the oil after every 50 hours of operation or at least once a year if the tractor is not used for 50 hours in one year. Check the crankcase oil level before starting the engine and after each eight (8) hours of operation. TO CHANGE ENGINE OIL (See Fig. 16 & 17) Determine temperature range expected before oil change. All oil must meet API service classification SG-SL. • Be sure tractor is on level surface. • Oil will drain more freely when warm. • Catch oil in a suitable container. LEFT LOWER DASH COVER REMOVAL • Raise hood. • Remove fastener from left lower dash cover. CAUTION: Remove lower dash cover carefully to ensure cover tabs are not broken. • Slide lower dash cover up to release cover tabs from tapered slots in lower dash and remove. LOWER DASH COVER FASTENER SLOTS • Remove oil fill cap/dipstick. Be careful not to allow dirt to enter the engine when changing oil. • Remove yellow cap from end of drain valve and install the drain tube onto the fitting. • Unlock drain valve by pushing inward and turning counterclockwise. • To open, pull out on the drain valve. CLOSED AND LOCKED POSITION YELLOW CAP OIL DRAIN VALVE 02463 DRAIN TUBE Fig. 17 • After oil has drained completely, close and lock the drain valve by pushing inward and turning clockwise until the pin is in the locked position as shown. • Remove the drain tube and replace the cap onto to the bottom fitting of the drain valve. • Refill engine with oil through oil fill dipstick tube. Pour slowly. Do not overfill. For approximate capacity see "PRODUCT SPECIFICATIONS" section of this manual. • Use gauge on oil fill cap/dipstick for checking level. For accurate reading, insert dipstick into the tube and push down firmly into place before removing. Keep oil up to, but not over, the "FULL" line on dipstick. Push dipstick down firmly into the tube when finished. ENGINE OIL FILTER Replace the engine oil filter every season or every other oil change if the tractor is used more than 100 hours in one year. AIR FILTER Your engine will not run properly using a dirty air filter. Service air cleaner more often under dusty conditions. CLEAN AIR SCREEN Air screen must be kept free of dirt and chaff to prevent engine damage from overheating. Clean with a wire brush or compressed air to remove dirt and stubborn dried gum fibers. ENGINE COOLING SYSTEM To ensure proper cooling, make sure the grass screen, cooling fins, and other external surfaces of the engine are kept clean at all times. Every 100 hours of operation (more often under extremely dusty, dirty conditions), remove the blower housing and other cooling shrouds. Clean the cooling fins and external surfaces as necessary. Ensure the cooling shrouds are reinstalled. NOTE: Operating the engine with a blocked grass screen, dirty or plugged cooling fins, and/or cooling shrouds removed will cause engine damage due to overheating. MUFFLER Inspect and replace corroded muffler and spark arrester (if equipped) as it could create a fire hazard and/or damage. TABS Fig. 16 16
-
 1
1 -
2
-
3
-
4
-
5
-
6
-
7
-
8
-
9
-
10
-
 11
11 -
 12
12 -
 13
13 -
 14
14 -
 15
15 -
 16
16 -
 17
17 -
 18
18 -
 19
19 -
 20
20 -
 21
21 -
22
-
23
-
24
-
25
-
26
-
27
-
28
 |
 |
