Husqvarna YTH22V46XLS Owners Manual - Page 21
To Replace Motion Drive Belt, See Fig. 31, Fig. 30, Important
 |
View all Husqvarna YTH22V46XLS manuals
Add to My Manuals
Save this manual to your list of manuals |
Page 21 highlights
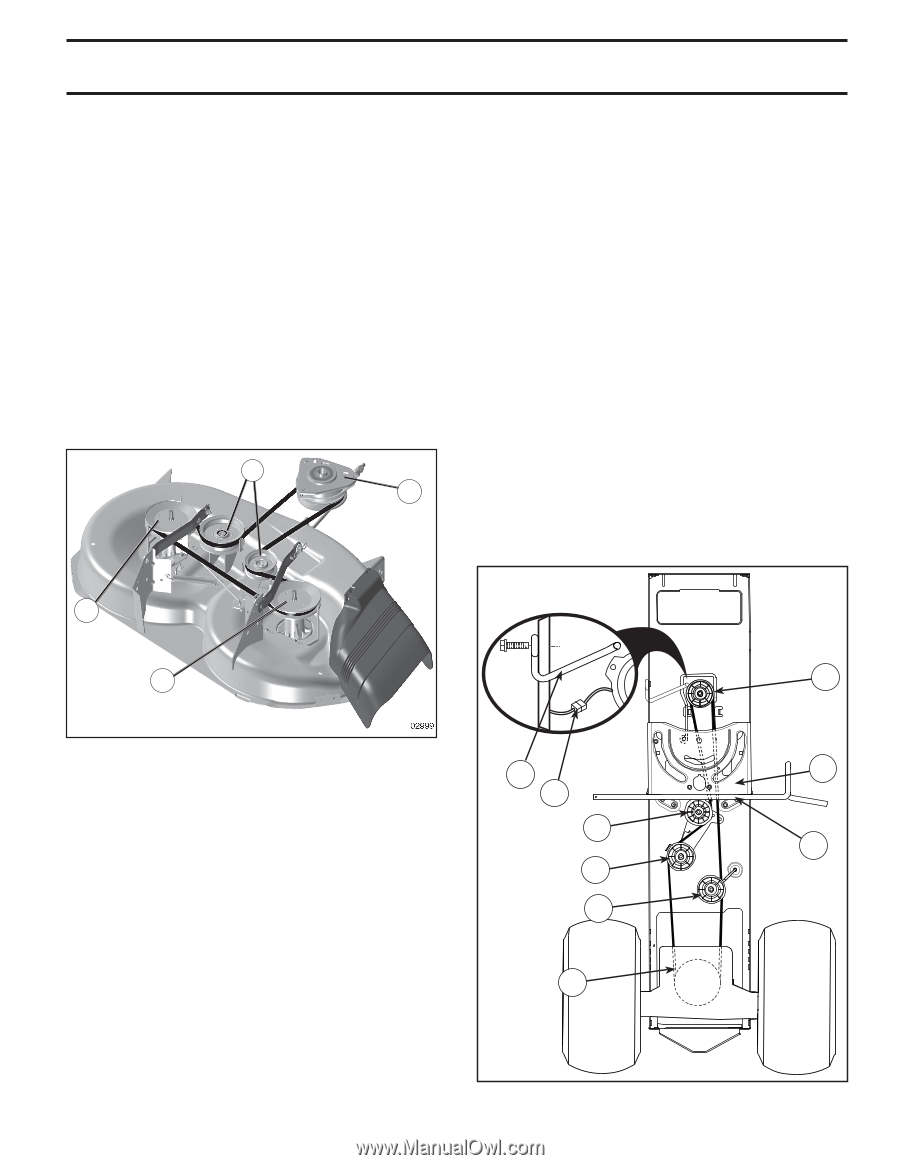
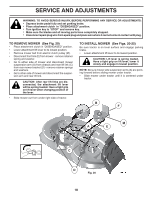
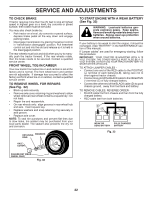
SERVICE AND ADJUSTMENTS TO REPLACE MOWER BLADE DRIVE BELT (See Fig. 30) MOWER DRIVE BELT REMOVAL • Park tractor on a level surface. Engage parking brake. • Lower attachment lift lever to its lowest position. • Remove any dirt or grass clippings which may have accumulated around mandrels and entire upper deck surface. • Remove belt from electric clutch pulley (M), both mandrel pulleys (R) and all idler pulleys (V). MOWER DRIVE BELT INSTALLATION • Install belt around all mandrel pulleys (R) and around idler pulleys (V) as shown. • Install belt onto electric clutch pulley (M). IMPORTANT: Check belt for proper routing in all mower pulley grooves. • Raise attachment lift lever to highest position. V M • Pull belt slack toward rear of tractor. Carefully remove belt upwards from transmission input pulley and over cooling fan blades (F). • Remove belt downward from engine pulley and around electric clutch (G). • Slide belt toward rear of tractor, off the steering plate (H) and remove from tractor. BELT INSTALLATION - • Install new belt from tractor rear to front, over the steering plate (H) and above clutch brake pedal shaft (J). • Pull belt toward front of tractor and roll belt around electric clutch and onto engine pulley (G). • Pull belt toward rear of tractor. Carefully work belt down around transmission cooling fan and onto the input pulley (F). Be sure belt is inside the belt keeper. • Install belt on centerspan idler (E). • Install belt through stationary idler (C) and clutching idler (D). • Reinstall anti-rotation link (B) on right side of tractor. Tighten securely. • Reconnect clutch harness (A). • Make sure belt is in all pulley grooves and inside all belt guides and keepers. • Install mower (See "TO INSTALL MOWER" section in this manual). R R G Fig. 30 TO REPLACE MOTION DRIVE BELT (See Fig. 31) Park the tractor on level surface. Engage parking brake. For assistance, there is a belt installation guide decal on bottom side of left footrest. BELT REMOVAL - • Remove mower (See "TO REMOVE MOWER" section in this manual). NOTE: Observe entire motion drive belt and position of all belt guides and keepers. • Disconnect clutch wire harness (A). • Remove anti-rotation link (B) on right side of tractor. • Remove belt from stationary idler (C) and clutching idler (D). • Remove belt from centerspan idler (E). B A C D E F H J 02953 electric Fig. 31 21
-
 1
1 -
2
-
3
-
4
-
5
-
6
-
7
-
8
-
9
-
10
-
11
-
12
-
13
-
14
-
15
-
 16
16 -
 17
17 -
 18
18 -
 19
19 -
 20
20 -
 21
21 -
 22
22 -
 23
23 -
 24
24 -
 25
25 -
 26
26 -
27
-
28
-
29
-
30
-
31
-
32
-
33
-
34
-
35
-
36
-
37
-
38
-
39
-
40
-
41
-
42
-
43
-
44
 |
 |