IBM 17352LX User Guide
IBM 17352LX Manual
 |
View all IBM 17352LX manuals
Add to My Manuals
Save this manual to your list of manuals |
IBM 17352LX manual content summary:
- IBM 17352LX | User Guide - Page 1
Rack Console Switch Installation and User's Guide For 17353LX and 17354LX - IBM 17352LX | User Guide - Page 2
- IBM 17352LX | User Guide - Page 3
Rack Console Switch Installation and User's Guide - IBM 17352LX | User Guide - Page 4
- IBM 17352LX | User Guide - Page 5
- IBM 17352LX | User Guide - Page 6
statement appear in the IBM Safety Information book under statement 1. Be sure to read all caution and danger statements in this documentation before performing the instructions. Read any additional safety information that comes with your server or optional device before you install the device. - IBM 17352LX | User Guide - Page 7
- IBM 17352LX | User Guide - Page 8
- IBM 17352LX | User Guide - Page 9
IBM Conversion Options and Console Switch Cables 2 OSCAR Graphical User Interface ...3 Security ...3 Video ...3 Plug and Play...4 Firmware Upgrades...4 Tiering Expansion...4 Chapter 2: Installation ...7 Safety Precautions ...8 Mounting the Rack Console Switch 10 Installing the switch vertically - IBM 17352LX | User Guide - Page 10
viii IBM Rack Console Switch Installation and User's Guide Configuring the display behavior 34 Configuring the status flag ...35 Configuring rack console switch security 37 Accessing Options and Buttons on the Commands Window 40 Using the Version Window ...41 Resetting the Keyboard and Mouse 44 - IBM 17352LX | User Guide - Page 11
that have USB-based KVM ports 3 Figure 1.3: Example rack console switch configuration (for 2 x 16 5 Figure 2.1: Rack console switch vertical installation 11 Figure 2.2: Rack console switch horizontal installation 12 Figure 2.3: Example rack console switch configuration (2 x 16 model 13 Figure - IBM 17352LX | User Guide - Page 12
x IBM Rack Console Switch Installation and User's Guide Figure 3.21: Diagnostics window...47 Figure 3.22: Diag Warning window 48 Figure 3.23: Broadcast window ...49 Figure 3.24: Broadcast enable window 50 Figure 3.25: Switch window ...51 Figure 3.26: Keyboard window ...52 Figure 3.27: Keyboard - IBM 17352LX | User Guide - Page 13
Rack console switch models, ports, users, maximum tiered and daisy-chained servers.. 2 Table 1.2: Console switch cable resolution and refresh rate 3 Table 2.1: Tiering of rack console switches 16 Table 2.2: Earlier model switches with support for one-level tiering 18 Table 2.3: IBM LCM2 support - IBM 17352LX | User Guide - Page 14
xii IBM Rack Console Switch Installation and User's Guide - IBM 17352LX | User Guide - Page 15
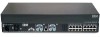
Console Switch and IBM 2 x 16 Rack Console Switch are described in this installation and user's guide. These rack console switches integrate analog keyboard, video, and mouse (KVM) switching technology with advanced cable management and a graphical user interface. Analog rack interface (ARI) ports - IBM 17352LX | User Guide - Page 16
2 IBM Rack Console Switch Installation and User's Guide Models and Features An IBM 1 x 8 Rack Console Switch supports access by a single local user. An IBM 2 x 16 Rack Console Switch supports simultaneous access by two local users. The following table summarizes the features provided by the two - IBM 17352LX | User Guide - Page 17
Chapter 1: Product Overview 3 Either a USB console switch cable or a UCO can be used to connect a server that has USB-based KVM ports. UCO USB console switch cable Figure 1.2: Options for connecting servers that have USB-based KVM ports OSCAR Graphical User Interface The OSCAR interface provides - IBM 17352LX | User Guide - Page 18
4 IBM Rack Console Switch Installation and User's Guide Table 1.2: Console switch cable resolution and refresh rate (Continued) Maximum Resolution 800 x 600 800 x 600 800 x 600 Refresh Rate 56 Hz 60 Hz 72 Hz Refresh Rate VESA VESA - IBM 17352LX | User Guide - Page 19
Rack console switch (tiered) Earlier-model switch (tiered) Chapter 1: Product Overview 5 Rack of servers Console switch cable or CO Critical server Local user B Rack console switch (main) Local user A Figure 1.3: Example rack console switch configuration (for 2 x 16) - IBM 17352LX | User Guide - Page 20
6 IBM Rack Console Switch Installation and User's Guide - IBM 17352LX | User Guide - Page 21
CD • Quick Installation Guide • 1U filler panel Additional items needed: • One Phillips screwdriver • For each server to be attached or daisy chained: • One IBM Conversion Option (KCO or UCO) and one CAT 5 cable -or• One IBM 3M Console Switch Cable (PS/2 or USB) • For each rack console switch to be - IBM 17352LX | User Guide - Page 22
8 IBM Rack Console Switch Installation and User's Guide Safety Precautions Use the following safety guidelines to help ensure your own personal safety and to help protect the system and working environment from potential damage. - IBM 17352LX | User Guide - Page 23
on the rack console switch components, and never operate the rack console switch in a wet environment. If the rack console switch gets wet, see the appropriate section in the troubleshooting guide or contact the trained service provider. • Use the rack console switch only with approved equipment - IBM 17352LX | User Guide - Page 24
10 IBM Rack Console Switch Installation and User's Guide • Operate the rack console switch only from the type of external power source indicated on the electrical ratings label. If you are not sure of the type of power source required, consult the service provider or local power company. • Be sure - IBM 17352LX | User Guide - Page 25
to the rack documentation for information about relocating side braces if they are not already spaced for this installation. Figure 2.1: Rack console switch vertical installation Installing the switch horizontally in the 1 U rack mounting space NOTE: The filler panel must be placed in front of the - IBM 17352LX | User Guide - Page 26
12 IBM Rack Console Switch Installation and User's Guide through the slots in the mounting bracket and the holes in the mounting rail, then into the cage nuts or clip nuts. Figure 2.2: Rack console switch horizontal installation Configuring the Rack Console Switch Plug the supplied power cord into - IBM 17352LX | User Guide - Page 27
Chapter 2: Installation 13 Local User B Configuration port (for updating firmware) ACI port Rack console switch ACI port ACI port ARI ports Local user A Local user A Servers 2-16 Servers 2-16 Local User A Server 1 Figure 2.3: Example rack console switch configuration (2 x 16 model) - IBM 17352LX | User Guide - Page 28
IBM Rack Console Switch Installation and User's Guide b. Connect the RJ-45 end of a CAT 5 cable to the first RJ-45 connector on the unattached end of the CO. c. If you are not daisy-chaining other servers off this server, attach a terminator to the second RJ-45 connector on the console switch cable - IBM 17352LX | User Guide - Page 29
Chapter 2: Installation 15 This procedure assumes that you are using one or more KCOs to daisy chain two or more servers. One server is already connected to an ARI port on the rack console switch using a KCO. 1. Make sure that each server you want to connect to the switch is turned off. 2. Connect a - IBM 17352LX | User Guide - Page 30
16 IBM Rack Console Switch Installation and User's Guide 3. On a UCO connected to a server that is either already connected to an ARI port or daisychained, attach one end of a CAT 5 cable to the second RJ-45 connector. 4. Attach the other end of the CAT 5 cable to the first RJ-45 connector on a UCO - IBM 17352LX | User Guide - Page 31
user B (2 x 16 only) Chapter 2: Installation 17 Rack console switch ARI ports 15 primary servers Tiered (secondary) rack console switch ACI port 16 secondary servers Figure 2.6: Rack console switch configuration with a tiered switch (2 x 16 model shown) Tiering multiple rack console switches - IBM 17352LX | User Guide - Page 32
18 IBM Rack Console Switch Installation and User's Guide 3. Attach one end of a CAT 5 cable to the RJ-45 connector (ACI port) on local user A on the tiered rack console switch. 4. Attach the other end of a CAT 5 cable to one of the 16 RJ-45 (ARI) ports on the main rack console switch. NOTE: The - IBM 17352LX | User Guide - Page 33
Installation 19 The IBM Local 2x8 Console Manager (LCM2) model supports two levels of tiering as shown in the following table. Table 2.3: IBM LCM2 support for two-level tiering Primary Switch Secondary Switch IBM LCM2 IBM LCM2 IBM LCM2 IBM LCM2 Tertiary Switch IBM 1 x 8 Console Switch/ IBM - IBM 17352LX | User Guide - Page 34
20 IBM Rack Console Switch Installation and User's Guide Figure 2.7: IBM 2 x 16 Rack Console Switch example configuration with an earlier-model switch - IBM 17352LX | User Guide - Page 35
Installation 21 Tiering earlier model switches 1. Mount the earlier-model switches according to the instructions included with those devices. The current-model switch should already be mounted. 2. Attach the keyboard, monitor, and mouse connectors of a PS/2 console switch cable or CO to a local port - IBM 17352LX | User Guide - Page 36
22 IBM Rack Console Switch Installation and User's Guide - IBM 17352LX | User Guide - Page 37
in "Configuring the hot key sequence for launching the OSCAR interface or the login window" on page 34. Accessing the rack console switch 1. Press the Print Screen key on the keyboard of a local user station attached to the rack console switch. If logging in is not required, the Main window opens. - IBM 17352LX | User Guide - Page 38
24 IBM Rack Console Switch Installation and User's Guide 2. If logging in is required, the Login window opens. Figure 3.1: Login window 3. To log in as an administrator, enter Admin in the Username field and enter the configured password in the Password field. 4. To log in as a regular user, do the - IBM 17352LX | User Guide - Page 39
number to differentiate between the chained COs), Separate entries assigned the same port number have different eIDs. eID The server's electronic ID. The name and eID are stored in the memory of the CO or console switch cable connected to the server and are retained even if the connector is - IBM 17352LX | User Guide - Page 40
26 IBM Rack Console Switch Installation and User's Guide The status of the servers in the system is indicated in the right columns of the Main window. The following table describes the status symbols. Table 3.2: OSCAR interface status symbols Symbol Description The CO or console switch cable is - IBM 17352LX | User Guide - Page 41
. If needed, see "Accessing the rack console switch" on page 23. 2. Make sure a screen delay time is set. If needed, see "Configuring a screen delay time" on page 34. 3. If the server list is sorted by the port number (the Port button is selected), type the port number and press Enter. -orIf the - IBM 17352LX | User Guide - Page 42
28 IBM Rack Console Switch Installation and User's Guide Table 3.3: OSCAR interface navigation basics (Continued) Action Result F1 Opens the Help window for the current window. Closes the current window without saving changes and - IBM 17352LX | User Guide - Page 43
3: Using the OSCAR Interface 29 Configuration from the Setup Window By default, anyone with physical access to a local user station connected to the rack console switch can perform configuration from the Setup window within the OSCAR interface. Figure 3.3: Setup window If the Admin account is - IBM 17352LX | User Guide - Page 44
30 IBM Rack Console Switch Installation and User's Guide As shown in Figure 3.4, buttons on the Setup window for regular users give access to only the Menu, Flag and Security windows. All other windows available to the administrator are described in the following table. Table 3.4: Setup - IBM 17352LX | User Guide - Page 45
assigned to a server is stored in the console switch cable or CO, so even if you move the cable or CO to another ARI port, the name and configuration of the server is still recognized by the switch. NOTE: If a server is turned off, its CO or console switch cable does not appear in the Names list - IBM 17352LX | User Guide - Page 46
32 IBM Rack Console Switch Installation and User's Guide Figure 3.6: Name modify window 4. Type a ports on a tiered switch The rack console switch automatically discovers tiered switches, but you need to specify the number of ports on the tiered switch through the Devices window. When a tiered switch - IBM 17352LX | User Guide - Page 47
The Device Modify window opens. Figure 3.8: Device modify window 5. Choose the number of ports supported by the tiered switch and click OK. If the number of ports on the tiered switch is not listed, click Other and type a port number between 4 and 24. 6. Click OK. 7. Repeat steps 3-5 for each tiered - IBM 17352LX | User Guide - Page 48
34 IBM Rack Console Switch Installation and User's Guide Configuring the display behavior Use the Menu window to do the Menu window 1. Access the OSCAR interface Main window. If needed, see "Accessing the rack console switch" on page 23. 2. Click Menu. The Menu window opens. Figure 3.9: Menu window - IBM 17352LX | User Guide - Page 49
the OSCAR interface appearing. To perform a soft switch, see "Soft switching using a hot key sequence" on page 27. Configuring the status flag When a user is connected to a server, a status flag displays on the desktop and shows the name or the port number of the selected server or the status of - IBM 17352LX | User Guide - Page 50
36 IBM Rack Console Switch Installation and User's Guide Figure 3.10: Flag window Determining the display of to show the flag all the time or select Timed to display the flag for only five seconds after switching. 4. Select a flag color in the Display Color area. 5. In the Display Mode area, select - IBM 17352LX | User Guide - Page 51
Using the OSCAR Interface 37 Configuring rack console switch security The Security window enables you to window that displays for all users when restricted access is not configured. When access is restricted, only the Admin user sees this window, and regular users see only the Change Password - IBM 17352LX | User Guide - Page 52
38 IBM Rack Console Switch Installation and User's Guide Figure 3.13: Security window (user) Setting or changing the current user's password support. See "Appendix C: Technical Support" for contact information. If you are a regular user and you forget your password, contact your rack console switch - IBM 17352LX | User Guide - Page 53
the window without saving changes. NOTE: After the specified Inactivity Time, the screen saver turns on. Activation of the screen saver disconnects the current user from a server. The status flag displays Free. Exiting the screen saver mode 1. Press any key or move the mouse. 2. If logging in is - IBM 17352LX | User Guide - Page 54
40 IBM Rack Console Switch Installation and User's Guide Accessing Options and Buttons on the Commands Window The functions that are available on the Commands window vary depending on whether restricted access is configured - IBM 17352LX | User Guide - Page 55
Accessing the Versions window and viewing rack console switch hardware and firmware versions 1. Access the Commands window. If needed, see "Accessing the Commands window" on page 40. 2. Click Commands->Display Versions. The Version window opens. Figure 3.16: Version window 3. Click the Target button - IBM 17352LX | User Guide - Page 56
42 IBM Rack Console Switch Installation and User's Guide Figure 3.17: Target Selection window 4. Select the name of a server and click the Version button. The Target Version window opens and displays the hardware and firmware versions of the connector used to attach the selected server. Figure 3.18: - IBM 17352LX | User Guide - Page 57
the Target Selection window. Resetting a console switch cable NOTE: If a tiered switch is not recognized, you can use the Reset button to reset a PS/2 console switch cable attached to the tiered switch. (Be sure that the PS/2 console switch cable is connected to a tiered switch and not to a server - IBM 17352LX | User Guide - Page 58
IBM Rack Console Switch Installation and User's Guide 3. Click Target. The Target Selection window opens. 4. Select the name of the server that is connected to a tiered server with the console switch cable scan mode, the rack console switch automatically scans from port to port (server to server). - IBM 17352LX | User Guide - Page 59
Click the check box next to a server. -or• Double-click on the server name or port. -or• Press Alt and the number of the server you want to scan. 3. In the next to the server to be removed. -orDouble-click on the name or port of the server. -orClick the Clear button to remove all servers from the - IBM 17352LX | User Guide - Page 60
46 IBM Rack Console Switch Installation and User's Guide Setting the scan duration 1. Access the Setup->Scan window as described in the two previous procedures. 2. Type a value in the Scan Time field. The duration - IBM 17352LX | User Guide - Page 61
the condition of the main board RAM Validates the current firmware images stored in the system's Flash Verifies the switch matrix controller is accessible and functional Local Video Indicates 40, 2. Click Run Diagnostics. A Diag Warning message opens to indicate that all users are disconnected. - IBM 17352LX | User Guide - Page 62
IBM Rack Console Switch Installation and User's Guide Figure 3.22: Diag Warning window 3. Click OK to begin diagnostics. -orClick X or press Esc to exit the window without running a diagnostic test. All users broadcast to up to 16 servers at a time, one server per ARI port. Accessing the Broadcast - IBM 17352LX | User Guide - Page 63
must be identical for all servers receiving a broadcast to interpret keystrokes identically. Specifically, the Caps Lock and Num Lock modes must be the same on all keyboards. While the rack console switch attempts to send keystrokes to the selected servers simultaneously, some servers can block - IBM 17352LX | User Guide - Page 64
50 IBM Rack Console Switch Installation and User's Guide Figure 3.24: Broadcast enable window 7. Click OK to enable broadcasting. 8. Type the information and perform the mouse movements you want to broadcast from the user station. NOTE: Access by a second local user is disabled when broadcast mode - IBM 17352LX | User Guide - Page 65
is Used Use the Keyboard window to set the keyboard language when a non-English keyboard is connected to a local user station and servers with USB ports are connected to the switch. Setting the keyboard language 1. Access the Setup window. If needed, see "Accessing the Setup window" on page 30 - IBM 17352LX | User Guide - Page 66
52 IBM Rack Console Switch Installation and User's Guide Figure 3.26: Keyboard window 3. Select the checkbox for the correct language. Click OK. The Keyboard Warning window opens. Figure 3.27: Keyboard Warning window 4. Click OK - IBM 17352LX | User Guide - Page 67
Chapter 3: Using the OSCAR Interface 53 2. Click Language. The Language window displays. Figure 3.28: Language window 3. Select the desired language. 4. Click OK to change the OSCAR interface language and return to the Setup window. -orClick X or press Esc to exit without changing the keyboard - IBM 17352LX | User Guide - Page 68
54 IBM Rack Console Switch Installation and User's Guide - IBM 17352LX | User Guide - Page 69
default, anyone with physical access to a local user station connected to the rack console switch can access all functions of the OSCAR interface and switch configuration tasks. Regular users can set and change their own passwords, and they can access only the servers for which they are specifically - IBM 17352LX | User Guide - Page 70
56 IBM Rack Console Switch Installation and User's Guide Figure 4.1: User Setup window Configuring users with the User Setup window The User Setup window allows the administrator to edit, access, or delete a user account. The window is only accessible if the Enable User Account checkbox is enabled - IBM 17352LX | User Guide - Page 71
orClick X or press Esc to exit the window without saving changes. 5. To configure server access for the selected user, click Access. The User Access window opens. Figure 4.3: User Access window a. To assign all servers to the user, click the Check All button. b. To assign an individual server to the - IBM 17352LX | User Guide - Page 72
58 IBM Rack Console Switch Installation and User's Guide c. To clear access to all servers for the user (instead of deleting the account) click the Clear All button. d. Click OK to save the changes. -orClick X or press Esc to exit the window without saving changes. 6. To restore the selected user - IBM 17352LX | User Guide - Page 73
rack console switch firmware 1. Connect a standard serial cable to a COM port on the computer and to the configuration port on the back panel of the rack console switch. Make a note of which COM port you use, and then turn on the switch. 2. On the connected computer, go to http://www.ibm.com/support - IBM 17352LX | User Guide - Page 74
60 IBM Rack Console Switch Installation and User's Guide 8. Once the firmware is updated, an Update Complete message displays. Click the Close button to exit the window. 9. The switch automatically reboots after the upgrade is completed. Troubleshooting possible error conditions If the firmware does - IBM 17352LX | User Guide - Page 75
Appendices 61 NOTE: You can configure automatic upgrades of all COs connected to the rack console switch by checking the Auto upgrade box in the CO Status window. 3. Click the checkbox next to one or more CO types. 4. Click Upgrade. The CO - IBM 17352LX | User Guide - Page 76
IBM Rack Console Switch Installation and User's Guide Appendix B: Technical Specifications Table B.1: Rack console switch product specifications Product Specifications Server Ports Number Cable Types Connectors Sync Types Plug and Play Video Resolution Update Port Number Type Connector Local Port - IBM 17352LX | User Guide - Page 77
about diagnostic tools is in the Hardware Maintenance Manual and Troubleshooting Guide or Problem Determination and Service Guide on the IBM Documentation CD that comes with your server. • Go to the IBM support Web site at http://www.ibm.com/servers/eserver/support/xseries/ index.html to check for - IBM 17352LX | User Guide - Page 78
64 IBM Rack Console Switch Installation and User's Guide Getting help and information from the World Wide Web On the World Wide Web, the IBM Web site has up-to-date information about IBM systems, optional devices, services, and support. The address for IBM System x™ and xSeries® information is http - IBM 17352LX | User Guide - Page 79
IBM Taiwan product service contact information: IBM Taiwan Corporation 3F, No 7, Song Ren Rd. Taipei, Taiwan Telephone: 0800-016-888 Appendices 65 - IBM 17352LX | User Guide - Page 80
IBM Rack Console Switch Installation and User's Guide Appendix D: Notices This information was developed for products and services offered in the U.S.A. IBM may not offer the products, services, or features discussed in this document in other countries. Consult your local IBM implied warranties in - IBM 17352LX | User Guide - Page 81
are trademarks of Sun Microsystems, Inc. IBM makes no representations or warranties with respect to non- IBM products. Support (if any) for the non-IBM products is provided by the third party, not IBM. Some software may differ from its retail version (if available), and may not include user manuals - IBM 17352LX | User Guide - Page 82
68 IBM Rack Console Switch Installation and User's Guide on IBM product recycling offerings can be found on IBM's Internet site at http://www.ibm.com/ ibm/environment/products/prp.shtml. Esta unidad debe reciclarse o desecharse de acuerdo con lo establecido en la normativa nacional o local aplicable - IBM 17352LX | User Guide - Page 83
collection and treatment, contact your local IBM representative. Battery return program This product may contain a sealed lead acid, nickel cadmium, nickel metal hydride, lithium, or lithium ion battery. Consult your user manual or service manual for specific battery information. The battery must be - IBM 17352LX | User Guide - Page 84
70 IBM Rack Console Switch Installation and User's Guide Electronic emission notices Federal Communications Commission (FCC) statement Note: This equipment has been tested and found to comply with the limits for a Class A digital device, - IBM 17352LX | User Guide - Page 85
equipment. Attention: This is a Class A product. In a domestic environment this product may cause radio interference in which case the user may be required to take adequate measures. Taiwanese Class A warning statement Chinese Class A warning statement Japanese Voluntary Control Council for - IBM 17352LX | User Guide - Page 86
72 IBM Rack Console Switch Installation and User's Guide - IBM 17352LX | User Guide - Page 87
emission notice 70 configuration port features and benefits 1 using to upgrade firmware 59 console switch cables access blocked status 26 connecting servers to the switch 13 connecting servers with 13 disconnected, clearing from the server list 26 hardware tests 46 installation requirements 7 PS - IBM 17352LX | User Guide - Page 88
74 IBM Rack Console Switch Installation and User's Guide COs connecting servers to the switch 13 connecting servers with 13 diagnostics 46 disconnected, clearing from the server list 26 enabling automatic firmware upgrades 61 firmware upgrade status symbol 26 hardware tests 46 installation - IBM 17352LX | User Guide - Page 89
servers with 14 requirements for installation 7 supported 1 Keep Alive functionality 1 keyboard and mouse resetting 44 country code, configuring 51 monitor, and mouse, connecting 14 KVM conversion options See KCOs 2 L legacy switches, tiering with 4 local users, connecting 14 M Main window example - IBM 17352LX | User Guide - Page 90
38 users, configuring 56 Plug and Play 4 ports See ARI ports power cord 7 preemptive switch mode, configuring 50 Print Screen key, for accessing the OSCAR interface 23 PS/2 console switch cables supported 1 Q Quick Installation Guide 7 Quick Installation Guide for COs 13 R rack console switch - IBM 17352LX | User Guide - Page 91
chaining with 15 requirements for installation 7 support 1 United States electronic emission Class A notice 70 United States FCC Class A notice 70 update utility 59 USB console switch cable support 1 USB conversion options See UCOs usernames, configuring 56 users configuring server access 55 default - IBM 17352LX | User Guide - Page 92
78 IBM Rack Console Switch Installation and User's Guide - IBM 17352LX | User Guide - Page 93
- IBM 17352LX | User Guide - Page 94
43V6019 590-701-501B
-
 1
1 -
 2
2 -
 3
3 -
 4
4 -
 5
5 -
 6
6 -
 7
7 -
8
-
9
-
10
-
11
-
12
-
13
-
14
-
15
-
16
-
17
-
18
-
19
-
20
-
21
-
22
-
23
-
24
-
25
-
26
-
27
-
28
-
29
-
30
-
31
-
32
-
33
-
34
-
35
-
36
-
37
-
38
-
39
-
40
-
41
-
42
-
43
-
44
-
45
-
46
-
47
-
48
-
49
-
50
-
51
-
52
-
53
-
54
-
55
-
56
-
57
-
58
-
59
-
60
-
61
-
62
-
63
-
64
-
65
-
66
-
67
-
68
-
69
-
70
-
71
-
72
-
73
-
74
-
75
-
76
-
77
-
78
-
79
-
80
-
81
-
82
-
83
-
84
-
85
-
86
-
87
-
88
-
89
-
90
-
91
-
92
-
93
-
94
 |
 |
Installation and User’s Guide
For 17353LX and 17354LX
Rack Console
Switch