IBM 9514B03 Installation Guide - Page 17
mouse connector at the rear of the monitor.
 |
UPC - 087944378501
View all IBM 9514B03 manuals
Add to My Manuals
Save this manual to your list of manuals |
Page 17 highlights
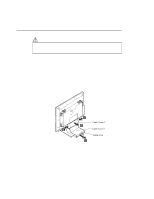
6 Release the cables from either side by removing the chips or from the rear. 7 If your computer does not have a power-saving function and you want to use standby mode, or if you are using an extension cable on the keyboard and mouse; then connect the optional keyboard/mouse cable as shown: 1 Disconnect the keyboard cable from your PC; then connect it to the keyboard connector at the rear of the monitor. 2 Disconnect the mouse cable from your PC; then connect it to the mouse connector at the rear of the monitor. 3 Connect the keyboard/mouse cable (P/N:83H7859) to the connector at the rear of the monitor. Then connect the other end to the keyboard and mouse connectors on the PC. Chapter 1. Setting Up Your Monitor 7
-
 1
1 -
2
-
3
-
4
-
5
-
6
-
7
-
8
-
9
-
10
-
11
-
 12
12 -
 13
13 -
 14
14 -
 15
15 -
 16
16 -
 17
17 -
 18
18 -
 19
19 -
 20
20 -
 21
21 -
 22
22 -
23
-
24
-
25
-
26
-
27
-
28
-
29
-
30
-
31
-
32
-
33
-
34
-
35
-
36
-
37
-
38
-
39
-
40
-
41
-
42
-
43
-
44
-
45
-
46
-
47
-
48
-
49
-
50
-
51
-
52
-
53
-
54
-
55
-
56
-
57
-
58
 |
 |

6
Release the cables from either side by removing the chips or from the
rear.
7
If your computer does not have a power-saving function and you want
to use standby mode, or if you are using an extension cable on the
keyboard and mouse; then connect the optional keyboard/mouse cable
as shown:
1
Disconnect the keyboard cable from your PC; then connect it to
the keyboard connector at the rear of the monitor.
2
Disconnect the mouse cable from your PC; then connect it to the
mouse connector at the rear of the monitor.
3
Connect the keyboard/mouse cable (P/N:83H7859) to the
connector at the rear of the monitor.
Then connect the other end
to the keyboard and mouse connectors on the PC.
Chapter 1.
Setting Up Your Monitor
7