Icom IP501H Quick Guide - Page 2
Information Sur La Formation À La SÉcuritÉ - accessories
 |
View all Icom IP501H manuals
Add to My Manuals
Save this manual to your list of manuals |
Page 2 highlights
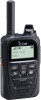
PRÉCAUTIONS (suite) R AVERTISSEMENT! NE JAMAIS insérer un émetteurrécepteur humide ou poussiéreux (avec sa batterie) dans le chargeur. Ceci peut corroder les bornes du chargeur de la batterie ou endommager le chargeur. Le chargeur n'est pas étanche. REMARQUE: Charger la batterie à l'intérieur de la plage de températures spécifiée: BC-202IP2: 10°C ~ 40°C (50°F to 104°F) BC-211: 10°C ~ 40°C (50°F to 104°F) BC-218: 10°C ~ 40°C (50°F to 104°F) Icom recommande une température de charge de 25˚C (77°F). Sinon, le temps de charge sera plus long, mais la batterie ne sera pas atteindre une charge complète. La charge s'arrête automatiquement lorsque la température est hors de la plage spécifiée. Interférences Bluetooth® Bluetooth® utilise la bande de 2,4 GHz. Si vous utilisez l'émetteurs-récepteurs dans la bande de 2,4 GHz à proximité d'un appareil Bluetooth®, ceci peut provoquer des interférences. Ceci peut réduire le débit de communication et rendre la connexion instable. Dans ce cas, utilisez l'émetteurs-récepteurs à distance suffisante de la zone de communication de l'appareil Bluetooth® ou cessez d'utiliser l'appareil Bluetooth®. INFORMATION SUR LA FORMATION À LA SÉCURITÉ Cet appareil a été testé et homologué avec ses accessoires d'origine en vue de la conformité FCC. L'utilisation d'accessoires tiers peut ne pas être conforme aux exigences imposées par la FCC pour la conformité à l'exposition aux fréquences radio et doit être évitée. INFORMATION FCC Cet équipement a été testé et reconnu conforme aux limites fixées pour un appareil numérique de classe B, conformément au point 15 de la réglementation FCC. Ces limites ont été fixées afin d'assurer une protection raisonnable contre les interférences nocives dans une installation résidentielle. Cet équipement génère, utilise et peut émettre un rayonnement de fréquence radio. S'il n'a pas été installé conformément aux instructions, il peut par ailleurs créer des interférences perturbant les communications radio. Toutefois, il n'y a aucune garantie que les interférences ne se produiront pas dans une installation particulière. Si cet équipement crée des interférences perturbant la réception de la radio ou de la télévision, comme cela peut être déterminé en éteignant et en allumant l'équipement, l'utilisateur est invité à essayer de corriger l'interférence en prenant une ou plusieurs des mesures ci-après : • Réorienter ou changer de place l'antenne de réception. • Éloigner l'équipement et le récepteur. • Connecter l'équipement sur une prise sur un autre circuit que celui sur lequel le récepteur est connecté. • Faire appel au revendeur ou à un technicien radio/TV expérimenté. MISE EN GARDE: Tout changement ou modification, non expressément approuvé par Icom Inc., peut annuler l'autorisation de l'utilisateur à utiliser cet appareil conformément à la réglementation FCC. Cet appareil est conforme à la partie 15 de la réglementation FCC. Son utilisation est soumise au respect de deux conditions : (1) Cet appareil ne doit pas causer d'interférences nuisibles et (2) cet appareil doit accepter toute interférence reçue, y compris les interférence pouvant entraîner un fonctionnement non désiré. Technical Information IP501H SAR 10g: 0.63 W/kg Version 3G (W-CDMA) Frequency Band 4G (LTE) Bluetooth EXP USA B1, B8 B2, B5 FDD-LTE B1, B3, B7, B8, B20 TD-LTE B38, B40 FDD-LTE B2, B4, B5, B17 2402 - 2480 MHz Version 3G (W-CDMA) Output Power 4G (LTE) Bluetooth Common 24 dBm (tipical) 25.7 dBm (tipical) 9.13 dBm (maximum) 1 Mbps IP503H Version 3G (W-CDMA) EXP B1, B8 AUS B1, B5 Version 3G (W-CDMA) Common 24 dBm (tipical) SAR 10g: 0.63 W/kg Frequency Band 4G (LTE) Bluetooth B1, B3, B7, B8, B20 B1, B3, B5, B7, B8, B28 2402 - 2480 MHz Output Power 4G (LTE) Bluetooth 23 dBm (tipical) 7.3 dBm (maximum) 3 Mbps SUPPLIED ACCESSORIES Battery pack Antenna Belt clip Hand strap NOTE: Some accessories are not supplied, or the shape is different, depending on the transceiver version. PANEL DESCRIPTION NOTE: Instructions and screens on this guide may differ, depending on the settings. Antenna [TX/RX] indicator [PTT] switch [Option] key*1 [PWR/VOL] dial Function screen Keypad Microphone Speaker*2 *1 Ask your dealer about the assigned function. *2 While connecting an optional speaker microphone, the audio is not output from the internal speaker. When connecting optional equipment • Be sure to turn OFF the power before connecting or disconnecting optional equipment to or from the jack. • Remove the cable by holding the plug not cable. • Insert the plug securely when connecting the cable. CAUTION: Attach the jack cover when no optional equipment is connected. D Operating keys [Address] key* • Selects a preset address. Push to select "All Call," "Group/Talkgroup Call," "Individual Call," or "Phone Call." [Call history] key* • Selects the call history. Push to select the "TX log," "RX log," "TX MSG log," "RX MSG log," "TX TEL log" or "RX TEL log." • Hold down until "Emergency" is displayed to send an emergency call, depending on a preset. [FUNC] key • Selects the message, Presence or Talk group to send. [CLR/Lock] key • Push to return to the previous screen from a function screen. • Hold down for 1 second to turn the Key Lock function ON or OFF. [PTT] switch and [PWR/VOL] dial can be used even while the Key Lock function is ON. [▲]/[▼] key • Push to scroll the screen or move the cursor. *May be usable, depending on a preset D Function Display Standby screen Example: When receiving a custom message 10/4 12:57 All 10/4 13:00 All Gather immediately Scrolls, depending on the message length : Signal strength The signal strength is represented by 3 bars. In the 3G mode, the received signal strength is indicated by the icon. In the LTE mode, the icon is displayed. When the transceiver location is out of the service area, or cannot receive the control signal, the (outof-area) icon blinks. If the transceiver has not been registered, is displayed. : Call types Shows the call type. Blinks when a call or message is received. : All/Group Call : Talkgroup Call* : Individual Call : Phone Call* * May be usable, depending on a presetting. : Bluetooth Displayed when the transceiver is connected to Bluetooth device. : Pocket beep • Displayed when the Pocket Beep function is ON. • Blinks when a call is received. This icon blinks until the transceiver return to the standby mode after a received signal disappears. : P-Bell Displayed when the P-Bell function is used. : Key Lock Displayed when Key Lock function is ON. : Remaining battery capacity Represents the remaining capacity in 4 steps. sufficient exhausted capacity a little. nearing exhaustion (Charging is necessary) Exhausted (Charging required) When the battery charge is almost exhausted, the battery status indicator " " starts blinking, and warning beeps sound every 30 seconds. Charge the battery pack immediately. When "LOW BATTERY" is displayed and beeps sound, the transceiver power will be automatically turned OFF soon. BASIC OPERATION D Turning the transceiver ON or OFF Turning ON: Turn [PWR/VOL] clockwise to the 12 o'clock position. • A beep sounds. The dial rotation is made 回す tight to resist dust and water intrusion. Turn IP501H Ver. . . / 10/4 12:57 All Standby screen Turning OFF Turn [PWR/VOL] maximum counter clockwise until it makes a "click" sound. Adjusting the audio output level Turn [PWR/VOL] to adjust the audio output level. The volume can be adjusted between 0 and 32. NOTE: If the output level is set to the minimum, the beep does not sound. Volume: 10 Volume adjustment screen D Receiving and Transmitting Receiving: When a Call is received, the [TX/RX] indicator lights green. Rotate [DIAL] to adjust the audio output level to a comfortable listening level. Transmitting: While holding down [PTT], speak at your normal voice level. • The [TX/RX] indicator lights red while [PTT] is pushed. Talk while receiving a call: While receiving a call, push [PTT] to talk in the full duplex mode* like a telephone call. • In the Full Duplex mode, the [TX/RX] indicator lights orange. * Depending on a preset. Ask your dealer for details. IMPORTANT: To maximize the readability of your signal: 1. After pushing [PTT], pause briefly before you start speaking. 2. Hold the microphone 5 ~ 10 cm (2 ~ 4 inches) from your mouth, then speak at your normal voice level. BATTERY CHARGING NOTE: Operating time may be shorter, depending on the operating condition such as the roaming frequency. Frequently roaming makes the operating time shorter. D Charging with the optional BC-202IP2 Charging time: Approximately 3.5 hours for the BP-272 Turn OFF Battery pack Battery pack + Transceiver AC outlet BC-123S* Self-tapping screws (3.5x30 mm) (User supplied) *A different type, or no power adapter is supplied, depending on the charger version. Rapid charger Charging indicator BC-202IP2 Lights orange: Charging Lights green: Charged If the indicator blinks in orange, read the IP501H/ IP503H instruction manual on the Icom web site. Fully charge the battery pack when the first time of use or has not been used for more than 2 months. • The charger automatically restarts charging when the attached battery pack voltage drops. • Disconnect the AC cable from the outlet when the charger is not in use. R DANGER! Use the battery only with the transceiver for which it is specified. Never use a battery with any other equipment, or for any purpose that is not specified in this instruction manual. D Charging with the optional BC-211 The BC-211 rapidly charges up to 6 battery packs. Charging time: Approximately 3.5 hours for the BP-272 Battery pack Battery pack + Transceiver Turn OFF To an AC outlet BC-211 Power adapter (Not supplied with some versions) Charging indicator Lights orange: Charging Lights green: Charged If the indicator blinks in orange, read the IP501H/IP503H instruction manual on the Icom web site. ATTACHING THE BATTERY PACK Follow the order (q ~ w) in the illustration below. After attaching, check that the battery pack is securely attached. (2 sliding locks are in the place.) w q Battery pack CAUTION: Even when the transceiver's power is OFF, a small current still flows in the transceiver. Remove the battery pack when not using it for a long time. Otherwise, the battery will become exhausted. NOTE: Turn OFF the power before remove the battery pack in order (1 ~ 2) in the illustration to the right. 1 1 2 ATTACHING THE ANTENNA/HAND STRAP Supplied antenna Supplied hand strap CAUTION: • NEVER carry the transceiver by holding only the antenna. • Transmitting without an antenna may damage the internal circuit. NOTE: You can use only the supplied antenna. ATTACHING THE BELT CLIP Remove the battery pack before attaching the belt clip. 1 2 Lift the tab up 1, and slide the belt clip in the direction of the arrow 2. Supplied belt clip Battery pack Slide the belt clip in the direction of the arrow until the belt clip locks in place, and makes a 'click' sound. OPTIONS D Carrying case LC-185 (For use with BP-272) MB-57L: Shoulder strap D Battery Pack BP-272: Li-ion Battery Pack Voltage: 7.4 V Capacity: Minimum: 1880 mAh, Typical: 2000 mAh Operating time: 17 hours (TX:RX:Standby=5:5:90) D Chargers BC-202IP2: Rapid Charger (with BC-123S) BC-202IP3L: Rapid Charger (with BC-123S) BC-211: Multi-charger (with BC-157S) BC-218: Rapid Charger (with Bluetooth® function) BC-123S: AC Adapter (for BC-202IP2) BC-123SA/SE: AC Adapter (for when a BC-202IP3L is used) BC-157S: AC Adapter (for BC-211) BC-207S: AC Adapter (for BC-218) BC-228: AC Adapter (for 2 to 6 BC-202IP3Ls connected) CP-22 (For BC-202IP2, and BC-218, 12V/24V) CP-23L (For BC-202IP2 and BC-218, 12V) D Holder MB-135: Belt Clip (Same as supplied) D Cables OPC-2006LS: Plug Adapter Cable OPC-2328: PTT Switch Cable OPC-2359: PTT Switch Cable OPC-478UC*3: Programming Cable OPC-2144: Plug Adapter Cable D Speaker-Microphones HM-153LS: HM-166LS: HM-183LS: HM-186LS: HM-215: Earphone Microphone Earphone Microphone Speaker Microphone Speaker Microphone Speaker Microphone (For BC-218) D Headsets HS-94*1: HS-95*1: HS-97*1: HS-102*2: VS-3: Headset (Ear hook type) Headset (Neck and arm type) Throat Microphone Headset (Earphone type) Bluetooth® Headset D Mount MBF-1: MBA-7: Mounting Base (For MBA-7) Bracket Adapter (For BC-218) D Other VE-SP1: Speakerphone Unit *1 To use the VOX function, the OPC-2006LS (Plug Adapter Cable) is necessary. To use the talk switch, the OPC-2328 (PTT Switch Cable) is necessary. *2 The OPC-2359 (PTT Switch Cable) is necessary. *3 The OPC-2144 (Plug Adapter Cable) is necessary.
-
 1
1 -
 2
2
 |
 |
