Icom M200 Instruction Manual - Page 19
Mounting the transceiver
 |
View all Icom M200 manuals
Add to My Manuals
Save this manual to your list of manuals |
Page 19 highlights
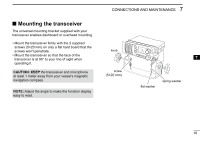
7 CONNECTIONS AND MAINTENANCE ■ Mounting the transceiver The universal mounting bracket supplied with your transceiver enables dashboard or overhead mounting. • Mount the transceiver firmly with the 2 supplied screws (5×20 mm) on only a flat hard board that the screws won't penetrate. • Mount the transceiver so that the face of the transceiver is at 90° to your line of sight when operating it. CAUTION: KEEP the transceiver and microphone at least 1 meter away from your vessel's magnetic navigation compass. NOTE: Adjust the angle to make the function display easy to read. knob screw (5×20 mm) 7 flat washer spring washer 16
-
 1
1 -
2
-
3
-
4
-
5
-
6
-
7
-
8
-
9
-
10
-
11
-
12
-
13
-
 14
14 -
 15
15 -
 16
16 -
 17
17 -
 18
18 -
 19
19 -
 20
20 -
 21
21 -
 22
22 -
 23
23 -
 24
24
 |
 |

16
7
CONNECTIONS AND MAINTENANCE
■
Mounting the transceiver
The universal mounting bracket supplied with your
transceiver enables dashboard or overhead mounting.
•
Mount the transceiver firmly with the 2 supplied
screws (5×20 mm) on only a flat hard board that the
screws won't penetrate.
•
Mount the transceiver so that the face of the
transceiver is at 90° to your line of sight when
operating it.
CAUTION:
KEEP
the transceiver and microphone
at least 1 meter away from your vessel’s magnetic
navigation compass.
NOTE:
Adjust the angle to make the function display
easy to read.
knob
spring washer
flat washer
screw
(
5×20 mm
)
7