Icom VE-PG3 Precautions - Page 2
Initializing The Ve-pg3, About The Firmware Update Function
 |
View all Icom VE-PG3 manuals
Add to My Manuals
Save this manual to your list of manuals |
Page 2 highlights
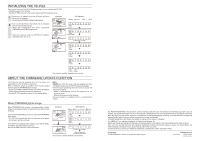
INITIALIZING THE VE-PG3 If you cannot access to the VE-PG3 setting screen, you can initialize the VE-PG3. • Initializing clears all the settings. • See the VE-PG3 instruction manual for initializing from the setting screen. 1 Disconnect all cables from the VE-PG3, and then connect the AC adapter. • Verify that the [POWER] indicator lights green. 2 Push in and hold [INIT] on the bottom until all indicators on the front panel light orange. • When the initialization has been completed, [PWR/MSG] and [V/RoIP] light green. • After the initializing, reset the VE-PG3's IP address, operating mode, and so on. [Operation] Rear panel AC adapter Turn ON the power [LED indication*] :Black out :Light Lights (Green) Bottom Use a pin Blinks Push in and hold ʢOrange/Greenʣ All LEDs lightʢOrangeʣ :Blink Release Blinks ʢGreenʣ Lights (Orange) Blinks ʢOrangeʣ Lights Lights (Green) (Green) *The indication may differ, depending on the setting. ABOUT THE FIRMWARE UPDATE FUNCTION The firmware may be updated when the functions and specifications of the VE-PG3 are improved. When a firmware update is available, the Firmware Update function lights the [PWR/MSG] LED orange. • To use the Firmware Update function, an internet connection, DNS and default gateway settings are necessary. See the VE-PG3 instruction manual for the setting details. NOTE: • NEVER turn OFF the power until the updating has been completed. Otherwise, the VE-PG3 may be damaged. • The Firmware Update function will not work under the following conditions: - While communicating with an IP telephone in the converter mode. - While an Emergency call is ongoing. • Ask your dealer for updated function or specification details. When [PWR/MSG] lights orange When [PWR/MSG] lights orange, a firmware update is ready. Follow the procedures below to download and install the new firmware. Push in and hold [UPDATE] on the front panel until [PWR/MSG] lights green. • The VE-PG3 automatically starts to download and update the firmware, and then reboots. If the VE-PG3 is initialized after updating, reset the VE-PG3's IP address, operating mode, and so on. See the VE-PG3 instruction manual for details. [Operation] Front panel Push in and hold Use a pin. [LED indication*] :Black out :Light :Blink Lights (Orange) Blinks (Green) All LEDs light (Orange) Release After the rebooting, [PWR/MSG] lights green. *The indication may differ, depending on the setting. ALL RIGHTS RESERVED. This document contains material protected under International and Domestic Copyright Laws and Treaties. Any unauthorized reprint or use of this material is prohibited. No part of this document may be reproduced or transmitted in any form or by any means, electronic or mechanical, including photocopying, recording, or by any information storage and retrieval system without express written permission from Icom Incorporated. All stated specifications and design are subject to change without notice or obligation. The AMBE+2™ is a registered trademark of Digital Voice Systems, Inc. Adobe and Reader are registered trademarks of Adobe Systems Incorporated in the United States and/or other countries. Icom, Icom Inc. and the Icom logo are registered trademarks of Icom Incorporated (Japan) in Japan, the United States, the United Kingdom, Germany, France, Spain, Russia and/or other countries. All other products or brands are registered trademarks or trademarks of their respective holders. 1-1-32 Kamiminami, Hirano-ku, Osaka 547-0003, Japan A-7046W-1EX Printed in Japan © 2012 Icom Inc.
-
 1
1 -
 2
2
 |
 |