Image Fitness 14.0 Treadmill English Manual - Page 7
Note: One replacement Base Pad 116 and Spacer
 |
View all Image Fitness 14.0 Treadmill manuals
Add to My Manuals
Save this manual to your list of manuals |
Page 7 highlights
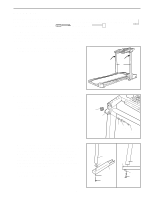
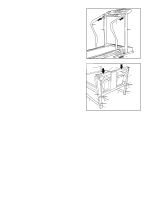
4. Slide the upper end of a Handrail (85) and then the Extension Leg (103) into the right Upright (82) as shown. (Note: It may be helpful to tip the Uprights [82] forward as you insert the Extension Leg. If necessary, tap the Extension Leg with a rubber mallet to fully insert it.) Slide the other Handrail (85) into the left Upright (82) as described above. 4 85 82 85 82 103 5. With the help of a second person, carefully tip the Uprights (82) down as shown. Make sure that the Extension Legs (103) and Handrails (85) remain in the Uprights. Next, attach each Extension Leg (103) with two Screws (101) and a Base Pad (116) as shown in drawing 5. Make sure that the Extension Legs are fully inserted into the Uprights (82) and push down on the Uprights as you tighten the Screws. Tighten the Handrail Bolts (78). Note: One replacement Base Pad (116) and Spacer (not shown) are included. If a Base Pad becomes worn and needs to be replaced, use the replacement Base Pad. If a Thick Base Pad (97) needs to be replaced, use the replacement Base Pad with the Spacer. With the help of a second person, carefully tip the Uprights (82) back to the upright position. 5 82 103 85 97 116 85 101 97 78 82 116 101 103 97 78 6. Make sure that all parts are properly tightened before you use the treadmill. Keep the included allen wrench in a secure place. The allen wrench is used to adjust the walking belt (see page 21). To protect the floor or carpet from damage, place a mat under the treadmill. 7
-
 1
1 -
 2
2 -
 3
3 -
 4
4 -
 5
5 -
 6
6 -
 7
7 -
 8
8 -
 9
9 -
 10
10 -
 11
11 -
 12
12 -
13
-
14
-
15
-
16
-
17
-
18
-
19
-
20
-
21
-
22
-
23
-
24
-
25
-
26
 |
 |
