Image Fitness 570 Home Trainer English Manual - Page 4
Image Fitness 570 Home Trainer Manual
 |
View all Image Fitness 570 Home Trainer manuals
Add to My Manuals
Save this manual to your list of manuals |
Page 4 highlights
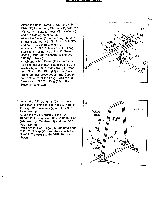
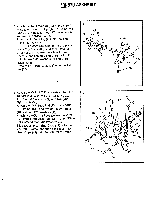
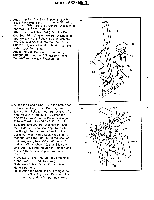
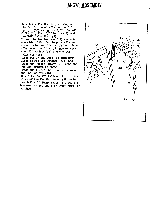
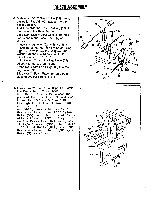
UM 11P I %A wkelher.seary.... 1. Attach the Base Frame (2) with one 6-3/4" 1 Plate (95) to the Long Stabilizer (1) with two 3/8" x 3-1/4" Bolts (3), four 3/8" Washers (4) and two 3/8" Nylon Nuts (5). Attach the Swivel (8) to the Long Stabilizer (1) using one 1/2" x 2-1/2" Shank Bolt (17) and one 026x 013 Washer (94). Attach two 3-1/2" Pulleys (7) to the Long Stabilizer (1) using two 3/8" x 2" Shank Bolts (6), four 3/8" Washers (4) and two 9 3/8" Nylon Nuts (5). Attach one 3-1/2" Pulley (7) to the Swivel (8) using one 3/8" x 2" Shand Bolt (6), 3/8" Washer (4) and 3/8" Nylon Nut (5). Press one 1/2" x 1" End Plug (93) to the Base Frame (2), also press two 2" End Caps (9) onto both ends of the Long Stabilizer (1). • Press one 1-1/2". End Plug (63) to the Swivel (8) as shown. iii 17 6 \ 8 7 63 4 I 5 4 4 4 94 5 2 2. Attach the "U" Upright (10) to the Long Stabilizer (1) using four 3/8" x 3-1/4" Bolts (3), eight 3/8" Washers (4) and four 3/8" Nylon Nuts (5). Attach the VKR Step(101) to the "U" Upright (10) using one 3/8" x 3" Shank Bolt (20), two 3/8" Washers (4) and one 3/8" Nylon Nut (5). Press two 2" End Plugs (25) into both ends of the VKR Step (101) and then attach the Non-Slip Tape (up) to the VKR Step as shown. 2 V.K.R SIDE (102) Plate side 20 • 4 5 PEC DEC SIDE 10 4 3 4 3
-
 1
1 -
 2
2 -
 3
3 -
 4
4 -
 5
5 -
 6
6 -
 7
7 -
 8
8 -
 9
9 -
 10
10 -
11
-
12
-
13
-
14
-
15
-
16
-
17
-
18
 |
 |
