Image Fitness E3000 Treadmill English Manual - Page 7
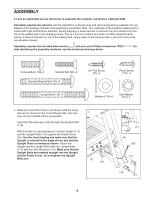
Brackets 109. Attach the Long Panel and the Short
 |
View all Image Fitness E3000 Treadmill manuals
Add to My Manuals
Save this manual to your list of manuals |
Page 7 highlights
2. Have a second person hold the console assembly near the Upright (111). Insert the wire harness extending from the console assembly through the hole in the top of the Upright. Attach the console assembly to the Upright with four Console Bolts (110) and two Star Washers (114). Firmly tighten the four Console Bolts. Next, connect the wire harness extending from the console assembly to the Wire Harness (108). The connectors should slide together easily and snap into place. If they do not, turn one connector and try again. 2 Wire Harness 114 110 111 108 Console Assembly 114 110 108 3. Note: For clarity, the console assembly is not shown in this step. Orient the Short Panel (106) so that the indicated notches are at the top. Have a second person hold the Short Panel against the Upright (111), with the top of the Short Panel flush with the top of the Upright. Firmly tighten the four Upright Bolts (113). Route the Wire Harness (108) down the indicated side of the Short Panel. Next, hold the Long Panel (112) against the opposite side of the Upright (111); make sure that the top of the Long Panel is flush with the top of the Upright and that the Wire Harness (108) is not pinched. Press the Long Panel and the Short Panel (106) together, and align the three holes in the Long Panel with the holes in the Panel Brackets (109). Attach the Long Panel and the Short Panel with three Panel Screws (101). 3 Notches 108 109 109 106 111 109 112 101 101 101 113 7
-
 1
1 -
 2
2 -
 3
3 -
 4
4 -
 5
5 -
 6
6 -
 7
7 -
 8
8 -
 9
9 -
 10
10 -
 11
11 -
 12
12 -
13
-
14
-
15
-
16
-
17
-
18
-
19
-
20
-
21
-
22
-
23
-
24
-
25
-
26
-
27
-
28
-
29
-
30
-
31
-
32
-
33
-
34
 |
 |
