Insignia IS-PA040721 User Manual (English) - Page 2
Controls Location, Operation, Power Supply
 |
View all Insignia IS-PA040721 manuals
Add to My Manuals
Save this manual to your list of manuals |
Page 2 highlights
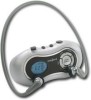
CONTROLS LOCATION 2 11 3 6 110 5 4 7 12 9 16 17 18 15 13 14 19 20 8 1. POWER ON/OFF BUTTON 2. BAND (AM/FM) BUTTON 3. TUNE/ + (HOUR)/ TUNE MINUTE) BUTTONS 4. VOLUME CONTROL BUTTONS 5. STATION PRESET BUTTON 6. MEMORY BUTTON 7. PHONE JACK 8. LCD DISPLAY 9. BELT CLIP 10. HOLD SWITCH 11. FM STEREO/TIME SET BUTTON 12. BATTERY COMPARTMENT 13. FM STEREO INDICATOR 14. HOLD INDICATOR 15. PRESET INDICATOR 16. VOLUME LEVEL INDICATOR 17. RADIO FREQUENCY DISPLAY 18. AM/FM INDICATOR 19. TIME AM/PM INDICATOR 20. LOW BATTERY INDICATOR POWER SUPPLY Slide the Battery Compartment cover (12) at the back of the unit and insert two "AAA"(RO3/UM4) dry cells. Take care that the cells are oriented for correct polarity. CAUTION Do not mix old and new batteries. Do not mix alkaline, standard (Carbon-zinc) or rechargeable (nickel-cadmium) batteries. If the LCD starts flashing or shuts off during operation, the batteries should be replaced. EN - 3 OPERATION 1. Press the Power ON/OFF button (1) to switch on the radio. 2. Select the FM or AM band by pressing the Band Button (2). The FM and AM bands are alternately selected each time when the Band Button is pressed. 3. Insert the headphone plug into the Phone Jack (7) if " " position is selected. 4. Press the "TUNE /+" (HOUR) or "TUNE MINUTE) Button (3) Higher frequency can be selected by pressing the "TUNE / +" button and lower frequency by "TUNE button. Press either button for more than 1 second to activate the automatic tuning mode and it will stop automatically when a station is reached. Press "TUNE / +" or "TUNE button to adjust for the best reception if necessary. Press the "TUNE / +" or "TUNE / "ڪbutton again to select another station. The automatic tuning will continue to scan even when the search has reached either of the band edges (max. frequency or min. frequency). Once the search reaches max. (or min.) frequency, it will return to min. (or max.) frequency and continue to search upwards (or downwards). 5. Adjust the volume by pressing the Volume Control Button (4) "+" or " "ڪto the desired level. 6. Select Mono or Stereo mode by setting the "FM STEREO" switch (11) to your desired choice, when listening with headphone to the FM band. PRESET TUNING Once the desired stations are stored in the memory, they can be recalled easily. Up to 10 AM and 10 FM stations can be stored in the memory. Perform the following in sequence to store a station frequency into the preset channel. 1. Tune in a desired station frequency according to the normal tuning procedure. 2. Then press the "MEMORY" (6) button. PRESET Indicator (15) will appear on the Display (8) and blinks. 3. Select the desired preset channel by pressing the "PRESET" button (5). 4. Then store the desired frequency into the channel by pressing the "MEMORY" button again. 5. Repeat steps 1 - 4 to store other frequencies in channels 1 -10. MEMORY RECALL Recall the stored frequencies 1 - 10 by pressing the "PRESET" button (5). EN -4
-
 1
1 -
 2
2 -
 3
3
 |
 |
