Insignia NS-19E320A13 Quick Setup Guide (English) - Page 1
Insignia NS-19E320A13 Manual
 |
View all Insignia NS-19E320A13 manuals
Add to My Manuals
Save this manual to your list of manuals |
Page 1 highlights
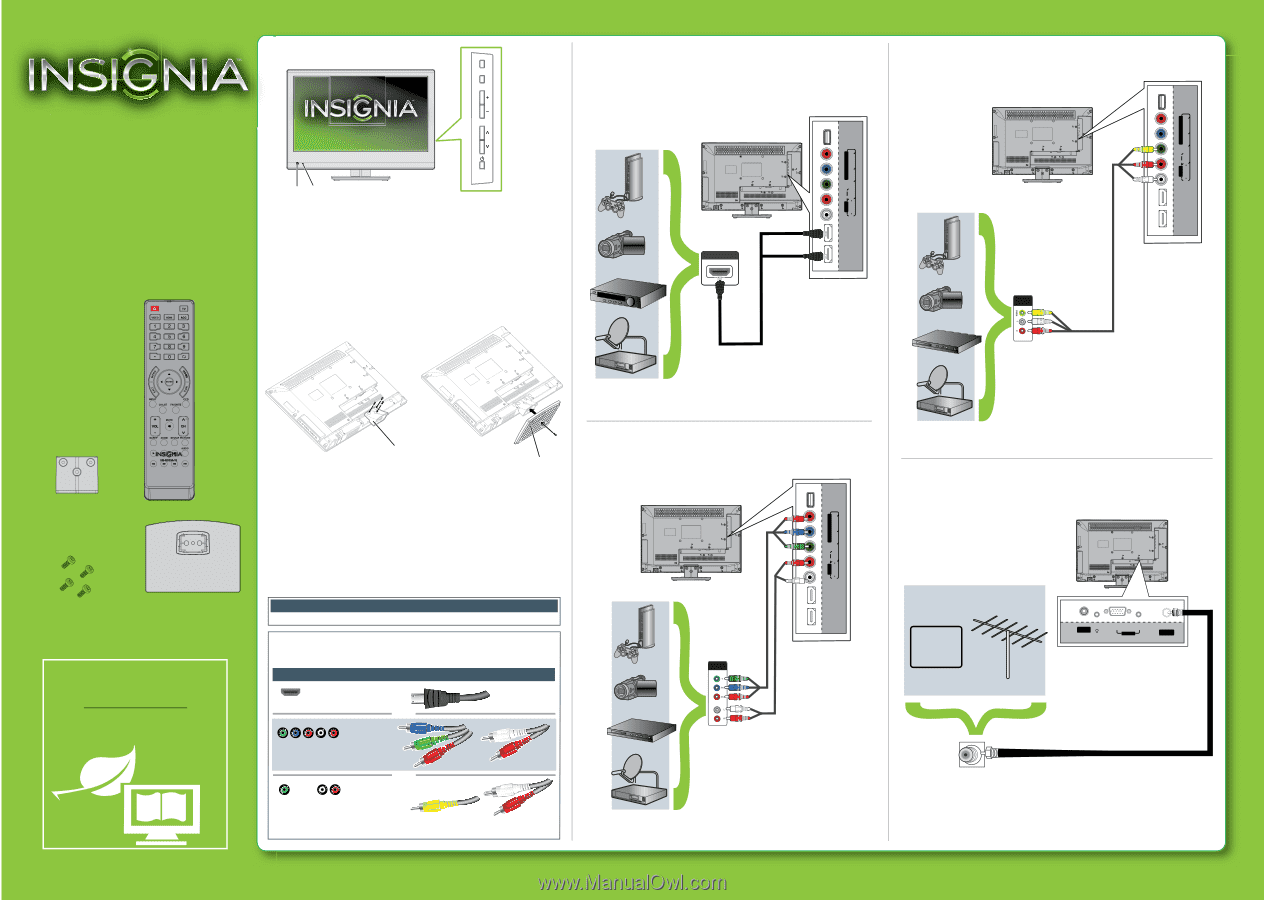
19"/22" LED TV QUICK SETUP GUIDE NS-19E320A13/NS-22E340A13 Thank You for purchasing this fine Insignia television. We hope you enjoy the quality and reliability of this product for years to come Remote control and 2 AAA batteries * Front features Connecting a DVD or Blu-ray player, cable box, MENU satellite receiver, camcorder, or game console INPUT Using an HDMI cable (best) VOL CH Remote control sensor Power indicator Note: 19" appearance is shown for illustration purpose. The appearance of your actual TV may differ from the illustrations in this guide. Installing the stand 1 Carefully place your TV screen face-down on a cushioned, clean surface to protect the screen from damages and scratches. 2 Align the stand column with the TV, then secure the stand column to the TV using three of the provided screws. 3 Align the stand base with the stand column, then secure the stand base to the stand column with one of the provided screws. OR HDMI OUT HDMI cable Note: Cable is not provided. US B PR C OMPONE NT IN PB L AUDIO R VIDE O/Y AV IN HDMI 2 (AR C ) HDMI 1 (DVI) Stand column 4 screws (M4 x 14 mm) ɹ Stand base WE ARE GOING GREEN! A copy of your User Guide is not provided in the box but is available online. Go to www.insigniaproducts.com, click Support & Service, enter your model number in the Product Search field, then click Search. Stand column Stand base Using component cables (better) Installing a wall-mount bracket 1 Carefully place your TV screen face-down on a cushioned, clean surface to protect the screen from damages and scratches. 2 If the stand column is attached to your TV, remove the screws that secure the stand column to your TV, then remove the stand column. 3 Attach the wall-mount bracket to your TV using the mounting holes on the back of your TV. See the instructions that came with the wall-mount bracket for information about how to correctly hang your TV. Warning This apparatus is intended to be supported by a UL Listed wall-mount bracket. Identifying cables Your TV has several connection types for connecting devices. For the best video quality, connect a device to the best available connection. Connection type Video quality Cable connector HDMI video/audio Best OR COMPONENT OUT Component video and analog audio Better OR Composite video Good and analog audio You can use the HDMI 1 jack to connect a DVI device to your TV. You need to attach an HDMI-to-DVI adapter to the end of the HDMI cable that connects to the DVI device's jack. Note: Cables are not provided. AV IN C OMPONE NT IN HDMI 1 (DVI) HDMI 2 (AR C ) L AUDIO R VIDE O/Y PB PR US B Using composite cables (good) US B PR C OMPONE NT IN PB L AUDIO R VIDE O/Y AV IN HDMI 2 (AR C ) HDMI 1 (DVI) AUDIO/VIDEO OUT Note: Connect your yellow video cable connector to the VIDEO/Y jack. Note: Cable is not provided. Connecting an antenna/cable wall jack Connect a coaxial cable (not included) to the ANT/CABLE IN jack on your TV and to the Antenna or Cable wall jack. CABLE DIG ITA L OUTPUT / (C OAXIAL) AUDIO O UT VG A P C /DVI A U DIO PCI N ANT/ C ABLE I N Note: Cable is not provided.
-
 1
1 -
 2
2
 |
 |