Insignia NS-24FTV User Manual (English) - Page 19
Selecting the picture mode, Selecting the sound mode, Setting the date, Adding a channel description
 |
View all Insignia NS-24FTV manuals
Add to My Manuals
Save this manual to your list of manuals |
Page 19 highlights
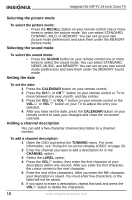
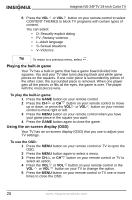
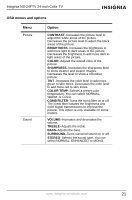
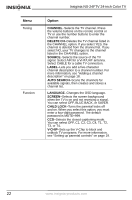
Insiginia NS-24FTV 24-inch Color TV Selecting the picture mode To select the picture mode: • Press the RECALL button on your remote control one or more times to select the picture mode. You can select STANDARD, DYNAMIC, MILD, or MEMORY. You can set up your own picture mode preferences and save them under the MEMORY picture mode. Selecting the sound mode To select the sound mode: • Press the SOUND button on your remote control one or more times to select the sound mode. You can select STANDARD, NEWS, MUSIC, and MEMORY. You can set up you own sound mode preferences and save them under the MEMORY sound mode. Setting the date To set the date: 1 Press the CALENDAR button on your remote control. 2 Press the CH or CH button on your remote control or TV to move between the year, month, and day entries. 3 Press the VOL or VOL button on your remote control or the VOL or VOL button on your TV to adjust the entry you selected. 4 After you have set the date, press the CALENDAR button on your remote control to save your changes and close the on-screen calendar. Adding a channel description You can add a five-character channel description to a channel number. To add a channel description: 1 Open the OSD and select the TUNNING menu. For more information, see "Using the on-screen display (OSD)" on page 20. 2 Enter the channel you want to add a description for in the CHANNEL option. 3 Select the LABEL option. 4 Press the VOL button, then enter the first character of your description within one second. After you enter the first character, the cursor moves to the next character. 5 Enter the rest of the characters. After you enter the fifth character, your description is saved. You must enter five characters, or the label will not be saved. 6 If you want to erase a description, repeat this task and press the VOL button to delete the characters. 18 www.insignia-products.com
-
 1
1 -
2
-
3
-
4
-
5
-
6
-
7
-
8
-
9
-
10
-
11
-
12
-
13
-
 14
14 -
 15
15 -
 16
16 -
 17
17 -
 18
18 -
 19
19 -
 20
20 -
 21
21 -
 22
22 -
 23
23 -
 24
24 -
25
-
26
-
27
-
28
-
29
-
30
-
31
-
32
-
33
-
34
-
35
-
36
-
37
-
38
-
39
-
40
-
41
-
42
-
43
-
44
-
45
-
46
-
47
-
48
-
49
-
50
-
51
-
52
-
53
-
54
-
55
-
56
-
57
-
58
-
59
-
60
-
61
-
62
-
63
-
64
-
65
-
66
-
67
-
68
-
69
-
70
-
71
-
72
-
73
-
74
-
75
-
76
-
77
-
78
-
79
-
80
-
81
-
82
-
83
-
84
-
85
-
86
-
87
-
88
-
89
-
90
 |
 |