Insignia NS-39DF310NA21 Quick Setup Guide - Page 1
Insignia NS-39DF310NA21 Manual
 |
View all Insignia NS-39DF310NA21 manuals
Add to My Manuals
Save this manual to your list of manuals |
Page 1 highlights
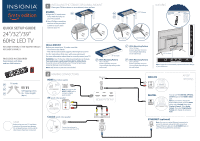
QUICK SETUP GUIDE 24"/32"/39" 60Hz LED TV NS-24DF310NA21 / NS-32DF310NA21 / NS-39DF310NA21 INCLUDED ACCESSORIES Voice Remote with Alexa and two AAA batteries ++ AAA AAA TV stands 24" 32" Self tapping screws 39" (4 x 12mm length) (4pcs.) STOP Before using your new TV, read these instructions to prevent any damage. Do not plug the power cord in until all other devices have been connected. 1 INSTALLING THE STANDS OR A WALL MOUNT Place your TV face-down on a cushioned, clean surface. STANDS 1 Align the TV stand screw 24" 32" holes with the holes on 39" your TV's bottom. 2 Use a Phillips screwdriver and two of the provided screws to secure each stand to your TV. 39" TV shown FEATURES Power indicator Remote control sensor Power/ Input button Press to turn your TV on or off manually. When your TV is on, a short press changes inputs, along press turns off your TV. 4 × 12 mm screws 4 × 12 mm screws 32" TV: 4 × 12 mm screws 39" TV: 4 × 12 mm screws 32" TV: 4 × 12 mm screws 39" TV: 4 × 12 mm screws WALL MOUNT Before you mount your TV, make sure that: • You remove the stands. • The wall-mount bracket supports the weight of your TV. See the instructions that came with your wall mount for more information about how to correctly mount your TV. WARNING: Your TV has four VESA mounting holes on the back. You must secure a wall-mount bracket to all four holes. If you do not use all four holes, your TV may fall and cause property damage or personal injury. Note: Wall-mount screws are not included. 2 MAKING CONNECTIONS HDMI (best video quality) 39" TV shown 24" VESA Mounting Pattern 100 × 100 mm Screws: type M4, 10 mm to 12 mm length depending on the wall mount /AUDIO OUT DIGITAL OPTICAL OUTPUT Note: You can use the HDMI 1 (ARC) jack to connect a digital audio system. AV (good video quality) AUDIO/VIDEO OUT VIDEO HDMI3 HDMI2 HDMI1 (ARC) HDMI OPTIONS Coaxial (good video quality) HD Connect an antenna to access live over-the-air TV. VIDEO L AUDIO R AV IN ANT/CABLE ETHERNET 32" VESA Mounting Pattern 100 × 100 mm Screws: type M4, 10 mm to 12 mm length depending on the wall mount 39" VESA Mounting Pattern 200 × 200 mm Screws: type M6, 10 mm to 12 mm length depending on the wall mount 39" TV shown A Note: Images do not necessarily represent the exact design of your television. ANALOG L R AUDIO IN SOUNDBAR AUDIO OPTIONS DIGITAL OPTICAL AUDIO IN SOUNDBAR You can use the DIGITAL OPTICAL OUTPUT jack or the HDMI1 (ARC) jack. Note: If you need to change the digital audio format, go to the Home menu, select Settings, then select Display & Sounds. Select Audio Output, then select Digital Audio Format and change the setting to PCM. ETHERNET (optional) ETHERNET Note: You can use a wired Ethernet connection to access the internet, instead of a WiFi connection. Plug an Ethernet cable into the ETHERNET jack on your TV and your Ethernet connection.
-
 1
1 -
 2
2
 |
 |