Insignia NS-AF8DBD2 User Guide - Page 12
Removing a basket, Understanding DualZone™ technology, Syncing cook finish times, CAUTION
 |
View all Insignia NS-AF8DBD2 manuals
Add to My Manuals
Save this manual to your list of manuals |
Page 12 highlights
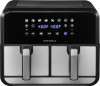
Removing a basket 1 Pull your air fryer's handle out to slide the pan out. 2 Remove the food by dumping it in a container or by using silicone-tipped tongs or utensils. DO NOT place a basket on the top of your air fryer. CAUTION: After cooking, the basket handle and food are hot. Use a potholder or oven mitt to avoid injury. Understanding DualZone™ technology Your air fryer is designed with DualZone™ technology that lets you use two cooking zones to increase versatility. The left side of the cooking chamber is zone 1. The right side is zone 2. Each zone has its own settings and display. With DualZone™ technology, you can use both zones with the different settings, use both zones with the same settings, and sync cook times so that both zones end cooking at the same time. Syncing cook finish times 1 Press (power). 2 Place a crisper plate into the bottom of each basket, then add food to the baskets. 3 Insert the baskets into the cooking chamber. Your air fryer automatically defaults the left side (zone 1). 4 Press a cooking function. You can select: . Bread Pizza French fries Steak Bacon Fish Chicken Pastries Note: You can cancel your selection by pressing the cooking function again. 5 Press TEMP + or TEMP - to set the temperature. The temperature appears in the left display. 6 Press TIME + or TIME - to set the cook time in increments from one minute to one hour. The time appears in the left display. 7 Press to select the right side (zone 2). 8 Press a cooking function. You can select: Bread Pizza French fries Steak Bacon Fish Chicken Pastries Note: You can cancel your selection by pressing the cooking function again. 12 www.insigniaproducts.com
-
 1
1 -
2
-
3
-
4
-
5
-
6
-
 7
7 -
 8
8 -
 9
9 -
 10
10 -
 11
11 -
 12
12 -
 13
13 -
 14
14 -
 15
15 -
 16
16 -
 17
17 -
18
-
19
-
20
-
21
 |
 |
