Insignia NS-DPF8A User Manual (English) - Page 9
Using the clock, calendar, scheduled, ON/OFF function, Setting the internal clock, Setting the alarm
 |
View all Insignia NS-DPF8A manuals
Add to My Manuals
Save this manual to your list of manuals |
Page 9 highlights
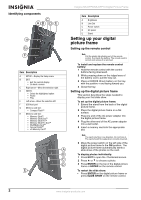
Insignia NS-DPF8/NS-DPF10 Digital Picture Frame Menu Option Rotate Settings Zoom Start Slideshow Set Clock Set Clock Set Alarm Set Alarm Time Alarm Setting Tone Set ON/OFF Schedule Weekdays Weekdays Weekends Weekends Start Scheduled ON/OFF Power Saving • Off • 2 Hours • 4 Hours • 8 Hours Brightness/Contrast Color/Tint Factory Default Description Rotate the displayed photo 90° counterclockwise. Zoom in on the displayed photo. Start the slide show. Set the internal clock. Set alarm time. Set alarm once, daily, or no alarm. Default tone or music tone. Turns on at xx:xx AM/PM Turns off at xx:xx AM/PM Turns on at xx:xx AM/PM Turns off at xx:xx AM/PM Start scheduled ON/OFF control. If unused for the selected time period, the digital picture frame goes to power saving mode. Any button press on the remote control or frame wakes it up. Adjust the LCD brightness and contrast. Adjust the LCD color and tint. Reset all settings to factory default values. Using the clock, calendar, scheduled ON/OFF function This function provides a combination view of calendar, real time clock, and continuous slide show for the selected memory source. This function can be selected by choosing CLOCK on the Select Mode screen, then pressing ENTER on the remote control or on the frame. Setting the internal clock When the digital picture frame's internal clock is set, you can use it as an alarm clock. To set the internal clock: 1 Go to CLOCK mode, then press SETUP to open the Setup menu. 2 Choose Set Clock. 3 Use or to move to a time or date field to be changed. 4 Use or to change the value in the selected field. 5 When the date and time are correct, press the ENTER button to set the time and return to the normal Clock/Calendar View screen. Setting the alarm Use your digital picture frame as an alarm clock. You can set it to sound a built-in tone or play pre-stored music with the filename pd_alarm.wav in the build-in memory. You can also set the alarm to alert only once or daily after setup. To set the alarm: 1 With the Clock/Calendar View screen displayed, press ENTER to open the Setup menu. 2 Choose Set Alarm, then press Enter to open a submenu. 3 Choose Set Alarm Time option to open another submenu for changing alarm time. 4 When the alarm time settings are completed, press ENTER to set the alarm and return to the normal Clock/Calendar View screen. Note The alarm defaults to Tone if the digital picture frame is turned off. www.insignia-products.com 7
-
 1
1 -
2
-
3
-
 4
4 -
 5
5 -
 6
6 -
 7
7 -
 8
8 -
 9
9 -
 10
10 -
 11
11 -
 12
12 -
 13
13 -
 14
14
 |
 |
