Insignia NS-FWM45W3 Quick Setup Guide - Page 1
Insignia NS-FWM45W3 Manual
 |
View all Insignia NS-FWM45W3 manuals
Add to My Manuals
Save this manual to your list of manuals |
Page 1 highlights
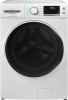
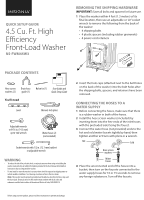
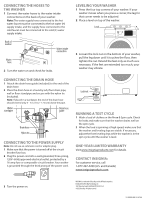
QUICK SETUP GUIDE 4.5 Cu. Ft. High Efficiency Front-Load Washer NS-FWM45W3 REMOVING THE SHIPPING HARDWARE IMPORTANT: Save all bolts and spacers for future use. 1 Place the washer within 4 feet (1.3 meters) of its final location, then use an adjustable or 1⁄2" socket wrench to remove the following from the back of the washer: • 4 shipping bolts • 4 plastic spacers (including rubber grommets) • 4 power cord retainers PACKAGE CONTENTS Hose screen Drain hose Nylon tie (1) User Guide and washers (2) guide (1) Quick Setup Guide You'll need Level Channel-lock pliers Adjustable wrench or 9/16 in. (14.3 mm) open-end wrench Water hoses (2) (not included) Socket wrench with 1/2 in. (12.7 mm) ratchet or adjustable wrench WARNING • To reduce the risk of fire, electric shock, or injury to persons when using or installing the washer, read and obey all safety information provided in the User Manual & Installation Instructions that accompanied the washer. • Do not install or store this washer in an area where it will be exposed to dripping water or outside weather conditions. See Choosing a location section in the User Guide. Note: This washer must be properly grounded and installed as described in these steps and the User Guide. Electrical service to the washer must conform with local codes and ordinances and the latest edition of the national Electrical Code, ANSI/NFPA 70. 2 Insert the hole caps (attached next to the bolt holes on the back of the washer) into the bolt holes after the shipping bolts, spacers, and retainers have been removed. CONNECTING THE HOSES TO A WATER SUPPLY 1 Before connecting the hoses, make sure that there is a rubber washer in both of the hoses. 2 Install the hose screen washers (included) by inserting them into the free ends of the inlet hoses with the protruded side facing the faucet. 3 Connect the water hose (not provided) ends to the hot and cold water faucets tightly by hand, then tighten another 2/3 turn with pliers or a wrench. Hot Cold HOT Hose screen washers Water hoses 4 Place the unconnected end of the hoses into a bucket, then turn on the faucets connected to the water supply hoses for 10 or 15 seconds to remove any foreign substances. Turn off the faucets. Before using your new product, please read these instructions to prevent any damage.
-
 1
1 -
 2
2
 |
 |