Insignia NS-IMP26SL0 Quick Setup Guide - Page 2
Cleaning And Maintenance, Tips For Saving Energy, Contact Insignia, Setting Up Your Ice Maker, Using
 |
View all Insignia NS-IMP26SL0 manuals
Add to My Manuals
Save this manual to your list of manuals |
Page 2 highlights
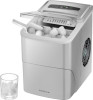
SETTING UP YOUR ICE MAKER 1 Place your ice maker on a level surface in a location where your ice maker is protected from direct sunlight and other sources of heat (such as a stove, furnace, or radiator). 2 Make sure that there is at least 4 inches (10 cm) of space between the back and sides of your ice maker and the surrounding walls. 3 Clean the interior with diluted detergent, warm water, and a soft cloth, then rinse with clear water. 4 Take out the ice basket and clean it. 5 Unplug the water drain cap to remove all water. Replace the water drain plug before filling with water. 6 Before using your ice maker for the first time, run two to three cycles of ice and dispose of them to help remove any plastic odor or residue from the manufacturing and shipping process. USING YOUR ICE MAKER FOR THE FIRST TIME WARNINGS: • Your ice maker must be grounded. Do not defeat the safety purpose of the grounding-type plug. A grounding-type plug has two blades and a third grounding prong. The third prong is provided for your safety. If the provided plug does not fit into your outlet, consult an electrician for replacement of the obsolete outlet. • Before plugging in your ice maker, wait one hour for the refrigerant fluid to settle. 1 Make sure that the water drain plug is in place and secure. 2 Open the cover, remove the ice basket, then pour drinking water into the reservoir. Make sure that the water level is below the MAX line. WARNING: Fill with drinking water only MAX line 3 Replace the ice basket, then close the cover. 4 Plug the power cord into a power outlet. 5 Press the ON/OFF button. The power indicator lights. 6 Press the SELECT button to select the ice cube size. If the room temperature is lower than 60°F (16°C), we recommend that you select the small cube size to keep ice from sticking together. Notes: • When the ice basket is full, your ice maker automatically stops making ice and the ICE FULL indicator lights. • After ice is made and goes into the ice basket, the ice begins to melt. To save the ice, remove it from the basket and freeze it. Otherwise, the ice melts, the water goes back into the reservoir, and your ice maker recycles the water to make ice again. • The ice making cycle lasts 6 to 13 minutes, depending on the selected ice cube size and the ambient temperature. If the room is extremely hot, the cycle may take longer. • While your ice maker is on, check the water level periodically. If the water level is too low, your ice maker stops automatically and the ADD WATER indicator light will illuminate. Turn off your ice maker, then fill the reservoir to the level mark. Wait at least three minutes for the refrigerant liquid inside the compressor to settle, then turn on your ice maker. • Change the water in the water reservoir every 24 hours to ensure that the water is fresh and the ice tastes good. • If your ice maker is not in use, drain all water left in the tank. CLEANING AND MAINTENANCE To clean your ice maker, follow the instructions in steps 3-5 in SETTING UP YOUR ICE MAKER. • Clean the ice maker at least once a week or every three days if your water quality is poor. CAUTION: Do not use bleach or vinegar to clean the internal components. TIPS FOR SAVING ENERGY • Locate your ice maker in the coolest area of the room, away from heat producing appliances or heating ducts. • Make sure that your ice maker is sufficiently ventilated, with adequate air circulation behind it. TROUBLESHOOTING PROBLEM The ADD WATER indicator is on. SOLUTION • Turn off your ice maker, open the cover, then remove the ice basket. Add water up to the MAX line. Replace the basket, then close the cover. Turn on your ice maker. The ICE FULL indicator is on. • Remove ice from the ice basket. Ice cubes stick together. • The ice cycle is too long for the room temperature. Stop your ice maker, and restart it when the ice blocks melt. Select the small size ice cube selection. • The water temperature may be too cold. Change the water in the inner tank. The best water temperature is between 45°F ~ 90°F (7°C ~ 32°C). The ice making cycle is normal, but no ice is made. • The room temperature or water temperature may be too high. The room temperature should be 50°F ~ 105°F (10°C ~ 40°C). The water temperature should be 45°F ~ 90°F (7°C ~ 32°C). • The refrigerant liquid may have leaked. Contact a qualified service technician for repair. • The pipe in the cooling system may be blocked. Contact a qualified service technician for repair. The ice maker will not • Direct sunlight or sunlight reflection can cause the sensor to stop. malfunction. Move your ice maker. My ice maker is noisy. • Your ice maker makes noise during the freezing cycle and when it is dumping ice. This is normal. SPECIFICATIONS Protection type 1 Power 115 V/60 Hz Wattage: 120 W (25°C), 140 W (40°C) Ice making current 1.7 A Ice harvest current 2.0 A Refrigerant R2600 a/21 g Design pressure High side: 290 psig Low side: 88 psig Dimensions (H×W×D) 8.7 × 12.3 × 12.6 in. (22.1 × 31.2 × 32.0 cm) Net weight 15.7 lbs. (7.1 kg) Enclosure Stainless steel Ice cube weight Small: .25 oz. (7 g) Large: .32 oz. (9 g) Reservoir capacity 2.11 qt. (2.0 l) ONE-YEAR LIMITED WARRANTY Visit www.insigniaproducts.com for details. CONTACT INSIGNIA: For customer service, call 1-877-467-4289 (U.S. and Canada) or 01-800-926-3000 (Mexico) www.insigniaproducts.com INSIGNIA is a trademark of Best Buy and its affiliated companies Distributed by Best Buy Purchasing, LLC 7601 Penn Ave South, Richfield, MN 55423 U.S.A. ©2019 Best Buy. All rights reserved. Made in China V2 ENGLISH 19-0483
-
 1
1 -
 2
2
 |
 |
