Insignia NS-P16AT08 Quick Setup Guide (English) - Page 1
Insignia NS-P16AT08 Manual
 |
View all Insignia NS-P16AT08 manuals
Add to My Manuals
Save this manual to your list of manuals |
Page 1 highlights
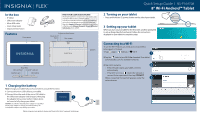
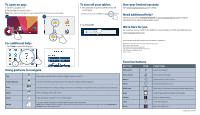
In the box • 8" tablet • USB power adapter • Micro USB cable • Quick Setup Guide • Important Information Features Front camera FIND YOUR USER GUIDE ONLINE! We are going green so a copy of your User Guide is not provided in the box but is available online. To find your manual, touch the ? icon on your tablet or go to www.insigniaproducts.com on your computer, then click Support & Service. Enter your model number in the box under Manual, Firmware, Drivers & Product Information, then click ►. Volume up/down button Power on/off button Rear camera Speakers Reset hole Micro USB port microSD™ card slot Earphone jack Microphone 1 Charging the battery Note: Charge your tablet fully (six hours) before using it the first time. 1 Connect the micro USB cable to your tablet. 2 Connect the other end of the micro USB cable to the USB power adapter (wall charger), then plug the adapter into a power outlet. It takes about six hours to fully charge your tablet. Caution: Use only the included power adapter or a qualified 5V/2A power adapter to charge your tablet's battery. An incompatible adapter may damage your tablet. Before using your new product, please read these instructions to prevent any damage. Quick Setup Guide I NS-P16AT08 8" Wi-Fi Android™ Tablet 2 Turning on your tablet • Press and hold the (power) button on the side of your tablet. 3 Setting up your tablet When you turn on your tablet for the first time, you'll be prompted to set up things like Wi-Fi and email. Follow the instructions displayed on your tablet to complete setup. Connecting to a Wi-Fi To use the Wi-Fi feature, you need access to a wireless access point or hotspot. 1 Tap Apps > Settings > Wi-Fi. 2 Tap the slider to turn Wi-Fi On, if needed. Your tablet automatically scans for available networks. 3 Tap a Wi-Fi network. • If the network is open, your tablet connects automatically. • If the Wi-Fi icon has a (lock), the network is secured. Enter a password, then tap CONNECT. When connected, "Connected" appears under the network name.
-
 1
1 -
 2
2
 |
 |