Insignia NS-PNK5011 Quick Setup Guide - Page 1
Insignia NS-PNK5011 Manual
 |
View all Insignia NS-PNK5011 manuals
Add to My Manuals
Save this manual to your list of manuals |
Page 1 highlights
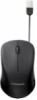
Package contents • Retractable Wired USB Mouse • Quick Setup Guide Quick Setup Guide USB Optical Mouse with Retractable Cord | NS-PNM5113/NS-PNM5113-C Setting up your mouse 1 Turn the mouse over and hold it in one hand, then pull out the USB cord to the desired length. System requirements • Windows® 8, Windows® 7, Windows Vista®, Windows® XP, or Mac OS 10.X or higher • One available USB port Features Scroll wheel Right button Retractable USB cord (cord shown stowed) Left button 2 Plug your mouse into an available USB port on your computer. The computer automatically detects the mouse and you can immediately begin using it. Caution: Using your mouse on a desk that is red, transparent, or highly reflective may interfere with the mouse's optical sensor. To retract the USB cord • Slightly pull out the USB cord and the cord automatically rewinds. Note: To prevent damaging the reel, hold onto the cord and guide it back into the mouse. Before using your new product, please read these instructions to prevent any damage.
-
 1
1 -
 2
2
 |
 |
