Insignia NS-PRCL01 User Manual (English) - Page 5
Setting up your clock radio
 |
View all Insignia NS-PRCL01 manuals
Add to My Manuals
Save this manual to your list of manuals |
Page 5 highlights
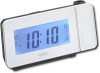
Projection Clock Radio LCD 3 Insert one CR2032 button cell battery (included) into the battery compartment. Make sure that the + symbol on the battery is facing out. # Indicator 1 RADIO 2 SLEEP 3 SNOOZE 4 VOL 5 MEM Description Lights when the radio is on. The AM or FM icon to the right indicates the selected radio band. Lights when the sleep timer is set. Lights when snooze is on. Shows the volume setting for the radio. Indicates a preset station is selected. Indicates the status of alarm 2. The icon below the alarm icon indicates your selection. 6 Alarm 2 • -Wake to buzzer • -Wake to radio • No icon-Alarm 2 off 7 Preset station number Indicates the preset number selected. 8 Main display Shows the current time, radio frequency, sleep time setting, or alarm ring time. Indicates the status of alarm 1. The icon below the alarm icon indicates your selection. 9 Alarm 1 • -Wake to buzzer • -Wake to radio • No icon-Alarm 1 off 4 Reinstall the backup battery slot cover. 5 Plug the AC adapter into your clock radio and a power outlet. Uninstalling the backup battery To uninstall the backup battery: 1 Make sure that the AC adapter is unplugged from the power outlet. 2 Turn your clock radio around so that the back is facing forward, then unscrew the circular backup battery cover. Setting up your clock radio Installing the backup battery You can install a backup battery (included) to provide temporary power in case the AC power fails. The backup battery only maintains the correct time. To install the backup battery: 1 Make sure that the AC adapter is unplugged from the power outlet. 2 Turn your clock radio around so the back is facing forward, then unscrew the circular backup battery cover. 3 Push the metal clip in direction shown with a screw driver or ballpoint pen. The backup battery should pop out. 4 If the backup battery does not pop out, press it down until it clicks, and repeat the Step 3. www.insigniaproducts.com 3
-
 1
1 -
 2
2 -
 3
3 -
 4
4 -
 5
5 -
 6
6 -
 7
7 -
 8
8 -
 9
9 -
 10
10 -
 11
11 -
12
 |
 |
