Insignia NS-SB314 User Manual (Español) - Page 11
Montaje de su barra de sonido en una pared, opcional - bluetooth
 |
View all Insignia NS-SB314 manuals
Add to My Manuals
Save this manual to your list of manuals |
Page 11 highlights
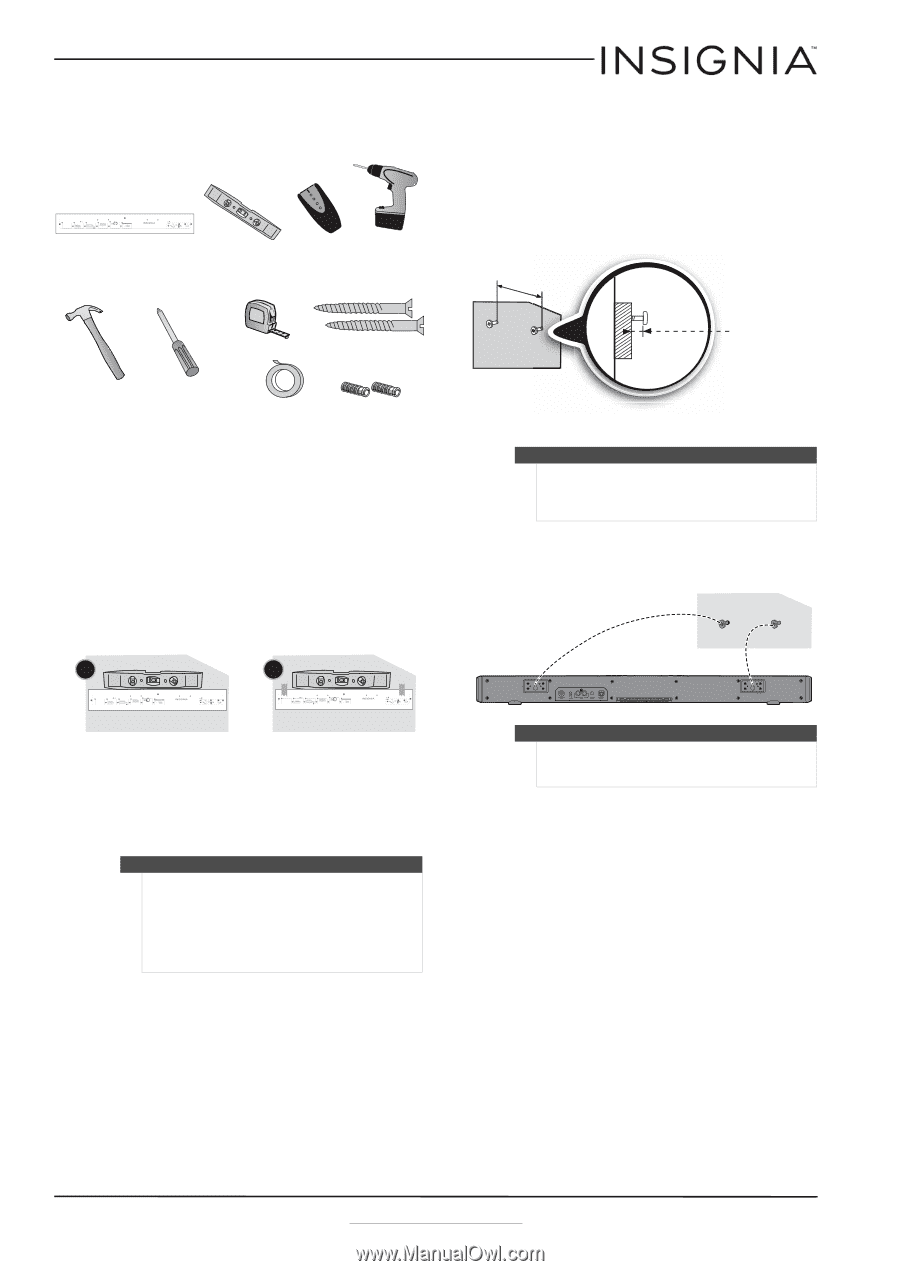
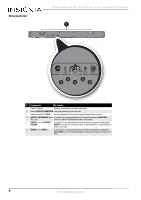
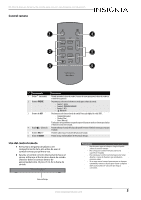
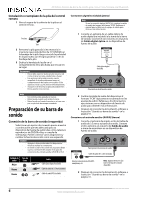
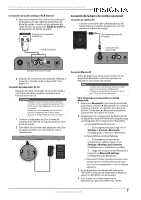
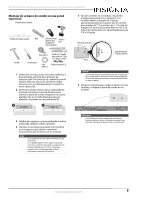
NS-SB314 Altavoz de barra de sonido para cine en casa Sistema con Bluetooth Montaje de su barra de sonido en una pared (opcional) Usted necesitará: Select a location close to your TV and directly in front of the viewing/listening position. For best sound quality, choose a location where sound waves are not blocked by furniture or other obstacles. Drill a hole here Position the wall mount template on the wall where you want to mount your soundbar, level the template, then tape it to the wall. Wall Note: Make sure that the template is level. Drill two holes in the wall where the template indicates, then remove the template. Wall LEVELING EDGE Wall Anchor If you are mounting on drywall or concrete, insert wall anchors (not included) into the holes and use a hammer to make sure that the anchors are flush against the wall. Hold a level to the Leveling Edge of this template LEVELING EDGE 20.43 inches (519 mm) Approx. 1/4 in (6.8 mm) Wall Secure two screws (not included) to the wall or wall anchors (if required). The screws must protrude from the wall by about 1/4". Use a #10 wood screw (or similar), 1 1/2" in length. The screw width must be about 3/16" and the screw head must be approximately 1/4" to 3/8". Soundbar Wall Align the speaker hanging brackets with the screws, then hang the soundbar on the screws. Wall mount template Position holes onto studs behind drywall or use anchors for mounting Warning: Improper installation can result in serious injury or damage to your soundbar. If necessary, seek the assistance of a professional. Drill a hole here Tools Needed Wall anchors (2) Screws (2) - #10 x 1 ½" wood screw (or similar) V1 14-0130 Plantilla de montaje en pared Nivel Detector de vigas (opcional para instalación en Taladro y broca vigas de madera) Martillo Cinta métrica Destornillador Cinta adhesiva Tornillos (2) - Tornillo para madera N.° 10 de 1 1/2 pulg. (o similar) Anclajes para pared (2) 1 Seleccione una ubicación cerca de su televisor y directamente enfrente de la posición de vista/escucha. Para obtener la calidad de sonido óptima, elija una ubicación donde las ondas sonoras no se ven bloqueadas por muebles u otros obstáculos. 2 Determine donde desea colocar la plantilla de montaje incluida en la pared donde quiere montar la barra de sonido. Asegúrese de que la plantilla esté a nivel (A), después pegue la plantilla a la pared con cinta adhesiva (B). A Select a location close to your TV and directly in front of the viewing/listening position. For best sound quality, choose a location where sound waves are not blocked by furniture or other obstacles. Drill a hole here Position the wall mount template on the wall where you want to mount your soundbar, level the template, then tape it to the wall. Wall Drill two holes in the wall where the template indicates, then remove the template. Wall Note: Make sure that the template is level. LEVELING EDGE Wall Anchor If you are mounting on drywall or concrete, insert wall anchors (not included) into the holes and use a hammer to make sure that the anchors are flush against the wall. Hold a level to the Leveling Edge of this template LEVELING EDGE 20.43 inches (519 mm) Approx. 1/4 in (6.8 mm) Wall Secure two screws (not included) to the wall or wall anchors (if required). The screws must protrude from the wall by about 1/4". Use a #10 wood screw (or similar), 1 1/2" in length. The screw width must be about 3/16" and the screw head must be approximately 1/4" to 3/8". Soundbar Wall Align the speaker hanging brackets with the screws, then hang the soundbar on the screws. Wall mount template Position holes onto studs behind drywall or use anchors for mounting Warning: Improper installation can result in serious injury or damage to your soundbar. If necessary, seek the assistance of a professional. Drill a hole here Tools Needed Wall anchors (2) Screws (2) - #10 x 1 ½" wood screw (or similar) V1 14-0130 B Select a location close to your TV and directly in front of the viewing/listening position. For best sound quality, choose a location where sound waves are not blocked by furniture or other obstacles. Drill a hole here Position the wall mount template on the wall where you want to mount your soundbar, level the template, then tape it to the wall. Wall Drill two holes in the wall where the template indicates, then remove the template. Wall Note: Make sure that the template is level. LEVELING EDGE Wall Anchor If you are mounting on drywall or concrete, insert wall anchors (not included) into the holes and use a hammer to make sure that the anchors are flush against the wall. Hold a level to the Leveling Edge of this template LEVELING EDGE 20.43 inches (519 mm) Approx. 1/4 in (6.8 mm) Wall Secure two screws (not included) to the wall or wall anchors (if required). The screws must protrude from the wall by about 1/4". Use a #10 wood screw (or similar), 1 1/2" in length. The screw width must be about 3/16" and the screw head must be approximately 1/4" to 3/8". Soundbar Wall Align the speaker hanging brackets with the screws, then hang the soundbar on the screws. Wall mount template Position holes onto studs behind drywall or use anchors for mounting Warning: Improper installation can result in serious injury or damage to your soundbar. If necessary, seek the assistance of a professional. Drill a hole here Tools Needed Wall anchors (2) Screws (2) - #10 x 1 ½" wood screw (or similar) V1 14-0130 3 Taladre dos agujeros en la pared donde lo indica la plantilla, después retire la plantilla. 4 Coloque los anclajes para pared (no incluidos) en los agujeros que taladro, usando las instrucciones que vinieron con los anclajes. Notas • • Si ha taladrado en una viga los anclajes no son necesarios. Si no puede taladrar en las vigas de la pared, concreto, u otro tipo de pared, se requieren los anclajes. Refiérase a las instrucciones que vienen con los anclajes para pared para determinar el tamaño de la broca. 5 Fije dos tornillos (no incluidos) a la pared o anclajes para pared (si se requieren). Los tornillos deben sobresalir de 1/4 pulg. aproximadamente de la pared. Use un tornillo para madera N.° 10 (o similar), de 1 1/2 pulg. de longitud. El ancho del tornillo debe ser de 3/16 pulg. y la cabeza debe ser aproximadamente de 1/4 a 3/8 pulg. 20.43 pulg. (519 mm) Pared Aproximadamente 1/4 pulg. (6.8 mm) CUIDADO Si necesita montar la barra de sonido en un panel de yeso, una pared de concreto o tipo similar, asegúrese de usar anclajes para pared que sean adecuados para su tipo de pared. 6 Alinee los soportes para colgar el altavoz con los tornillos y cuelgue la barra de sonido en los tornillos. Advertencia una instalación inadecuada podría resultar en lesiones graves o daños a su barra de sonido. Si es necesario, busque la asistencia de un profesional. www.insigniaproducts.com 9
-
 1
1 -
2
-
3
-
4
-
5
-
 6
6 -
 7
7 -
 8
8 -
 9
9 -
 10
10 -
 11
11 -
 12
12 -
 13
13 -
 14
14 -
 15
15 -
 16
16
 |
 |