Insignia NS-SB314 User Manual (Français) - Page 11
Remarques, Attention, Avertissement - bluetooth
 |
View all Insignia NS-SB314 manuals
Add to My Manuals
Save this manual to your list of manuals |
Page 11 highlights
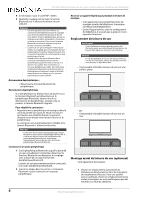
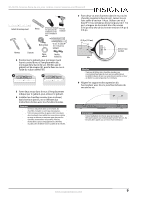
NS-SB314 Enceinte barre de son pour cinéma maison Système avec Bluetooth Select a location close to your TV and directly in front of the viewing/listening position. For best sound quality, choose a location where sound waves are not blocked by furniture or other obstacles. Drill a hole here Position the wall mount template on the wall where you want to mount your soundbar, level the template, then tape it to the wall. Wall Note: Make sure that the template is level. Drill two holes in the wall where the template indicates, then remove the template. Wall LEVELING EDGE Wall Anchor If you are mounting on drywall or concrete, insert wall anchors (not included) into the holes and use a hammer to make sure that the anchors are flush against the wall. Hold a level to the Leveling Edge of this template LEVELING EDGE 20.43 inches (519 mm) Approx. 1/4 in (6.8 mm) Wall Secure two screws (not included) to the wall or wall anchors (if required). The screws must protrude from the wall by about 1/4". Use a #10 wood screw (or similar), 1 1/2" in length. The screw width must be about 3/16" and the screw head must be approximately 1/4" to 3/8". Soundbar Wall Align the speaker hanging brackets with the screws, then hang the soundbar on the screws. Wall mount template Position holes onto studs behind drywall or use anchors for mounting Warning: Improper installation can result in serious injury or damage to your soundbar. If necessary, seek the assistance of a professional. Drill a hole here Tools Needed Wall anchors (2) Screws (2) - #10 x 1 ½" wood screw (or similar) V1 14-0130 Gabarit de montage mural Niveau Détecteur de montants (en option pour des installations sur des Perceuse et mèche murs à montants en bois) Mètre à ruban Vis (2) : vis à bois N° 10 x 1 1/2 po (ou similaire) Marteau Tournevis Ruban adhésif Chevilles murales (2) 2 Positionner le gabarit pour montage mural fourni contre le mur à l'emplacement de montage de la barre de son. Vérifier que le gabarit est de niveau (A), puis le fixer au mur à l'aide du ruban adhésif (B). A Select a location close to your TV and directly in front of the viewing/listening position. For best sound quality, choose a location where sound waves are not blocked by furniture or other obstacles. Drill a hole here Position the wall mount template on the wall where you want to mount your soundbar, level the template, then tape it to the wall. Wall Drill two holes in the wall where the template indicates, then remove the template. Wall Note: Make sure that the template is level. LEVELING EDGE Wall Anchor If you are mounting on drywall or concrete, insert wall anchors (not included) into the holes and use a hammer to make sure that the anchors are flush against the wall. Hold a level to the Leveling Edge of this template LEVELING EDGE 20.43 inches (519 mm) Approx. 1/4 in (6.8 mm) Wall Secure two screws (not included) to the wall or wall anchors (if required). The screws must protrude from the wall by about 1/4". Use a #10 wood screw (or similar), 1 1/2" in length. The screw width must be about 3/16" and the screw head must be approximately 1/4" to 3/8". Soundbar Wall Align the speaker hanging brackets with the screws, then hang the soundbar on the screws. Wall mount template Position holes onto studs behind drywall or use anchors for mounting Warning: Improper installation can result in serious injury or damage to your soundbar. If necessary, seek the assistance of a professional. Drill a hole here Tools Needed Wall anchors (2) Screws (2) - #10 x 1 ½" wood screw (or similar) V1 14-0130 B Select a location close to your TV and directly in front of the viewing/listening position. For best sound quality, choose a location where sound waves are not blocked by furniture or other obstacles. Drill a hole here Position the wall mount template on the wall where you want to mount your soundbar, level the template, then tape it to the wall. Wall Drill two holes in the wall where the template indicates, then remove the template. Wall Note: Make sure that the template is level. LEVELING EDGE Wall Anchor If you are mounting on drywall or concrete, insert wall anchors (not included) into the holes and use a hammer to make sure that the anchors are flush against the wall. Hold a level to the Leveling Edge of this template LEVELING EDGE 20.43 inches (519 mm) Approx. 1/4 in (6.8 mm) Wall Secure two screws (not included) to the wall or wall anchors (if required). The screws must protrude from the wall by about 1/4". Use a #10 wood screw (or similar), 1 1/2" in length. The screw width must be about 3/16" and the screw head must be approximately 1/4" to 3/8". Soundbar Wall Align the speaker hanging brackets with the screws, then hang the soundbar on the screws. Wall mount template Position holes onto studs behind drywall or use anchors for mounting Warning: Improper installation can result in serious injury or damage to your soundbar. If necessary, seek the assistance of a professional. Drill a hole here Tools Needed Wall anchors (2) Screws (2) - #10 x 1 ½" wood screw (or similar) V1 14-0130 3 Forer deux trous dans le mur à l'emplacement indiqué par le gabarit, puis enlever le gabarit. 4 Installer les chevilles murales (non incluses) dans les trous percés, en se référant aux instructions livrées avec les chevilles murales. Remarques • Si le trou est percé dans un montant, les chevilles murales ne sont pas nécessaires. • S'il n'est pas possible de percer des trous dans des montants mais plutôt sur une cloison sèche, un mur en béton ou un autre type de mur, les chevilles seront alors nécessaires. Voir les instructions qui accompagnent les chevilles murales afin de déterminer la taille de la mèche. 5 Fixer deux vis (non fournies) dans le mur ou les chevilles murales (si besoin est). Laisser les vis faire saillie d'environ 1/4 po. Utiliser une vis à bois N° 10 (ou similaire), d'une longueur de 1 1/2 po. La largeur de la vis doit être d'au moins 3/16 po et la tête de la vis entre environ 1/4 po à 3/8 po. 20,43 po (519 mm) Mur Environ 1/4 po (6,8 mm) Attention S'assurer d'utiliser des chevilles murales qui conviennent au type de mur qui sera utilisé pour installer la barre de son sur une cloison sèche, un mur en béton ou autre type de mur similaire. 6 Aligner les supports de suspension du haut-parleur avec les vis, puis fixer la barre de son sur les vis. Avertissement Une installation incorrecte peut provoquer des blessures graves ou endommager la barre de son. Au besoin, faire appel aux services d'un technicien. www.insigniaproducts.com 9
-
 1
1 -
2
-
3
-
4
-
5
-
 6
6 -
 7
7 -
 8
8 -
 9
9 -
 10
10 -
 11
11 -
 12
12 -
 13
13 -
 14
14 -
 15
15 -
 16
16
 |
 |