Intel DG41TX English Product Guide - Page 21
SATA Interfaces, Expandability, BIOS, ATA Auto Configuration - manual
 |
View all Intel DG41TX manuals
Add to My Manuals
Save this manual to your list of manuals |
Page 21 highlights
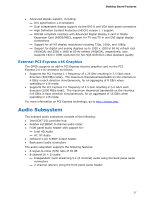
Desktop Board Features SATA Interfaces The ICH7 SATA controller provides four independent SATA ports with a theoretical maximum transfer rate of 3.0 Gb/s on each port. One device can be installed on each port for a maximum of four SATA devices. A point-to-point interface is used for host to device connections, unlike PATA which supports a master/slave configuration and two devices on each channel. For compatibility, the underlying SATA functionality is transparent to the operating system. The SATA controller supports IDE and AHCI configuration and can operate in both legacy and native modes. In Legacy mode, standard ATA I/O and IRQ resources are assigned (IRQ 14 and 15). In Native mode, standard PCI Conventional bus resource steering is used. Native mode is the preferred mode for configurations using the Windows* XP and Windows Vista* operating systems. NOTE ACHI is only supported in Microsoft Windows Vista and Microsoft Windows 7 operating systems. Expandability For system expansion, the Desktop Board provides the following expansion slots: • One PCI Express 2.0 x16 connector (compatible with PCI Express 1.1 add-in cards) • One PCI Express 1.1 x1 connector • Two PCI bus connectors BIOS The BIOS provides the Power-On Self-Test (POST), the BIOS Setup program, the PCI/PCI Express auto-configuration utilities, and the video BIOS. The BIOS is stored in the Serial Peripheral Interface (SPI) Flash device. The BIOS can be updated by following the instructions in Chapter 3. ATA Auto Configuration If you install a Serial or Parallel ATA device in your computer, the auto-configuration utility in the BIOS automatically detects and configures the device for your computer. You do not need to run the BIOS Setup program after installing an ATA device. You can override the auto-configuration options by specifying manual configuration in the BIOS Setup program. 21
-
 1
1 -
2
-
3
-
4
-
5
-
6
-
7
-
8
-
9
-
10
-
11
-
12
-
13
-
14
-
15
-
 16
16 -
 17
17 -
 18
18 -
 19
19 -
 20
20 -
 21
21 -
 22
22 -
 23
23 -
 24
24 -
 25
25 -
 26
26 -
27
-
28
-
29
-
30
-
31
-
32
-
33
-
34
-
35
-
36
-
37
-
38
-
39
-
40
-
41
-
42
-
43
-
44
-
45
-
46
-
47
-
48
-
49
-
50
-
51
-
52
-
53
-
54
-
55
-
56
-
57
-
58
-
59
-
60
-
61
-
62
-
63
-
64
-
65
-
66
-
67
-
68
-
69
-
70
-
71
-
72
-
73
-
74
-
75
-
76
-
77
-
78
-
79
-
80
 |
 |
