Intel SE7520BD2VD2 User Guide - Page 40
Preparing Media and Performing the BIOS Upgrade
 |
View all Intel SE7520BD2VD2 manuals
Add to My Manuals
Save this manual to your list of manuals |
Page 40 highlights
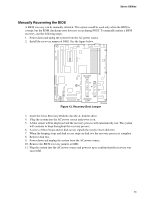
Server Utilities critical information regarding jumper settings, specific fixes, or other information to complete the upgrade. Preparing Media and Performing the BIOS Upgrade Floppy Update 1. Extract floppy.zip to a temporary folder off the root of the drive. 2. Insert blank floppy diskette in drive A: CAUTION All data on the floppy diskette will be destroyed! 3. From the root directory run MAKEFLPY.bat to create the two required BIOS update floppies. 4. Boot the system with the first BIOS update floppy. When prompted, insert the second BIOS update floppy to continue the BIOS update. 5. When BIOS flash update is complete, it will display a message that all writing and verification of flash is done. 6. Power cycle the system. 7. Press to enter BIOS Setup, and re-enter the custom values recorded earlier. Press to save the values and exit Setup. 8. In the unlikely event that a BIOS error occurs during the BIOS update process, see "Recovering the BIOS" for instructions on performing a BIOS recovery. Other Bootable Storage Update 1. Copy the afudos.exe, f.bat, fbb.bat, and the .ROM files to a bootable storage such as a USB DISK-ON-KEY. 2. Place the bootable storage such as USB DISK-ON-KEY containing the new BIOS into USB port of the system, and boot to pure DOS mode (non hi-mem or memory management environment). 3. Run fbb.bat (depending if the bootblock needs to be updated). fbb.bat updates both the system ROM and bootblock. ✏ NOTE If running fbb.bat / f.bat, jumper J1B1 (BIOS partition selection) should be set to pins 1-2 to select the correct BIOS partition. 4. When BIOS flash update is complete, it will display a message that all writing and verification of flash is done. Power-cycle the system. 5. As the system restarts, press to enter BIOS Setup, and re-enter the custom values you wrote down in step 3. 6. Press to save the values and exit Setup. 40
-
 1
1 -
2
-
3
-
4
-
5
-
6
-
7
-
8
-
9
-
10
-
11
-
12
-
13
-
14
-
15
-
16
-
17
-
18
-
19
-
20
-
21
-
22
-
23
-
24
-
25
-
26
-
27
-
28
-
29
-
30
-
31
-
32
-
33
-
34
-
 35
35 -
 36
36 -
 37
37 -
 38
38 -
 39
39 -
 40
40 -
 41
41 -
 42
42 -
 43
43 -
 44
44 -
 45
45 -
46
-
47
-
48
-
49
-
50
-
51
-
52
-
53
-
54
-
55
-
56
-
57
-
58
-
59
-
60
-
61
-
62
-
63
-
64
 |
 |
