Intel SR1600UR Quick Start Guide - Page 1
Intel SR1600UR - Server System - 0 MB RAM Manual
 |
UPC - 735858206723
View all Intel SR1600UR manuals
Add to My Manuals
Save this manual to your list of manuals |
Page 1 highlights
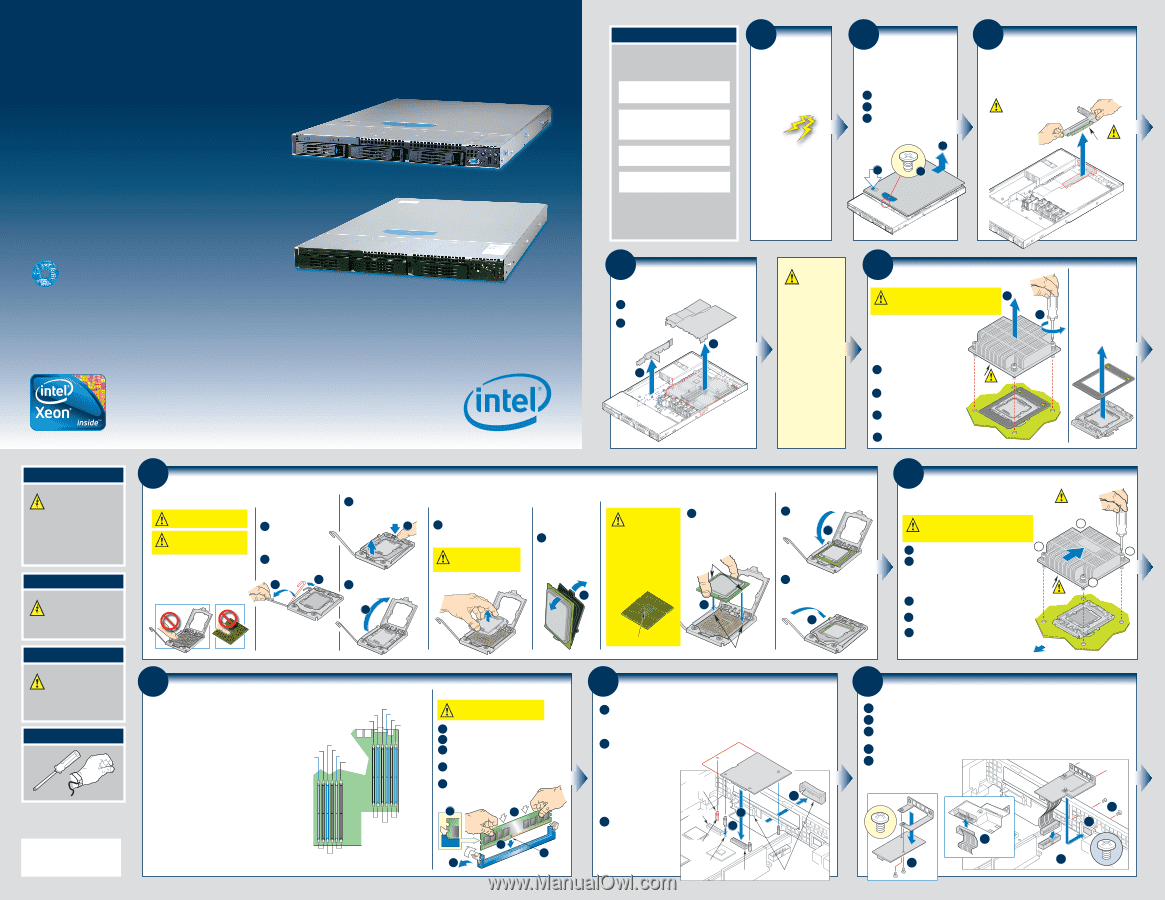
Intel® Server System SR1600UR Quick Start User's Guide Thank you for buying an Intel® Server System. The following information will help you assemble your Intel® Server System SR1600UR (both hot-swap and fixed drive systems) and install components. This guide and other supporting documents are located on the web at http://www.intel.com/p/en_US/support/highlights/server/s5520ur. If you are not familiar with ESD (Electrostatic Discharge) procedures used during system integration, please see the Intel® Server System SR1600UR Service Guide, available on the Intel® Server Deployment Toolkit CD or at http://www.intel.com/p/en_US/support/highlights/server/s5520ur. Please boot to the Intel® Server Deployment Toolkit CD first for BIOS and firmware configuration and updates. Read all cautions and warnings first before starting your server system integration. Hot-Swap Drive System Fixed Drive System Minimum Hardware Requirements To avoid integration difficulties and possible board damage, your system must meet the following minimum requirements: • Processor: Intel® Xeon® processor 5500 series with 2 MB cache support. • Memory Type: Minimum of one 512-MB, 240-pin DDR3 800/1066/1333-MT/s DIMMs. • Hard Disk Drives: SATA/SAS • Rack Mount Kit (EIA 310-D compliant) For a complete list of compatible processors and memory, see http://www.intel.com/p/en_US/ support/highlights/server/s5520ur 1 Preparing the Chassis Observe normal ESD (Electrostatic Discharge) procedures. Place your Intel® Server Chassis on a flat anti-static surface to perform the following integration procedures. Observe ESD procedures before reaching inside to make server board connections or install components. 2 Remove the Top Cover A Remove the security screw. B Depress the latch. C Slide cover back and lift upward. C B A 3 Remove Add-in Card Riser Assembly To remove the riser: Grasp the riser assembly with both hands and lift straight up. CAUTION: Place the riser assembly upside down to avoid damage to the riser card connector. Riser Card Connector 4 Remove Air Baffle and Processor Air Duct A Remove the air baffle. B Remove the processor air duct. Air Baffle AiPr rDouccetssor B A IMPORTANT! Before proceeding further, check your Intel® Server System for disconnected or loose cables and components that may have occurred during shipping. 5 Remove the Heatsink(s) CAUTION: The heatsink has thermal interface material (TIM) on the underside of it. Use caution so D that you do not damage the thermal interface material. Use gloves to avoid sharp edges. The heatsink is attached to the server board / processor socket with captive fasteners. Using a #2 Phillips* screwdriver, loosen the four screws located on the heatsink corners in a diagonal manner using the following procedure: A Using a #2 Phillips* screwdriver, start with screw 1 and loosen it by giving it two rotations and stop. (IMPORTANT: Do not fully loosen.) B Proceed to screw 2 and loosen it by giving it two rotations and stop. Similarly, loosen screws 3 and 4. C Repeat steps A and B by giving each screw two rotations each time until all screws are loosened. D Lift the heatsink straight up. TIM Discard to Install CPU A This Side Up Remove the Spacer IMPORTANT: This spacer must be removed and discarded before opening the socket to install the processor in Step 6. Discard to Install CPU This Side Up Warning Read all caution and safety statements in this document before performing any of the instructions. Also see the Intel® Server Board and Server Chassis Safety Information document at: http://www.intel.com/support/ motherboards/server/sb/cs-010770 .htm for complete safety information. Warning Installation and service of this product should only be performed by qualified service personnel to avoid risk of injury from electrical shock or energy hazard. Caution Observe normal ESD [Electrostatic Discharge] procedures during system integration to avoid possible damage to server board and/or other components. Tools Required Phillips* screwdriver Anti-static wrist strap Intel is a registered trademark of Intel Corporation or its subsidiaries in the United States and other countries. * Other names and brands may be claimed as the property of others. Copyright © 2011, Intel Corporation. All rights reserved. E52175-006 *E52175-006* 6 Install the Processor(s) Read all Cautions before proceeding. When opening a socket, DO NOT TOUCH the gold socket wires. When unpacking a processor, hold by the edges only to avoid touching the gold contact wires. NOTE: If you are only using one processor on your server board, install the processor on the CPU socket labeled 'CPU 1' on the server board. A. Open the Socket Lever A Push the lever handle down and away from the socket to release it. B Rotate the lever open all the way. B A B. Open the Load Plate A Push the rear tab with your finger tip to bring the front end of the load plate up slightly. A B Open the load plate as shown. B C. Remove the Socket Protective Cover A Grasp the socket protective cover by the two tabs and carefully lift straight up. To avoid damage, DO NOT DROP the cover onto the socket wires or components. Save the protective cover for future use. D. Remove the E. Install the Processor Processor Protective Cover A Take the processor out of the box and remove the protective shipping cover. CAUTION: The underside of the processor has components that may damage the socket wires if installed improperly. Processor must align correctly with the socket opening before installation. DO NOT DROP processor A into the socket! F. Close Load Plate and Socket Lever A Orient the processor with the socket such that the orientation notches on the processor align with the two orientation posts on the socket. Install the processor as shown. Orientation Notch A Close the load plate all the way as shown. A B Close the socket lever and ensure that the load plate tab engages under the socket A lever when fully closed. B Components Orientation Post 7 Install the Heatsink(s) IMPORTANT NOTE: This Intel® Server Chassis requires passive heatsinks. CAUTION: Do not over-tighten fasteners. CAUTION: The heatsink has thermal interface material (TIM) on the underside of it. Use caution so that you do not damage the thermal interface material. Use gloves to avoid sharp edges. A Remove the protective film on the TIM if present. 2 3 Air Flow 1 B Align heatsink fins to the front and back of the chassis for correct airflow. Airflow goes from front-to-back of chassis. Each heatsink has four captive fasteners and should be tightened in a 4 diagonal manner using the following procedure: C Using a #2 Phillips* screwdriver, start with screw 1 and engage screw TIM threads by giving it two rotations and stop. (Do not fully tighten.) D Proceed to screw 2 and engage screw threads by giving it two rotations and stop. Similarly, engage screws 3 and 4. E Repeat steps C and D by giving each screw until each screw is lightly tightened up to a 8 inch-lbs torque. Note: Heatsink styles may vary. two rotations maximum of each tiCmheassis Front 8 Install Memory DIMMs Memory Configurations and Population Order: For best performance, a minimum of three DIMMs per CPU is recommended. In a single-processor configuration, always populate A1 DIMM first. In a dual-processor configuration, always populate A1 DIMM first for CPU 1 and D1 DIMM first for CPU2. DIMM F2 DIMM F1 Note: For additional memory configurations, see the Service Guide on the Intel® Server Deployment Toolkit CD that accompanied your Intel® Server System SR1600UR, or go to: http://www.intel.com/p/en_US/support/highlights/server/s5520ur. DIMM A1 DIMM A2 DIMM E1 DIMM E2 DIMM D1 DIMM D2 DIMM B2 DIMM B1 DIMM C2 DIMM C1 CPU Socket 1 CPU Socket 2 Memory sizing and configuration is supported only for qualified DIMMs approved by Intel. For a list of supported memory, use the Server Configurator Tool available at: http://serverconfigurator.intel.com/default.aspx. Chan F Chan D Chan E Chan A Chan C Chan B To Install DIMMs: CAUTION: Avoid touching contacts when handling or installing DIMMs. A Open both DIMM socket levers. B Note location of alignment notch. C Insert DIMM making sure the connector edge of the DIMM aligns correctly with the slot. D Push down firmly on the DIMM until it snaps into place and both levers close. E IMPORTANT! Visually check that each latch is fully closed and correctly engaged with each DIMM edge slot. E D C B A 9 Install I/O Expansion Module (optional) A Squeeze the sides of the filler panel(s) to disengage it from the server system back panel and remove it. Note: If you are installing an I/O expansion module that uses only one slot, remove the filler panel only from the slot shown so that the module can be attached to I/O Connector 1; do not remove the filler panel from the other slot. B Install the standoffs to the server board by pressing into the holes as shown. Note: For the 1-socket module, install three standoffs as shown in gray. For the 2-socket module, also install the fourth standoff as shown in red. Fourth Standoff Position I/O Connector 2 C Position the module over the server board, fit the front of the module into the back panel slot(s), and then attach the module to the server board connector and engage the standoffs. Snap Standoff Standoff Hole I/2O-SEoxcpk.eMt odulIe/1O-SEoxcpk.eMt odule A C B I/O Connector 1 Filler Panels 10 Install Intel® Remote Management Module 3 (optional) A Squeeze the sides of the RMM3 filler panel to disengage it from the server system back panel and remove it. B Attach the RMM3 module bracket to the RMM3 module with two screws as shown. C Connect one end of the cable (labeled 'RMM3') to the RMM3 connector on the RMM3 module. Note that cable connectors are keyed and can only go in one way. D Connect the opposite end of the cable (labeled 'server board') to the RMM3 connector on the server board. E Attach the module bracket to the chassis with two screws as shown. Note that screws install from the back of the chassis. Bottom RMMR3MMMo3dMuloedule EE AA Top View B C D D RCMoMnRnC3MeocMnton3rector
-
 1
1
 |
 |