Invacare 1556922 Owners Manual 2 - Page 4
Installing the Hoist
 |
View all Invacare 1556922 manuals
Add to My Manuals
Save this manual to your list of manuals |
Page 4 highlights
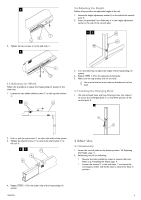
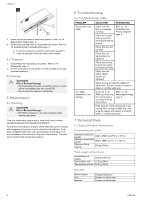
I-Transia™ 5. Open the legs of the second vertical pole module. 6. Raise the second vertical pole module B. 3.4 Installing the Hoist WARNING! - Before installing the hoist, read and understand the hoist user manual, part number 1183377. 1. Loosen the two screws H securing the end stop I to the rail E. 7. Lift the other end of the top bracket and rail module C and mount it on top of the vertical pole module C. The top bracket must be flush with the mark on the vertical pole G. 8. Lock the top bracket C to the vertical pole B with the locking arm D. 2. Remove the end stop from the rail. It may be necessary to tilt the end stop as you remove it from the rail. If the end stop cannot be tilted and removed, remove the two screws from the end stop. 3. Insert the hoist J into the rail E. 9. Lock the rail module E to the top bracket module C with the two yellow thumb screws F. 4. Mount the end stop I, making sure that the spring pin K is positioned in the pre-drilled hole L. The end stop may need to be tilted to enable mounting. If the screws were removed while removing the end stop, install the two screws after the end stop is in position. 4 1183379A
-
 1
1 -
 2
2 -
 3
3 -
 4
4 -
 5
5 -
 6
6 -
 7
7 -
 8
8
 |
 |
