JET Tools J-4002 User Manual - Page 11
Changing abrasive discs, Miter gauge, Motor Belt
 |
View all JET Tools J-4002 manuals
Add to My Manuals
Save this manual to your list of manuals |
Page 11 highlights
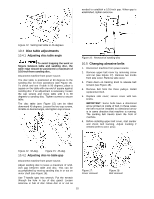
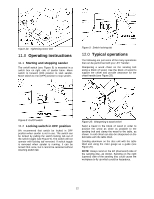
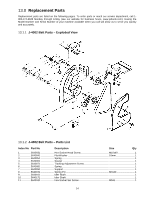
10.6 Changing abrasive discs 1. Disconnect machine from power source. 2. Remove screws and nuts from sanding disc table. Remove disc table. 3. Remove lower disc guard (see Figure 19). Figure 19: Figure 20: Lower guard removal Sanding disc removal 4. Loosen setscrew in hub of disc. Remove disc from motor shaft (see Figure 20). 5. Remove old abrasive disc by peeling it from sanding disc plate. 6. Clean disc plate thoroughly. Spray the face of the disc with 3M Super 77 adhesive (or equivalent). 7. Remove backing from new abrasive disc and press abrasive disc firmly onto disc plate (see Figure 21). Figure 22: Disc installation 9. Tighten setscrew in hub of disc plate. 10. Replace lower disc guard and sanding disc table. 10.7 Miter gauge A miter gauge (see Figure 23) is supplied with the sander. The miter gauge can be used on disc table or belt table. The miter gauge can be set anywhere up to 45 degrees right or left. Figure 21: Attaching sanding disc 8. Align keyway in disc hub with key on motor shaft (see Figure 22). Install disc plate on shaft. Position disc so that the face of disc with the attached abrasive protrudes slightly more than the edge of upper disc guard. Figure 23: Miter gauge (shown on disc table) Adjust the angle by loosening knob, rotating miter gauge to desired angle and retightening knob. 10.8 Motor Belt Disconnect machine from power source. If the motor belt becomes loose, the belt can be tightened by loosening the motor hold down nuts (see Figure 24). Slide motor to rear of sander to tighten belt. Hold motor in position and tighten the four hold down nuts. 11
-
 1
1 -
2
-
3
-
4
-
5
-
 6
6 -
 7
7 -
 8
8 -
 9
9 -
 10
10 -
 11
11 -
 12
12 -
 13
13 -
 14
14 -
 15
15 -
 16
16 -
17
-
18
-
19
-
20
 |
 |
