JVC CU-VD20U Instructions - Page 5
Connections, Connecting to the Camera, Connecting to PC
 |
UPC - 046838030000
View all JVC CU-VD20U manuals
Add to My Manuals
Save this manual to your list of manuals |
Page 5 highlights
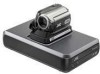
Connections AC Adapter (provided for the burner) B F Hard Disk Camera G D Power Cord (Provided) C To DC Connector H A USB Cable (Provided) Rear of burner To USB Connector AC Adapter (provided for the camera) E To AC Outlet Connecting to the Camera A Connect the AC adapter to the burner. B Connect the power cord to the AC adapter. C Connect the power cord to an AC outlet. D Connect the provided USB cable to the USB connector of the burner. E Connect the camera to an AC outlet. (੬ Refer to the instruction manual for the camera.) F Turn on the camera. G Press the power button (C/B) on the front to turn on the burner. The power lamp lights in green. H Connect the provided USB cable to the USB connector of the camera. NOTES: ● Insert a disc after [INSERT DISC] is displayed on the camera. ● Be sure to use the provided USB cable to connect the burner and the camera. ● When using a camera, make sure the power is provided with the AC adapter, not the battery. ● Do not subject the camera or burner to vibration or mechanical shock while writing to a disc. Be especially careful if the camera is placed on the burner during writing. ● Refer to "Dubbing Video Files To DVD Discs" in the manual for writing discs. ● The DVD discs that are written with this unit cannot be played with some DVD recorders/players. In that case, use [PLAY DVD] of the camera to playback discs. Connecting to PC A Connect the AC adapter to the burner. B Connect the power cord to the AC adapter. C Connect the power cord to an AC outlet. D Press the power button (C/B) on the front to turn on the burner. The power lamp lights in green. E Turn on the PC. F Connect the burner to the PC with the USB cable. NOTE: To connect the burner to a PC, use the USB cable provided with the camera. Power Cord AC Adapter (provided for the burner) USB Cable (provided for the camera) EN 5
-
 1
1 -
 2
2 -
 3
3 -
 4
4 -
 5
5 -
 6
6 -
 7
7 -
 8
8 -
 9
9 -
 10
10 -
 11
11 -
12
-
13
-
14
-
15
-
16
-
17
-
18
-
19
-
20
-
21
-
22
-
23
-
24
-
25
-
26
-
27
-
28
-
29
-
30
-
31
-
32
-
33
-
34
-
35
-
36
-
37
-
38
-
39
-
40
-
41
-
42
-
43
-
44
-
45
-
46
-
47
-
48
-
49
-
50
-
51
-
52
-
53
-
54
-
55
-
56
-
57
-
58
-
59
-
60
-
61
-
62
-
63
-
64
-
65
-
66
-
67
-
68
-
69
-
70
-
71
-
72
-
73
-
74
-
75
-
76
-
77
-
78
-
79
-
80
-
81
-
82
-
83
-
84
-
85
-
86
-
87
-
88
-
89
-
90
-
91
-
92
-
93
-
94
-
95
-
96
-
97
-
98
-
99
-
100
-
101
-
102
-
103
-
104
-
105
-
106
-
107
-
108
-
109
-
110
-
111
-
112
-
113
-
114
-
115
-
116
-
117
-
118
-
119
-
120
-
121
-
122
-
123
-
124
-
125
-
126
-
127
-
128
 |
 |
