JVC DLA-NX9 Operation Manual 1 - Page 8

Contents

Page 8 highlights

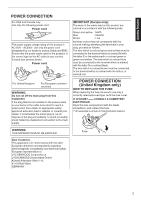
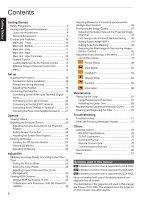
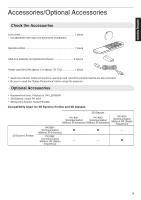
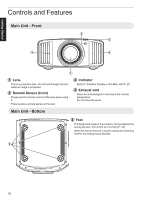
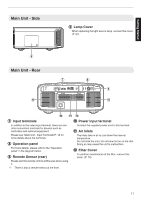
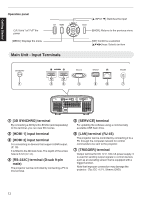
Contents Getting Started Getting Started Safety Precautions 2 Accessories/Optional Accessories 9 Check the Accessories 9 Optional Accessories 9 Controls and Features 10 Main Unit - Front 10 Main Unit - Bottom 10 Main Unit - Side 11 Main Unit - Rear 11 Main Unit - Input Terminals 12 Remote Control 13 Loading Batteries into the Remote Control ........ 14 Effective Range of Remote Control Unit 14 Menu 15 Set up Installing the Projector 16 Precautions during Installation 16 Precautions during Mounting 17 Adjusting the Position 18 Connecting the Projector 19 Connecting to the HDMI Input Terminal (Digital Input 19 Connecting to the LAN Terminal 20 Connecting to the RS-232C Terminal 20 Connecting to the TRIGGER Terminal 21 Connecting the Power Cord (Supplied Accessory) ...... 21 Operate Viewing Videos 22 Adjusting the Projector Screen 24 Adjusting the Lens According to the Projection Position 24 Setting Screen Correction 25 Adjusting the Screen Size (Aspect 26 Viewing 3D Movies 27 Installing the 3D Synchro Emitter 27 Viewing 3D Movies 28 Adjusting 3D Movies 28 Adjust/Set Selecting an Image Quality According to the Video Type 29 Setting the Picture Mode 29 Setting the Color Profile 30 Adjusting to your Preferred Color (Color Management 32 Viewing HDR Contents 33 Original HDR Technology of JVC 33 Collaboration with Panasonic UHD BD Player DPUB9000 35 8 Adjusting Movies for Increased Expressiveness (Multiple Pixel Control 36 Fine-tuning the Image Quality 37 Adjusting the Output Value of the Projected Image (Gamma 37 Fine-tuning to the Preferred Gamma Setting ..... 39 Setting Frame Adapt HDR*1 41 Setting Auto Tone Mapping 43 Reducing the After-image of Fast-moving Images (Motion Control 45 Adjustments and Settings in the Menu 47 List of Menu Items 47 Picture Adjust 49 Input Signal 54 Installation 56 Display Setup 63 Function 64 Information 66 Maintenance Replacing the Lamp 67 Lamp Replacement Procedure 67 Resetting the Lamp Time 69 Maintaining the Cabinet and Remote Control ........ 70 Cleaning and Replacing the Filter 70 Troubleshooting Troubleshooting 71 When the Following Messages Appear 75 Others External Control 76 RS-232C Specifications 76 TCP/IP Connection 76 Command Format 77 Remote Control Code 78 Communications Example 79 Specifications 80 Index 91 Symbols used in this manual k indicates a function that is supported by DLA-NX9. l indicates a function that is supported by DLA-NX7. m indicates a function that is supported by DLA-NX5. Items not marked with any of the above symbols are supported by all models. The illustrations of the projector unit used in this manual are those of DLA-NX9. The appearance of the projector of other models may differ slightly.

  • 1
  • 2
  • 3
  • 4
  • 5
  • 6
  • 7
  • 8
  • 9
  • 10
  • 11
  • 12
  • 13
  • 14
  • 15
  • 16
  • 17
  • 18
  • 19
  • 20
  • 21
  • 22
  • 23
  • 24
  • 25
  • 26
  • 27
  • 28
  • 29
  • 30
  • 31
  • 32
  • 33
  • 34
  • 35
  • 36
  • 37
  • 38
  • 39
  • 40
  • 41
  • 42
  • 43
  • 44
  • 45
  • 46
  • 47
  • 48
  • 49
  • 50
  • 51
  • 52
  • 53
  • 54
  • 55
  • 56
  • 57
  • 58
  • 59
  • 60
  • 61
  • 62
  • 63
  • 64
  • 65
  • 66
  • 67
  • 68
  • 69
  • 70
  • 71
  • 72
  • 73
  • 74
  • 75
  • 76
  • 77
  • 78
  • 79
  • 80
  • 81
  • 82
  • 83
  • 84
  • 85
  • 86
  • 87
  • 88
  • 89
  • 90
  • 91
  • 92
  • 93
  • 94

Contents
Getting Started
Safety Precautions
..................................................
2
Accessories/Optional Accessories
..........................
9
Check the Accessories
........................................
9
Optional Accessories
...........................................
9
Controls and Features
...........................................
10
Main Unit - Front
................................................
10
Main Unit - Bottom
.............................................
10
Main Unit - Side
.................................................
11
Main Unit - Rear
.................................................
11
Main Unit - Input Terminals
................................
12
Remote Control
.................................................
13
Loading Batteries into the Remote Control
........
14
Effective Range of Remote Control Unit
............
14
Menu
.................................................................
15
Set up
Installing the Projector
...........................................
16
Precautions during Installation
...........................
16
Precautions during Mounting
.............................
17
Adjusting the Position
........................................
18
Connecting the Projector
.......................................
19
Connecting to the HDMI Input Terminal (Digital
Input)
.................................................................
19
Connecting to the LAN Terminal
........................
20
Connecting to the RS-232C Terminal
................
20
Connecting to the TRIGGER Terminal
...............
21
Connecting the Power Cord (Supplied Accessory)
......
21
Operate
Viewing Videos
......................................................
22
Adjusting the Projector Screen
..............................
24
Adjusting the Lens According to the Projection
Position
..............................................................
24
Setting Screen Correction
..................................
25
Adjusting the Screen Size (Aspect)
...................
26
Viewing 3D Movies
................................................
27
Installing the 3D Synchro Emitter
.......................
27
Viewing 3D Movies
............................................
28
Adjusting 3D Movies
..........................................
28
Adjust/Set
Selecting an Image Quality According to the Video
Type
......................................................................
29
Setting the Picture Mode
...................................
29
Setting the Color Profile
.....................................
30
Adjusting to your Preferred Color (Color
Management)
....................................................
32
Viewing HDR Contents
..........................................
33
Original HDR Technology of JVC
......................
33
Collaboration with Panasonic UHD BD Player DP-
UB9000
.............................................................
35
Adjusting Movies for Increased Expressiveness
(Multiple Pixel Control)
..........................................
36
Fine-tuning the Image Quality
...............................
37
Adjusting the Output Value of the Projected Image
(Gamma)
...........................................................
37
Fine-tuning to the Preferred Gamma Setting
.....
39
Setting Frame Adapt HDR*1
..............................
41
Setting Auto Tone Mapping
...............................
43
Reducing the After-image of Fast-moving Images
(Motion Control)
.................................................
45
Adjustments and Settings in the Menu
..................
47
List of Menu Items
.............................................
47
Picture Adjust
...........................................
49
Input Signal
...............................................
54
Installation
................................................
56
Display Setup
...........................................
63
Function
....................................................
64
Information
................................................
66
Maintenance
Replacing the Lamp
..............................................
67
Lamp Replacement Procedure
..........................
67
Resetting the Lamp Time
...................................
69
Maintaining the Cabinet and Remote Control
........
70
Cleaning and Replacing the Filter
.........................
70
Troubleshooting
Troubleshooting
....................................................
71
When the Following Messages Appear...
..............
75
Others
External Control
....................................................
76
RS-232C Specifications
.....................................
76
TCP/IP Connection
............................................
76
Command Format
..............................................
77
Remote Control Code
........................................
78
Communications Example
.................................
79
Specifications
........................................................
80
Index
.....................................................................
91
Symbols used in this manual
k
indicates a function that is supported by DLA-NX9.
l
indicates a function that is supported by DLA-NX7.
m
indicates a function that is supported by DLA-NX5.
Items not marked with any of the above symbols are
supported by all models.
The illustrations of the projector unit used in this manual
are those of DLA-NX9. The appearance of the projector
of other models may differ slightly.
8
Getting Started