JVC DZ-VCA3U DZ-VCA3U 24-page Instruction Manual - Page 18
Basic operation Continued
 |
View all JVC DZ-VCA3U manuals
Add to My Manuals
Save this manual to your list of manuals |
Page 18 highlights
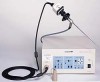
Basic operation (Continued) Mark (Red) Connector Connector Cap Camera head CAMERA CAMERA OUTPUT LEVEL AUTO MANUAL WHITE BALANCE MENU SETTING AUTO SETTING MANUAL ON OFF ADJUST GAIN SHUTTER RED BLUE ENHANCE FREEZE BAR POWER ON I OFF O CCU Camera control unit DZ-VCA3U Operation of Micro HD camera Check system operation according to the following procedures. 1. Insert the camera connector while aligning it to the red mark as shown on the left figure. When cap is connected to the camera connector: Turn the cap counterclockwise to remove it. 2. Connect the endoscope adapter to the C mount of camera head. 3. Connect the power plug directly to the wall outlet of the operating room. 4. When operating this system, set the switches on the CCU panel as follows: 1) OUTPUT LEVEL : [AUTO] 2) WHITE BALANCE : [AUTO] 3) MENU SETTING : [OFF] 5. Switch on the CCU. 6. Adjust the white balance. SR-W7MAU (W-VHS) (Optional) MUTING VOLUME UNDER DEGAUSS SCAN PULSE CROSS COLOR OFF MENU SCREENS ASPECT AREA CHECK MARKER SLOT 1 SLOT 2 SLOT 3 A B C D E F INPUT SELECT POWER DT-V1900CGU (Optional) Isolation transformer AA-V31U (Optional) AC 120V System operation Check system operation according to the following procedures. 1. Insert the camera connector while aligning it to the red mark as shown on the left figure. When cap is connected to the camera connector: Turn the cap counterclockwise to remove it. 2. When the camera is used as a system, connect the power plugs of the camera and other equipments to the isolation transformer AA-V31U. 3. Switch on isolation transformer AA-V31U power switch. 4. Switch on W-VHS power. Insert W-VHS tape, and make sure that it can record. 5. Switch on the power of monitor. At CCU front panel mode selection, set it to "Camera". Then check that picture taken by camera can be displayed on the monitor. 6. Operate each device according to its operating procedure. Note : Consult JVC service personnel or authorized dealer when connecting the system for the first time. Do not disconnect, or modify the connection by yourself. 18
-
 1
1 -
2
-
3
-
4
-
5
-
6
-
7
-
8
-
9
-
10
-
11
-
12
-
 13
13 -
 14
14 -
 15
15 -
 16
16 -
 17
17 -
 18
18 -
 19
19 -
 20
20 -
 21
21 -
 22
22 -
 23
23 -
24
 |
 |
