JVC GR-SX851U Instruction Manual - Page 9
Using The Battery Pack, Using Ac Power, Using A Car Battery - manual
 |
UPC - 046838158049
View all JVC GR-SX851U manuals
Add to My Manuals
Save this manual to your list of manuals |
Page 9 highlights
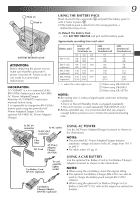
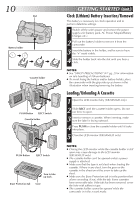
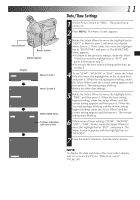
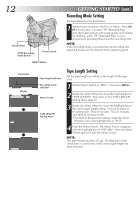
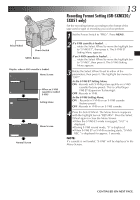
A Hook on. B Push in. BATTERY RELEASE Switch ATTENTION: Before detaching the power source, make sure that the camcorder's power is turned off. Failure to do so can result in a camcorder malfunction. INFORMATION: VU-V856KIT is a set composed of the BN-V856U battery pack and AA-V80U AC Power Adapter/Charger. Read the VU-V856KIT's instruction manuals before using. It is impossible to charge the BN-V856U battery pack using the provided AC Power Adapter/Charger. Use the optional AA-V80U AC Power Adapter/ Charger. 9 EN USING THE BATTERY PACK Hook its end to the camcorder and push the battery pack in until it locks in place . •If the battery pack is attached in the wrong position, a malfunction may occur. To Detach The Battery Pack . . . .... slide BATTERY RELEASE and pull out the battery pack. Approximate recording time (unit: min.) Battery pack LCD monitor off/ Viewfinder on 12 3 LCD monitor on/ Viewfinder off 1 LCD monitor on/ Viewfinder on 1 BN-V11U 90 105 100 (45) (50) BN-V12U (optional) 90 105 100 (45) (50) BN-V20U (optional) 140 170 165 (65) (90) BN-V856U 570 670 670 (optional) (330) (360) 80 (45) 80 (45) 130 (75) 520 (310) 70 (40) 70 (40) 115 (70) 460 (290) ( ) : when the video light is on. 1 When using GR-SXM320 2 When using GR-SX851 3 When using GR-AX750 NOTES: ● Recording time is reduced significantly under the following conditions: •Zoom or Record-Standby mode is engaged repeatedly. •The LCD monitor is used repeatedly (GR-SXM320 only). ● Before extended use, it is recommended that you prepare enough battery packs to cover 3 times the planned shooting time. To DC IN connector To AC outlet To DC OUT connector Core filter DC Cord AC Power Adapter/ Charger AA-V16U Car Battery Cord AP-V7U (optional) To car's cigarette lighter socket Car Battery Charger/Adapter BH-V3U (optional) USING AC POWER Use the AC Power Adapter/Charger (connect as shown in the illustration). NOTES: ● The provided AC Power Adapter/Charger features automatic voltage selection in the AC range from 110 V to 240 V. ● For other notes, ੬ pg. 8. USING A CAR BATTERY Use the optional Car Battery Cord or Car Battery Charger/ Adapter (connect as shown in the illustration). NOTES: ● When using the car battery, leave the engine idling. ● The optional Car Battery Charger (BH-V3U) can also be used to charge the battery pack (except BN-V20U/ V856U). ● When using the optional Car Battery Charger or Car Battery Cord (AP-V7U), refer to the respective instruction booklet.
-
 1
1 -
2
-
3
-
 4
4 -
 5
5 -
 6
6 -
 7
7 -
 8
8 -
 9
9 -
 10
10 -
 11
11 -
 12
12 -
 13
13 -
 14
14 -
15
-
16
-
17
-
18
-
19
-
20
-
21
-
22
-
23
-
24
-
25
-
26
-
27
-
28
-
29
-
30
-
31
-
32
-
33
-
34
-
35
-
36
-
37
-
38
-
39
-
40
-
41
-
42
-
43
-
44
-
45
-
46
-
47
-
48
-
49
-
50
-
51
-
52
-
53
-
54
-
55
-
56
 |
 |
