JVC GRAX890 Instructions - Page 7
Store Battery
 |
UPC - 046838010316
View all JVC GRAX890 manuals
Add to My Manuals
Save this manual to your list of manuals |
Page 7 highlights
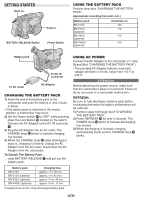
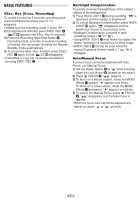
STORE BATTERY: Be sure to fully discharge a battery pack by performing the following steps before storing it for a long period of time, otherwise the battery performance will be reduced. 1) Attach the battery to the camcorder with no cassette inserted. 2) Set the Power Switch ! to " " or " " while pressing down the Lock Button 0 located on the switch. • During charging or discharging, the camcorder cannot be operated. • Charging and discharging is not possible if the wrong type of battery is used. • When charging the battery pack for the first time or after a long storage period, the CHARGE lamp * may not light. Remove the battery pack from the camcorder, then try charging again. • If a fully-charged battery's operation time remains extremely short, the battery is worn out. Please purchase a new one. • Perform charging where the temperature is between 10°C and 35°C (50°F and 95°F). 20°C to 25°C (68°F to 77°F) is the ideal temperature range for charging. If the environment is too cold, charging may be incomplete. • Charging time varies according to the ambient temperature and the status of the battery pack. • Since the AC Adapter processes electricity internally, it becomes warm during use. Be sure to use it only in well-ventilated areas. • The following operation stops charging or discharging: • Set the Power Switch ! to "PLAY", " " or " ". • Disconnect the AC Adapter from the camcorder. • Unplug the AC Adapter's power cord from the AC outlet. • Detach the battery from the camcorder. • Using the optional AA-V15 AC Power Adapter/ Charger, you can charge the BN-V10U/V12U/ V20U/V400U battery pack without the camcorder. However, it cannot be used as an AC adapter. • To avoid interference with reception, do not use the AC Adapter near a radio. • Recording time is reduced significantly when Zoom or Record-Standby mode is engaged repeatedly. • Before extended use, it is recommended that you prepare enough battery packs to cover 3 times the planned shooting time. Date/Time Settings 1) Set the Power Switch ! to " " while pressing down the Lock Button 0 located on the switch. 2) Press the MENU Wheel 1 in. The Menu Screen appears. 3) Rotate the MENU Wheel 1 to select "BTO SYSTEM MENU" and press it to display SYSTEM MENU. Rotate the MENU Wheel 1 to select "BNEXT" and press it to display the next page. 4) Rotate the MENU Wheel 1 to select "DATE/ TIME" and press it. The DATE/TIME Menu appears. 5) To set "YEAR", "MONTH", "DAY" or "TIME" (hour/minute), rotate the MENU Wheel 1 to select the desired item, and press it. When the setting begins blinking, rotate the MENU Wheel 1 until the correct setting appears and then press it. The setting stops blinking. 6) When none of these settings ("YEAR", "MONTH", "DAY", "TIME") blinks, rotate the MENU Wheel 1 to select "BEXIT", and press it. The Menu Screen reappears with the highlight bar on "BRETURN". 7) Press the MENU Wheel 1 in to close the Menu Screen. • To display the date and time in the camcorder's display and on a connected TV, see DATE/TIME DISP. (੬ pg. 20) in SYSTEM MENU. • The date/time cannot be stored in memory if the built-in clock battery runs out. Consult an authorized JVC dealer for replacement, or set the date/time as necessary before you start shooting. 1 ! 0 DAT E T I ME YEAR MON T H DAY T I ME 2003 J UN 28 PM 8 : 2 0 12-hour indication with AM or PM BE X I T 7
-
 1
1 -
 2
2 -
 3
3 -
 4
4 -
 5
5 -
 6
6 -
 7
7 -
 8
8 -
 9
9 -
 10
10 -
 11
11 -
 12
12 -
13
-
14
-
15
-
16
-
17
-
18
-
19
-
20
-
21
-
22
-
23
-
24
-
25
-
26
-
27
-
28
-
29
-
30
-
31
-
32
 |
 |
