JVC GZ-E200 Basic User Guide - Page 6
Inserting an SD Card, Using the Icon Buttons/Thumbnails - user guide
 |
View all JVC GZ-E200 manuals
Add to My Manuals
Save this manual to your list of manuals |
Page 6 highlights
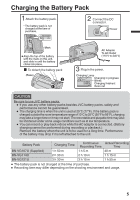
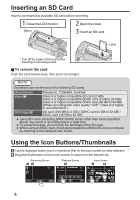
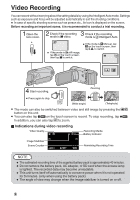
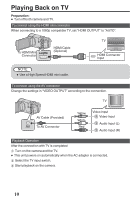
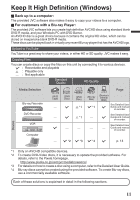
Inserting an SD Card Insert a commercially available SD card before recording. Close the LCD monitor. (Base) Open the cover. Insert an SD card. Label .. Turn off the power of this unit before inserting or removing a card. o To remove the card Push the card inward once, then pull it out straight. NOTE Operations are confirmed on the following SD cards. Manufacturer Panasonic, TOSHIBA, SanDisk Video A Class 4 or higher compatible SD card (2 GB)/ Class 4 or higher compatible SDHC card (4 GB to 32 GB)/ Class 4 or higher compatible SDXC card (48 GB to 64 GB) (When recording with video quality "UXP", Class 6 or higher is recommended.) Still Image B SD card (256 MB to 2 GB) / SDHC card (4 GB to 32 GB) / SDXC card (48 GB to 64 GB) 0 Using SD cards (including SDHC/SDXC cards) other than those specified above may result in recording failure or data loss. 0 To protect the data, do not touch the terminals of the SD card. 0 When using an SDXC card, check its compatibility with the OS of your computer by referring to the Detailed User Guide. Using the Icon Buttons/Thumbnails A Tap the displayed button (icon) or thumbnail (file) on the touch screen to make selection. B Drag the thumbnails on the touch screen to search for the desired file. Recording Screen Playback Screen Index Screen 0:01:23 0:12:34 ˻PLAY REC 4 MENU ˻REC 6 MENU ˻REC
-
 1
1 -
 2
2 -
 3
3 -
 4
4 -
 5
5 -
 6
6 -
 7
7 -
 8
8 -
 9
9 -
 10
10 -
 11
11 -
 12
12 -
13
-
14
-
15
-
16
-
17
-
18
-
19
-
20
-
21
-
22
-
23
-
24
-
25
-
26
-
27
-
28
-
29
-
30
-
31
-
32
-
33
-
34
-
35
-
36
-
37
-
38
-
39
-
40
-
41
-
42
-
43
-
44
-
45
-
46
-
47
-
48
-
49
-
50
-
51
-
52
-
53
-
54
-
55
-
56
-
57
-
58
-
59
-
60
 |
 |
