JVC GZ HD5 Easy Start Guide - Page 2
Using the Slider and Operation Buttons - software
 |
UPC - 046838033490
View all JVC GZ HD5 manuals
Add to My Manuals
Save this manual to your list of manuals |
Page 2 highlights
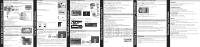
Using the Slider and Operation Buttons How to Install Software File Backup to Computer Uploading Videos to YouTube™ Uploading Videos to iTunes® (GZ-HD620) Recording Techniques PLAYBACK ON A TV (CONT.) -To connect using the COMPONENT/AV connector • Change the settings in [COMPONENT OUTPUT]/[VIDEO OUTPUT] according to the connection. To AC Outlet To DC Terminal AV AV COMPONENT To COMPONENT Terminal Component Cable (Provided for GZ-HD620 only) To AV Terminal Do not connect the yellow plug when using component cable. AV Cable (Provided) -Playback Operation After the connection with TV is completed 2 Turn on the camera and the TV. 3 Select the TV input switch. 4 Start playback on the camera. TV Component Video Input Y CB/PB CR/PR Video Input Video Input Audio Input (L) Audio Input (R) USING THE OPERATION BUTTONS A To select an Operation icon appearing on the left side, touch the portion of the Slider next A to Operation icon. B To select an Operation icon appearing at the bottom of the screen, touch the buttons underneath them. B OK MENU CHANGING MENU SETTINGS Select an item from the menu screen. 2 Touch the D button. 3 Slide your finger up and down on the Slider. 2 Select VIDEO REGISTER EVENT VIDEO QUALITY ZOOM GAIN UP TIME-LAPSE RECORDING SET ? QUIT 4 Touch the C button. 3 Touch 1 Touch PC USERS Preparation: • Load the provided CD-ROM into the PC. • In Windows Vista, the auto play dialog box appears. 2 Click [Easy Installation]. Follow the on-screen instructions. 3 Click [Next]. 4 Click [Finish]. • Everio MediaBrowser icons are created on the desktop. Mac USERS • You may use the software supplied with the Mac Computer to view and edit files from the Everio Camera. • Connect the Everio Camera to the Mac Computer using a USB Cable. Note: Files must be transferred to the Mac Computer for editing. USB jack iMovie and iPhoto To USB port You can import files from this unit to a PC using Apple's iMovie '09 (video) or iPhoto (still image). To verify the system requirements, select "About This Mac" from the Apple menu. You can determine the operating system version, processor and amount of memory. Note: • For the latest information on iMovie or iPhoto, refer to the Apple website. • For details on how to use iMovie or iPhoto, refer to the help file of the respective software. • There is no guarantee that the operations will work with all computer environments. FILE BACKUP (Windows PC) Preparation: • Install the Everio MediaBrowser software onto the PC. • Make sure that enough space is left in the PC's HDD. • Close the LCD monitor to turn off the camera. • Connect the camera to the PC with the USB cable. 2 Open the LCD monitor to turn on the camera. 3 Select [BACK UP] on the Camera. Everio MediaBrowser starts on the PC. USB MENU CREATE DISC DIRECT DISC UPLOAD EXPORT TO LIBRARY BACK UP SET ? QUIT To USB Terminal To DC Terminal USB Cable (Provided) AC Adapter To AC Outlet (110V to 240V) 4 Click [All volume in camcorder] and click [Next]. 5 Click [Start]. The Backup starts. Saving destination (PC) To USB Terminal 1 Click 2 Click Click FILE BACKUP (Mac Computer) Preparation: • Make sure that enough space is left in the Mac's HDD. • Close the LCD Monitor to turn off the camera. • Connect the camera to the Mac Computer with the USB cable. 2 Open the LCD monitor to turn on the camera. 3 Select [PLAYBACK ON PC] on the Camera. USB MENU PLAYBACK ON PC CREATE DISC DIRECT DISC UPLOAD EXPORT TO LIBRARY SET ? QUIT USB jack To USB port 4 Copy and Paste the files to the Mac Computer for backup. HOW TO RECORD A FILE (VIDEO CLIP) FOR YouTube™ 2 Press the L button to select the recording mode. 3 Press the A /B button to select the video mode. 4 Press the UPLOAD/EXPORT* button to display the UPLOAD SHOOTING/ EXPORT SHOOTING* menu. 5 Select [UPLOAD SHOOTING] and touch the C button. • The mode switches between ON and OFF with every touch. • After setting, touch the J button. 6 Press the START/STOP button to start recording. • Recording stops automatically after 10 minutes. HOW TO UPLOAD A FILE(VIDEO CLIP) TO YouTube™ (Windows PC only) Uploading Videos You can upload your videos to YouTube™ using the provided software "Everio MediaBrowser". Install the software on your PC and connect this unit to the PC. • For details on how to use the software, refer to the help file. "Installing the Provided Software" "Connecting this Unit to PC" Trouble with Uploading Videos • Check if you have created an account with YouTube™. Trouble with Using the Provided Software Everio MediaBrowser Consult the customer service center below. • Pixela User Support Center Region USA and Canada Europe (UK, Germany, France, and Spain) Other Countries in Europe Asia (Philippines) Language English English/German/ French/Spanish English/German/ French/Spanish English Phone # +1-800-458-4029 (toll-free) +800-1532-4865 (toll-free) +44-1489-564-764 +63-2-438-0090 China Chinese 10800-163-0014 (toll-free) • For details on how to upload to YouTube™ or transfer files to iTunes®*, refer to "MediaBrowser Help". * GZ-HD620 HOW TO RECORD A FILE FOR iTunes® 2 Press the L button to select the recording mode. 3 Press the A /B button to select the video mode. 4 Press the UPLOAD/EXPORT button to display the UPLOAD SHOOTING/EXPORT SHOOTING menu. 5 Select [EXPORT SHOOTING] and touch the C button. UPLOAD SHOOTING EXPORT SHOOTING SORT OK MENU • The mode switches between ON and OFF with every touch. • After setting, touch the J button. 6 Press the START/STOP button to start recording. HOW TO TRANSFER FILES TO iTunes® (Windows PC only) You can export videos to iTunes® using the provided software "Everio MediaBrowser". Install the software on your PC and connect this unit to the PC. • For details on how to use the software, refer to the help file. • For details on transferring files to iPod, refer to the help file of iTunes®. Trouble with Exporting Files to iTunes® • Refer to "Q&A", "Latest Information", "Download Information", etc. in "Click for Latest Product Info" in the help file of the provided Everio MediaBrowser software. Trouble with Using the Provided Software Everio MediaBrowser • Consult the customer service center on previous page. TRADEMARK • Windows® is either registered trademark or trademark of Microsoft Corporation in the United States and/or other countries. • Macintosh is a registered trademark of Apple Inc. • iTunes, iMovie, iPhoto are trademarks of Apple Inc., registered in the U.S. and other countries. • YouTube and the YouTube logo are trademarks and/or registered trademarks of YouTube LLC. Preparation - Always check available memory space and battery power in advance. - Make sure your battery is fully charged. - A spare battery may be useful. Stabilizing Your Picture Try these tips to improve the image: - Look for a place to sit down and take your video. - Look for something you can set your camera on. - Consider using a tripod or a monopod to further steady your video. Camera Movement The most enjoyable and professional looking videos generally have very little camera movement - Treat all movements as a special effect. - If you must move the camera, do it slowly. Zooming As a general rule, your video will look better if you zoom the lens before you start your recording: - Focus on the subject first, then begin recording. - If you must zoom during a recording, treat it as a special effect and zoom slowly. Exposure - Remember to shoot with the sun or the primary light source behind you. - Keeping the range of contrast in your scene to a reasonable level is the easiest way to improve the picture quality. - Pay special attention to objects in the LCD screen that appear very washed out or over exposed. - Making a simple change in how the camera is aimed or by zooming in slightly, you may reduce contrast to a reasonable range. Length of Recording Many recordings are ruined by stopping the recording too soon and missing the best moment: - Always try for at least a 10 second recording. - When in doubt, let the recording continue longer. - It is much easier to edit unneeded material later.
-
 1
1 -
 2
2
 |
 |