JVC GZ-HM960BUS Easy Start Guide - Page 1
JVC GZ-HM960BUS Manual
 |
View all JVC GZ-HM960BUS manuals
Add to My Manuals
Save this manual to your list of manuals |
Page 1 highlights
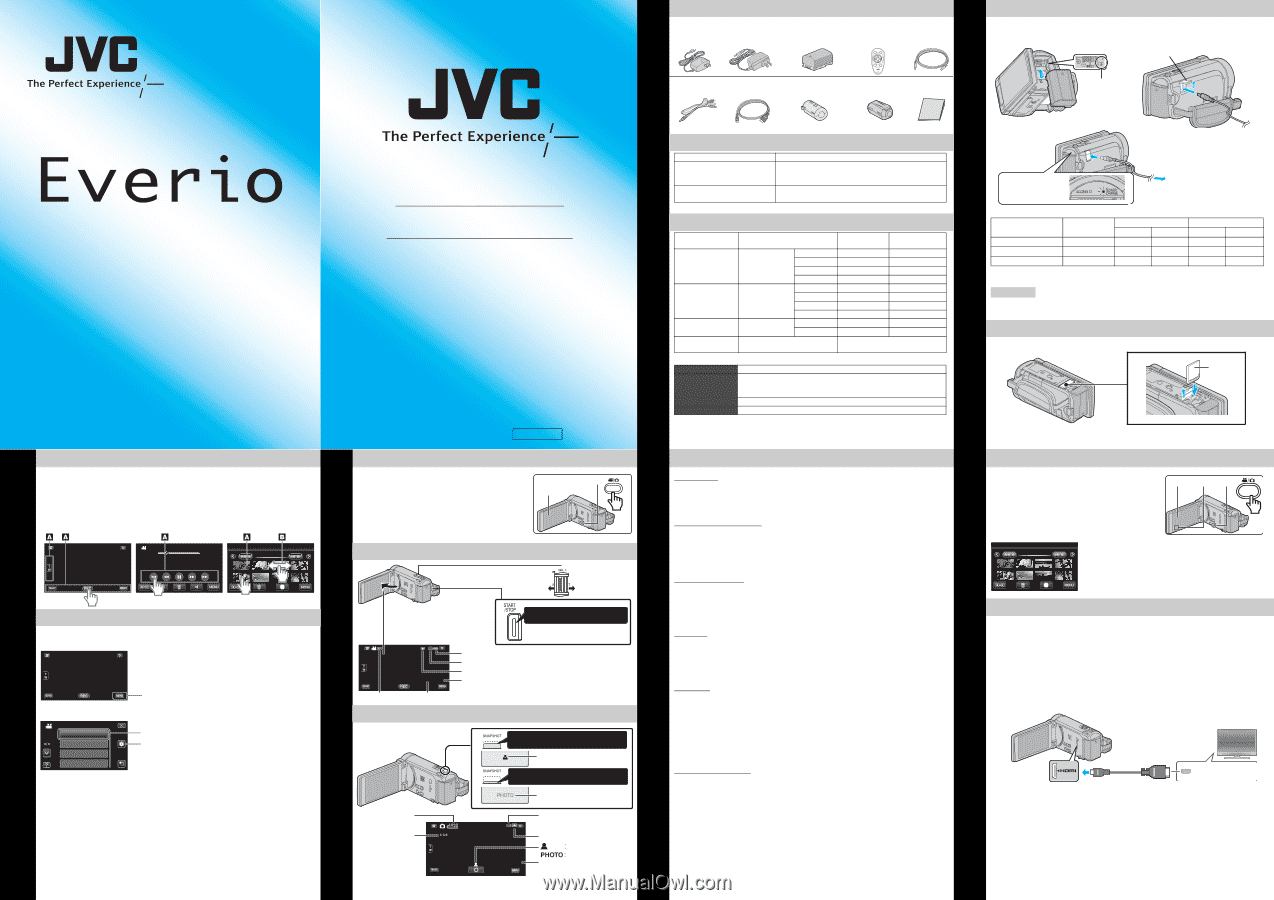
Using the Touch Screen LYT2313-002A-M Easy Start Guide This easy start guide is designed to navigate you to using your new Everio quickly. Please refer to the owner's manual for a detailed listing of features. For more details on operating this product, please refer to the "Detailed User Guide" at the following website: http://manual.jvc.co.jp/index.html/ For additional online video tutorials, please visit: http://camcorder.jvc.com/tutorials.jsp USING THE ICON BUTTONS/THUMBNAILS There are two ways to operate the touch screen, namely "tap" and "drag". The following are some examples. A Tap the displayed button (icon) or thumbnail (file) on the touch screen to make selection. B Drag the thumbnails on the touch screen to search for the desired file. Example: Recording Screen Playback Screen Index Playback Screen 00:01:23 00:12:34 2011 CHANGING MENU SETTINGS Select an item from the menu screen. A Tap MENU on the touch screen to display the main menu. Tap B Tap the desired selection on the touch screen. • Tap ∧ or ∨ to scroll the pages. VIDEO SCENE SELECT FOCUS FOCUS ASSIST Tap Common (Q) menu FOCUS ASSIST COLOR • Selections are also available in the Common (Q) menu. Recording Files For more details on operating this product, please refer to the "Detailed User Guide" at the following website: http://manual.jvc.co.jp/index.html/ For additional online video tutorials, please visit: http://camcorder.jvc.com/tutorials.jsp Customer Care Center TOLL FREE 1-800-252-5722 Register your EVERIO online at: REGISTER.JVC.COM and receive a special offer. JVC U.S.A. A Division of JVC Americas Corp. 1700 Valley Road, Wayne, NJ 07470 www.jvc.com LYT2313-002A-M C1C/C1CW 0111HOH-SW-VM RECORDING FILES A Open the LCD monitor to turn on the unit. B Press the A/B button on the unit to select the 2 video or still image mode. 1 The Mode will be displayed in the LCD. VIDEO RECORDING (Wide angle) Zooming (Telephoto) The information below will be displayed on the LCD during recording. Press to Start Recording • Press again to Stop Recording. 10:10 AM 0:00:00 [0:54] Battery Indicator Recording Media Image Stabilizer Remaining Recording Time Video Quality Scene Counter STILL IMAGE RECORDING Image Size Shutter Speed 10:10 AM Press halfway to focus Lights up in green when focused Press fully to take still image Lights up during still image recording Recording Media Battery Indicator Focus Recording in Progress [6630] Remaining Number of Shots Recording Techniques Accessories SUPPLIED ACCESSORIES FOR THE CAMERA AC Adapter AC Adapter AP-V30U* AC-V11U* (for GZ-HM960) (for GZ-HM860) Battery Pack BN-VG114U Remote Control RM-V760U USB Cable (Type A - Mini Type B) START /STOP SNAP SHOT AV Cable HDMI Mini Cable Core Filter (Large) x 2 INFO INDEX Core Filter (Small) Basic User Guide • Optional Accessory: Component Cable (QAM1266-001) AVAILABLE ACCESSORIES FOR THE CAMERA Product Name* Description Battery Pack • BN-VG121U • BN-VG138U • Provides a longer recording time than the battery pack that comes with this unit or it can also be used as a spare battery pack. Battery Charger • Enables the battery pack to be charged without • AA-VG1U using this unit. * To order any of these accessories please visit www.store.jvc.com or call 1-800-252-5722 TYPES OF USABLE SD CARDS Memory Cards Capacity A Video B Still images AVCHD (UXP) (3968x2976/4:3) 256 MB - - SD Cards Supports 256 MB 512 MB to 2 GB 1 GB - - 70 140 2 GB 10 m 250 4 GB 20 m 500 SDHC Cards Supports 4 GB to 8 GB 40 m 1100 32 GB 16 GB 1 h 20 m 2300 32 GB 2 h 50 m 4700 SDXC Cards Supports 48 GB 48 GB 4 h 20 m 7000 to 64 GB 64 GB 5 h 50 m 9400 Eye-Fi Cards Supports wireless LAN function Refer to the for details. Detailed User Guide Note: Operations are confirmed on the following SD cards. Manufacturer Panasonic, TOSHIBA, SanDisk Video A Still Image B Class 4 or higher compatible SD/SDHC/SDXC card (2 GB to 64 GB) (When recording with image quality "UXP", Class 6 or higher is recommended.) SD/SDHC/SDXC card (256 MB to 64 GB) Eye-Fi Eye-Fi Connect X2 / Eye-Fi Explore X2 / Eye-Fi Pro X2 • Using cards other than those specified above may result in recording failure or data loss. Preparation - Always check available memory space and battery power in advance. - Make sure your battery is fully charged. - A spare battery may be useful. Stabilizing Your Picture Try these tips to improve the image: - Look for a place to sit down and take your video. - Look for something you can set your camera on. - Consider using a tripod or a monopod to further steady your video. Camera Movement The most enjoyable and professional looking videos generally have very little camera movement: - Treat all movements as a special effect. - If you must move the camera, do it slowly. Zooming As a general rule, your video will look better if you zoom the lens before you start your recording: - Focus on the subject first, then begin recording. - If you must zoom during a recording, treat it as a special effect and zoom slowly. Exposure - Remember to shoot with the sun or the primary light source behind you. - Keeping the range of contrast in your scene to a reasonable level is the easiest way to improve the picture quality. - Pay special attention to objects in the LCD screen that appear very washed out or over exposed. - Making a simple change in how the camera is aimed or by zooming in slightly, you may reduce contrast to a reasonable range. Length of Recording Many recordings are ruined by stopping the recording too soon and missing the best moment: - Always try for at least a 10 second recording. - When in doubt, let the recording continue longer. - It is much easier to edit unneeded material later. Playing Back Files Getting Started CHARGING THE BATTERY A Close the LCD to turn Off the Power B Attach the battery C Connect AC adapter into DC connector Cover Mark D Connect the AC adapter to outlet Charging in progress: Blinks Charging finished: Goes out AC Adapter To AC Outlet The AC adapter shown in the illustration is AC-V11U (for GZ-HM860). Battery Type Continuous Recording Actual Recording Charging Time GZ-HM960 GZ-HM860 GZ-HM960 GZ-HM860 BN-VG114U (Supplied) 2 h 30 m 1 h 10 m 1 h 15 m 40 m 40 m BN-VG121U 3 h 30 m 1 h 45 m 1 h 55 m 1 h 1 h 05 m BN-VG138U 6 h 10 m 3 h 05 m 3 h 25 m 1 h 40 m 1 h 55 m Note: The battery pack is not charged at the time of purchase. • The above are values when "MONITOR BRIGHTNESS" is set to "3" (standard). CAUTION • Be sure to use JVC battery packs. If you use any other battery packs besides JVC battery packs, safety and performance cannot be guaranteed. INSERTING THE SD CARD* A Close the LCD monitor. B Open the cover and insert an SD card. (Base) Terminal Side * SD card not included PLAYING BACK VIDEOS A Open the LCD monitor to turn on the unit. B Tap q on the touch screen to select the playback mode. C Press the A/B button on the unit to select the video or still image mode. D Tap on the thumbnail on the index screen to play back. • Tap b or a to scroll the pages. 2011 1 2 3 PLAYBACK ON TV Preparation: • Turn off both camera and TV. Ⅲ To connect using the HDMI mini connector ● Playing back 3D Images on a 3D compatible TV (GZ-HM960 only) If you are using a 3D compatible TV, you can play back 3D images by connecting to the HDMI mini connector. • When connecting to a 3D compatible TV, set [HDMI OUTPUT] to [AUTO]. ● Playing back in HD quality If you are using an HDTV, you can play back in HD quality by connecting to the HDMI mini connector. • When connecting to a 1080p compatible TV, set [HDMI OUTPUT] to [AUTO]. TV To HDMI (HDMI mini) Connector HDMI Mini Cable (Provided) HDMI Connector Input CONTINUE ON NEXT PAGE
-
 1
1 -
 2
2
 |
 |