JVC GZ MG37 Instructions - Page 48
Dubbing Video Files to DVD Discs Continued
 |
View all JVC GZ MG37 manuals
Add to My Manuals
Save this manual to your list of manuals |
Page 48 highlights
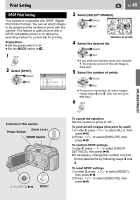
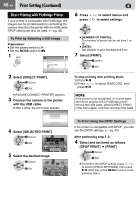
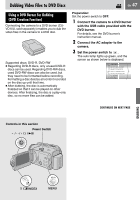
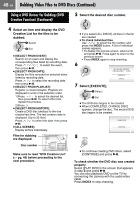
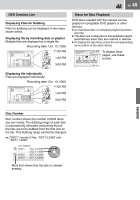
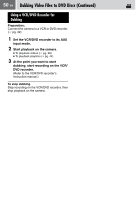
48 EN Dubbing Video Files to DVD Discs (Continued) Using a DVD Burner for Dubbing (DVD Creation Function) (Continued) 5 Select the desired disc number. 4 Select an item and display the DVD Creation List for the files to be dubbed. Select Set ● [SELECT FROM EVENT]: Search for an event and display the corresponding files listed by recording date. Press / / / to select the event, then press 49. ● [SELECT FROM DATE]: Display the files recorded on selected dates listed by recording date. Press / to select the recording date, then press 49. ● [SELECT FROM PLAYLIST]: Register a created playlist. Playlists are displayed in a list in the selection order. 1)Press / to select the desired list, then press 49. To select other lists, repeat this process. 2)Press . ● [SELECT FROM HISTORY]: Create a DVD disc identical to the one created last time. The last creation date is displayed. (Up to 20 files) Press / to select the date, then press 49. ● [ALL SCENES]: Display all files individually. Files for dubbing are displayed. Disc number DVD CREATION LIST 1 ALL DISCS DVD1 DVD2 DVD3 OCT.10.2006 OCT.11.2006 OCT.12.2006 OCT.13.2006 Make sure to read "DVD Creation List" (੬ pg. 49) before proceeding to the next procedure. ● If you select [ALL DISCS], all discs in the list are created. ● To check individual files Use / to select the file number and press the INDEX button. A list of individual scenes appears. • To display the preview screen, select a file and press 49. Press again to return to the previous screen. • Press INDEX again to stop checking. 6 ALL WILL BE CREATED TIME REQUIRED: 45 MIN EXECUTE CANCEL 7 Select [EXECUTE]. Select Set ● The DVD disc begins to be created. ● When [COMPLETED. CHANGE DISC] appears, change the disc. The second DVD disc begins to be created. COMPLETED CONTINUE 8 ● To continue creating DVD discs, select [CONTINUE] and press 49. To check whether the DVD disc was created properly Select [PLAY DVD] in the screen that appears in step 3 and press 49. You can also playback DVD on the TV by connecting the camera with the audio/video cable. Press INDEX to stop checking.
-
 1
1 -
2
-
3
-
4
-
5
-
6
-
7
-
8
-
9
-
10
-
11
-
12
-
13
-
14
-
15
-
16
-
17
-
18
-
19
-
20
-
21
-
22
-
23
-
24
-
25
-
26
-
27
-
28
-
29
-
30
-
31
-
32
-
33
-
34
-
35
-
36
-
37
-
38
-
39
-
40
-
41
-
42
-
 43
43 -
 44
44 -
 45
45 -
 46
46 -
 47
47 -
 48
48 -
 49
49 -
 50
50 -
 51
51 -
 52
52 -
 53
53 -
54
-
55
-
56
-
57
-
58
-
59
-
60
-
61
-
62
-
63
-
64
-
65
-
66
-
67
-
68
-
69
-
70
-
71
-
72
 |
 |