| Section |
Page |
| Major Features |
2 |
| SD Memory Card |
2 |
| DVD Creation Function |
2 |
| Video Event Registration |
2 |
| Editing Files on Your PC |
2 |
| Direct Printing |
2 |
| Read This First! - How to Handle the Hard Disk Camera |
3 |
| Safety Precautions |
5 |
| 2. Keep these instructions. |
5 |
| 3. Heed all warnings. |
5 |
| 4. Follow all instructions. |
5 |
| 5. Do not use this apparatus near water. |
5 |
| 6. Clean only with dry cloth. |
5 |
| 7. Do not block any ventilation openings. Install in accordance with the manufacturer’s instructions. |
5 |
| 8. Do not install near any heat sources such as radiators, heat registers, stoves, or other apparatus (including amplifiers) that produce heat. |
5 |
| 9. Only use attachments/accessories specified by the manufacturer. |
5 |
| 10. Use only with the cart, stand, tripod, bracket, or table specified by the manufacturer, or sold with the apparatus. When a cart is used, use caution when moving the cart/apparatus combination to avoid injury from tip-over. |
5 |
| 11. Unplug this apparatus during lightning storms or when unused for long periods of time. |
5 |
| 12. Refer all servicing to qualified service personnel. Servicing is required when the apparatus has been damaged in any way, su... |
5 |
| Contents |
6 |
| GETTING STARTED |
6 |
| RECORDING |
6 |
| PLAYBACK |
6 |
| EDITING/PRINTING |
6 |
| DUBBING |
7 |
| MENU SETTINGS |
7 |
| FURTHER INFORMATION |
7 |
| Regarding This Manual |
7 |
| Accessories |
8 |
| Attaching the Shoulder Strap |
9 |
| Attaching the Lens Cap |
9 |
| Attaching the Core Filter |
9 |
| Index |
10 |
| Controls |
11 |
| a Power Switch [OFF, , ] (Z pg. 12) |
11 |
| b Lock Button (Z pg. 12) |
11 |
| c Zoom Lever [W /T ] (Z pg. 18) |
11 |
| d Light Button [LIGHT] (Z pg. 18)/Information Button [INFO] (Z pg. 37) |
11 |
| e Mode Switch [MODE] (Z pg. 16, 20, 26, 30) |
11 |
| f Auto/Manual Mode Button [AUTO] (Z pg. 22) |
11 |
| g Menu Button [MENU] (Z pg. 52) |
11 |
| h Delete Button [] (Z pg. 19) |
11 |
| i Recording Start/Stop Button [REC/SNAP] (Z pg. 16, 20) |
11 |
| j Control Lever |
11 |
| k Index Button [INDEX] (Z pg. 28)/Remaining Space Button [] (Z pg. 19)/Data Battery Button [] (Z pg. 14) |
11 |
| l Battery Release Button [BATT.] (Z pg. 12) |
11 |
| Connectors |
11 |
| M S-Video Output Connector [S] (Z pg. 32) |
11 |
| N Audio/Video Output Connector [AV] |
11 |
| O USB (Universal Serial Bus) Connector (Z SOFTWARE INSTALLATION AND USB CONNECTION GUIDE) |
11 |
| P DC Input Connector [DC] (Z pg. 12) |
11 |
| Indicators |
11 |
| Q Power/Charge Lamp [POWER/CHARGE] (Z pg. 12) |
11 |
| R Access Lamp [ACCESS] (Lights up or blinks when you access files. Do not turn off the power or remove the battery pack/AC adapter while accessing files.) |
11 |
| S Auto Lamp [AUTO] (Lights up in Auto recording mode. Also lights up when connecting to a DVD burner [sold separately].) (Z pg. 47) |
11 |
| Other Parts |
11 |
| T Reset Button [RESET] (Z pg. 58) |
11 |
| U Speaker (Z pg. 26) |
11 |
| V Battery Pack Mount (Z pg. 12) |
11 |
| W Camera Sensor Remote Sensor (Z pg. 33) |
11 |
| X Lens |
11 |
| Y Stereo Microphone |
11 |
| a LED Light (Z pg. 18, 21) |
11 |
| b Grip Strap (Z pg. 14) |
11 |
| c SD Card Cover [OPEN] (Z pg. 15) |
11 |
| d Stud Hole (Z pg. 14) |
11 |
| e Tripod Mounting Socket (Z pg. 14) |
11 |
| Necessary Settings before Use |
12 |
| Power Related Preparations (Using the Battery Pack) |
12 |
| 1 |
12 |
| 2 |
12 |
| 3 |
12 |
| Language Setting |
13 |
| 1 |
13 |
| 2 |
13 |
| 3 |
13 |
| 4 |
13 |
| 5 |
13 |
| 6 |
13 |
| 7 |
13 |
| Date/Time Setting |
13 |
| 5 |
13 |
| 6 |
13 |
| 7 |
13 |
| Other Settings |
14 |
| Grip Adjustment |
14 |
| Tripod Mounting |
14 |
| Data Battery System |
14 |
| 1 |
14 |
| 2 |
14 |
| When Using an SD Card |
15 |
| Insert an SD card |
15 |
| 1 |
15 |
| 2 |
15 |
| 3 |
15 |
| Change the recording medium |
15 |
| 1 |
15 |
| 2 |
15 |
| 3 |
15 |
| 4 |
15 |
| 5 |
15 |
| Format an SD card when using it for the first time |
15 |
| Video Recording |
16 |
| Registering Files to Events |
17 |
| 1 |
17 |
| 2 |
17 |
| 3 |
17 |
| 4 |
17 |
| Video Recording (Continued) |
18 |
| Zooming |
18 |
| Changing the Screen Size |
18 |
| LED Light |
18 |
| Deleting a File |
19 |
| 1 |
19 |
| 2 |
19 |
| Checking the Remaining Space on the Recording Media |
19 |
| Still Image Recording |
20 |
| Zooming |
21 |
| Continuous Shooting |
21 |
| LED Light |
21 |
| Deleting a File |
21 |
| 1 |
21 |
| 2 |
21 |
| Manual Recording |
22 |
| Manual Setting in MSET Menu |
22 |
| 1 |
22 |
| 2 |
22 |
| 3 |
22 |
| 4 |
22 |
| 5 |
22 |
| MSET Menu |
23 |
| 1) Hold a sheet of plain white paper in front of the subject. Adjust the zoom, or position yourself so that the white paper fills the screen. |
23 |
| 2) Press and hold 49 until the indicator starts blinking then stops blinking. |
23 |
| Manual Recording (Continued) |
24 |
| MSET Menu (Continued) |
24 |
| Nightalive |
25 |
| Backlight Compensation |
25 |
| Spot Exposure Control |
25 |
| 1 |
25 |
| 2 |
25 |
| Video Playback |
26 |
| Various Operations during Playback |
27 |
| Still playback (Pause) |
27 |
| Search playback |
27 |
| Locating the start point of the file or skipping the file |
27 |
| Frame-by-frame playback |
27 |
| Slow motion playback |
27 |
| Playback zoom |
27 |
| Video Playback (Continued) |
28 |
| File Search Function |
28 |
| Date Index Screen |
28 |
| 1 |
28 |
| 2 |
28 |
| 3 |
28 |
| Event Screen |
29 |
| 1 |
29 |
| 2 |
29 |
| 3 |
29 |
| 4 |
29 |
| To Play Back Files in the [EXTMOV] Folder |
29 |
| 1 Press the REC/SNAP button while the index screen is displayed. |
29 |
| 2 After [MPG] is displayed, press // / to select the file you want to play, then press 49. |
29 |
| Deleting a Video File |
29 |
| 1 |
29 |
| 2 |
29 |
| Still Image Playback |
30 |
| File Search Function |
30 |
| Slide Show |
31 |
| Image Rotation |
31 |
| Playback Zoom |
31 |
| Deleting a Still Image File |
31 |
| 1 |
31 |
| 2 |
31 |
| Watching Images on TV/Remote Control |
32 |
| Connecting to a TV, VCR or DVD Recorder |
32 |
| Playback on TV |
32 |
| 1 |
32 |
| 2 |
32 |
| 3 |
32 |
| 4 |
32 |
| Playback Using the Remote Control |
33 |
| Beam Effective Area |
33 |
| To Reinsert the Battery |
33 |
| Buttons and Functions |
33 |
| A Infrared Beam Transmitting Window |
33 |
| B ZOOM (T/W) Buttons |
33 |
| C Up Button |
33 |
| D Skip Backward Button |
33 |
| E Left Button |
33 |
| F Back Button |
33 |
| G PLAYLIST Button (Z pg. 42) |
33 |
| H START/STOP Button |
33 |
| I SNAPSHOT Button (Z pg. 20) |
33 |
| J INFO Button (Z pg. 37) |
33 |
| K Skip Forward Button |
33 |
| L PLAY/PAUSE Button |
33 |
| M Right Button |
33 |
| N Next Button |
33 |
| O Down Button |
33 |
| P INDEX Button |
33 |
| Q DATE Button |
33 |
| Playback with Special Effects |
34 |
| 1 |
34 |
| 2 |
34 |
| 3 |
34 |
| 4 |
34 |
| [WIPE/FADER] |
35 |
| [EFFECT] |
35 |
| Managing Files |
36 |
| Deleting Files |
36 |
| Deleting with the Button |
36 |
| 1 |
36 |
| 2 |
36 |
| 3 |
36 |
| Deleting on Menu Screen |
37 |
| 1 |
37 |
| 2 |
37 |
| 3 |
37 |
| 1) Press /// to select the file you want to delete, then press 49. |
37 |
| 2) Press MENU. |
37 |
| 4 |
37 |
| Viewing File Information |
37 |
| Video Files |
37 |
| Still Image Files |
37 |
| Managing Files (Continued) |
38 |
| Protecting Files from Accidental Erasure |
38 |
| 1 |
38 |
| 2 |
38 |
| 3 |
38 |
| 1) Press /// to select the file you want to protect, then press 49. |
38 |
| 2) Press MENU. |
38 |
| 4 |
38 |
| 1) In step 3, select [CANCEL ALL], then press 49. |
38 |
| 2) Press / to select [EXECUTE], then press 49. |
38 |
| Formatting a Recording Medium |
39 |
| 1 |
39 |
| 2 |
39 |
| 3 |
39 |
| 4 |
39 |
| 5 |
39 |
| Managing Files (Continued) |
40 |
| Cleaning Up a Recording Medium |
40 |
| 1 |
40 |
| 2 |
40 |
| 3 |
40 |
| 4 |
40 |
| Resetting the File Number |
40 |
| 1 |
40 |
| 2 |
40 |
| 3 |
40 |
| 4 |
40 |
| Changing the Event Registration of Video Files after Recording |
41 |
| 1 |
41 |
| 2 |
41 |
| 3 |
41 |
| 4 |
41 |
| 5 |
41 |
| 6 |
41 |
| Playlists |
42 |
| 1 |
42 |
| 2 |
42 |
| Creating Playlists |
42 |
| 3 |
42 |
| 4 |
42 |
| 5 |
42 |
| 6 |
43 |
| 7 |
43 |
| 8 |
43 |
| 1) Press after step 6 to move to the registered file column shown on the right. |
43 |
| 2) Use / to select a file and press 49. |
43 |
| 3) Press INDEX to return to the previous screen. |
43 |
| 1) Press after step 6 to move to the registered file column shown on the right. |
43 |
| 2) Use / to select a file and press . |
43 |
| Displaying Files |
43 |
| When selecting [IMPORT FROM EVENT] or [IMPORT FROM DATE] |
43 |
| When selecting [ALL SCENES] |
43 |
| Playlists (Continued) |
44 |
| Playing Back Playlists |
44 |
| 3 |
44 |
| 4 |
44 |
| Other Operations of Playlists |
44 |
| Adding/Deleting Files in Playlist |
44 |
| 3 Press / to select [EDIT], then press 49. |
44 |
| 4 Press / to select the playlist you want to edit, then press 49. |
44 |
| Changing Playlist Names |
44 |
| 3 Press / to select [RENAME], then press 49. |
44 |
| 4 Press / to select the desired playlist, then press 49. |
44 |
| 5 Press /// to select the desired letter, then press 49. |
44 |
| 6 Press /// to select [], then press 49. |
44 |
| Deleting Playlist |
44 |
| 3 Press / to select [DELETE], then press 49. |
44 |
| 4 Press / to select a playlist you want to delete. |
44 |
| 5 Press 49. |
44 |
| 6 Press / to select [EXECUTE], then press 49. |
44 |
| Print Setting |
45 |
| DPOF Print Setting |
45 |
| 1 |
45 |
| 2 |
45 |
| 3 |
45 |
| 4 |
45 |
| 5 |
45 |
| 6 |
45 |
| 1) In step 3, press / to select [ALL1], then press 49. |
45 |
| 2) Press / to select [EXECUTE], then press 49. |
45 |
| 1) In step 3, press / to select [RESET], then press 49. |
45 |
| 2) Press / to select [EXECUTE], then press 49. |
45 |
| Print Setting (Continued) |
46 |
| Direct Printing with PictBridge Printer |
46 |
| To Print by Selecting a Still Image |
46 |
| 1 |
46 |
| 2 |
46 |
| 3 |
46 |
| 4 |
46 |
| 5 |
46 |
| 6 |
46 |
| 7 |
46 |
| 1) Press 49. |
46 |
| 2) Press / to select [EXECUTE], then press 49. |
46 |
| To Print Using the DPOF Settings |
46 |
| 4 |
46 |
| Dubbing Video Files to DVD Discs |
47 |
| Using a DVD Burner for Dubbing (DVD Creation Function) |
47 |
| 1 |
47 |
| 2 |
47 |
| 3 |
47 |
| Dubbing Video Files to DVD Discs (Continued) |
48 |
| Using a DVD Burner for Dubbing (DVD Creation Function) (Continued) |
48 |
| 4 |
48 |
| 1) Press / to select the desired list, then press 49. To select other lists, repeat this process. |
48 |
| 2) Press . |
48 |
| 5 |
48 |
| 6 |
48 |
| 7 |
48 |
| 8 |
48 |
| DVD Creation List |
49 |
| Menu for Disc Playback |
49 |
| Dubbing Video Files to DVD Discs (Continued) |
50 |
| Using a VCR/DVD Recorder for Dubbing |
50 |
| 1 |
50 |
| 2 |
50 |
| 3 |
50 |
| Copying/Moving Still Image Files |
51 |
| 1 |
51 |
| 2 |
51 |
| 3 |
51 |
| 4 |
51 |
| 5 |
51 |
| 6 |
51 |
| 1) Press /// to select the desired file, then press 49. |
51 |
| 2) Press MENU. |
51 |
| 7 |
51 |
| Changing the Menu Settings |
52 |
| 1 |
52 |
| 2 |
52 |
| 3 |
52 |
| Common Menus for All Modes |
53 |
| Changing the Menu Settings (Continued) |
54 |
| Common Menus for All Modes (Continued) |
54 |
| Video Recording Menus |
55 |
| Changing the Menu Settings (Continued) |
56 |
| Video Playback Menus |
56 |
| Still Image Recording Menus |
57 |
| Still Image Playback Menus |
57 |
| Troubleshooting |
58 |
| 1) Press RESET using a piece of wire or other pointed instrument. The power is turned off once and turned on again automatically. |
58 |
| 2) If nothing happens, set the power switch to OFF and remove the power supply (battery pack or AC adapter) from the camera, then reattach it. |
58 |
| 3) Execute [PRESET] from the menu. The camera returns to its factory-preset. (Z pg. 53) |
58 |
| Troubleshooting (Continued) |
60 |
| Warning Indications |
62 |
| Warning Indications (Continued) |
64 |
| Cleaning the Camera |
64 |
| Cautions |
65 |
| AC Adapter |
65 |
| Battery Packs |
65 |
| Recording Medium |
65 |
| Cautions (Continued) |
66 |
| Recording Medium (Continued) |
66 |
| LCD Monitor |
66 |
| Main Unit |
66 |
| How to Handle a CD-ROM |
67 |
| Specifications |
68 |
| Camera |
68 |
| For general |
68 |
| For video/audio |
68 |
| For still image |
68 |
| For connectors |
68 |
| AC Adapter |
68 |
| Remote Control |
68 |
| Recording Time and Number of Images |
69 |
| Indications on LCD Monitor |
70 |
| During both Video and Still Image Recording |
70 |
| a Selected Operation Mode Indicator (Z pg. 22) |
70 |
| b Tele Macro Mode Indicator (Z pg. 55, 57) |
70 |
| c Approximate Zoom Ratio (Z pg. 18, 21) |
70 |
| d Zoom Indicator (Z pg. 18, 21) |
70 |
| e Iris Lock Indicator (Z pg. 23) |
70 |
| f White Balance Indicator (Z pg. 23) |
70 |
| g Brightness Control Indicator (Z pg. 54) |
70 |
| h Battery Indicator (Z pg. 62) |
70 |
| i Date/Time (Z pg. 54) |
70 |
| j Selected Medium Indicator (Z pg. 15, 54) |
70 |
| k Drop Detection Indicator (Z pg. 53) |
70 |
| l Manual Focus Adjustment Indicator (Z pg. 23) |
70 |
| m Effect Mode Indicator (Z pg. 24) |
70 |
| n Program AE Mode Indicator (Z pg. 24) |
70 |
| o Shutter Speed (Z pg. 24) |
70 |
| p LED Light Indicator (Z pg. 18, 21) |
70 |
| q ±: Exposure Adjustment Indicator (Z pg. 23) |
70 |
| During Video Recording Only |
70 |
| a Mode Indicator (Z pg. 16) |
70 |
| b Screen Size Indicator (Z pg. 18) |
70 |
| c Wind Cut Indicator (Z pg. 55) |
70 |
| d Picture Quality: [U] (ultra fine), [F] (fine), [N] (normal), [E] (economy) (Z pg. 55) |
70 |
| e Remaining Time (Z pg. 16, 69) |
70 |
| f Counter (Z pg. 54) |
70 |
| g 7REC: (Appears during recording.) (Z pg. 16) |
70 |
| h Digital Image Stabilizer (DIS) Indicator (Z pg. 55) |
70 |
| During Still Image Recording Only |
70 |
| a Mode Indicator (Z pg. 20) |
70 |
| b Focus Indicator (Z pg. 20) |
70 |
| c Image Size: 640 (640 x 480) |
70 |
| d Picture Quality: FINE (fine) or STD (standard) (Z pg. 57) |
70 |
| e Remaining Number of Shots (Z pg. 69) |
70 |
| f : Continuous Shooting Mode Indicator (Z pg. 21) |
70 |
| g Shooting Indicator (Z pg. 20) |
70 |
| h Self-Timer Recording Indicator (Z pg. 57) |
70 |
| During Video Playback |
71 |
| a Mode Indicator (Z pg. 26) |
71 |
| b : Playlist Playback Indicator (Appears when playing back a playlist. Z pg. 44) |
71 |
| c Picture Quality: [U] (ultra fine), [F] (fine), [N] (normal), [E] (economy) (Z pg. 55) |
71 |
| d Playback Mode (Z pg. 27) |
71 |
| e Counter (Z pg. 54) |
71 |
| f Volume Level Indicator |
71 |
| g Battery Indicator (Z pg. 62) |
71 |
| h Date/Time (Z pg. 54) |
71 |
| i Selected Medium Indicator (Z pg. 15, 54) |
71 |
| j Effect Mode Indicator (Z pg. 34) |
71 |
| k Wipe/Fader Effect Indicator (Z pg. 34) |
71 |
| During Still Image Playback |
71 |
| a Mode Indicator (Z pg. 30) |
71 |
| b Folder/File Number |
71 |
| c Slide Show Playback Indicator (Z pg. 31) |
71 |
| d Battery Indicator (Z pg. 62) |
71 |
| e Date (Z pg. 54) |
71 |
| f Selected Medium Indicator (Z pg. 15, 54) |
71 |
| g Effect Mode Indicator (Z pg. 34) |
71 |

 1
1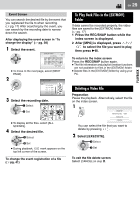 29
29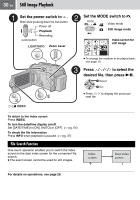 30
30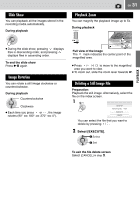 31
31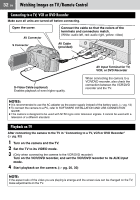 32
32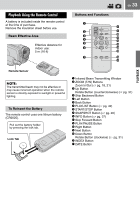 33
33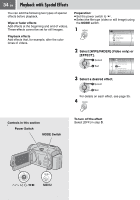 34
34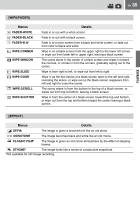 35
35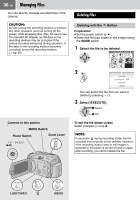 36
36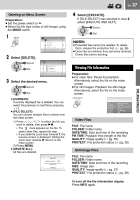 37
37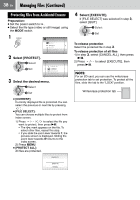 38
38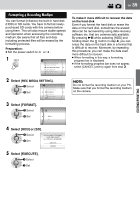 39
39

