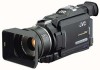
JVC JY-VS200U JY-VS200U User Manual -- Pages 2-35 (1231KB) - Page 19
Basic Recording For Video cont.
 |
View all JVC JY-VS200U manuals
Add to My Manuals
Save this manual to your list of manuals |
Page 19 highlights
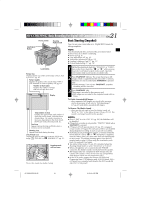
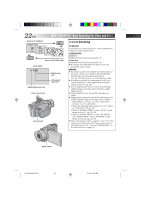
20 EN Power Switch SNAPSHOT Button RECORDING Basic Recording For Video (cont.) Shooting Mode Switch Snapshot (For Video Recording) This feature lets you record still images that look like photographs onto a tape. SNAPSHOT MODE SELECTION 1 Set the Shooting Mode Switch to "VIDEO", then set the Power Switch to " " while pressing down the Lock Button located on the switch. Pull out the viewfinder fully or open the LCD monitor fully. 2 Press the MENU wheel. The Menu Screen appears. Lock Button Display Menu Screen 3 Rotate the MENU wheel to select " CAMERA". Press it and the CAMERA Menu appears. 4 Rotate the MENU wheel to select "SNAP MODE", then press it. SNAP MODE - P I N-UP FRAME FULL MUL T I - 4 MUL T I - 9 NEGA POS I 5 Rotate the MENU wheel to select the desired Snapshot mode, then press it. Rotate the MENU wheel to select " 1RETURN" and press it twice. The Menu Screen closes. SNAPSHOT RECORDING 1 Set "CAMERA MODE" to "VIDEO" or "PS-VIDEO" in the Menu Screen (੬ pg. 28, 29). FULL Snapshot mode with no frame* √ MULTI-4 Multi-Analyzer 4 MULTI-9 Multi-Analyzer 9 NEGA POSI Nega/Posi mode* √ PIN-UP Pin-Up mode √ FRAME Snapshot mode with frame* √ * There is the sound effect of a shutter closing. √ When "FULL", "FRAME", "PIN-UP" or "NEGA POSI" is selected, snapshot recording will always be performed with higher quality (੬ pg. 24) even if "CAMERA MODE" is set to "VIDEO". 2 Press SNAPSHOT. If you press during Record-Standby PHOTO" appears and a still image will be recorded for approx. 6 seconds, then the camcorder re-enters the Record-Standby mode. If you press during Recording PHOTO" appears and a still image will be recorded for approx. 6 seconds, then the normal recording resumes. Motor Drive Mode Keeping SNAPSHOT pressed provides an effect similar to serial photography. (Interval between still images: approx. 1 second) NOTES: ● To remove the shutter sound, ੬ "BEEP" on pg. 30. ● If Digital Zoom is used while in the "MULTI-4" or "MULTI- 9" mode, Snapshot recording will be performed with 10X magnification. ● If Snapshot recording is not possible, "PHOTO" blinks when SNAPSHOT is pressed. ● If Program AE with special effects ( ੬ pg. 36) is engaged, certain modes of Program AE with special effects are disabled during Snapshot recording. In such a case, the icon blinks. ● If SNAPSHOT is pressed when "DIS" is set to "ON" ( ੬ pg. 29), the Stabilizer will be disabled. ● To dub images recorded on a tape to a memory card, ੬ pg. 60. ● When shooting in the Multi-Analyzer 4 or Multi-Analyzer 9 modes, the optional flash ( ੬ pg. 83) will not light. ● During playback as well, all snapshot modes except Nega/ Posi mode are available when " COPY" is set to "OFF" in the Menu Screen (੬ pg. 41). ● When a headphone set is connected to the PHONE connector, the shutter sound is not heard from the speaker, however it is recorded onto the tape. JY-VS200U EN 02-35 20 01.3.12, 6:55 PM
-
 1
1 -
2
-
3
-
4
-
5
-
6
-
7
-
8
-
9
-
10
-
11
-
12
-
13
-
 14
14 -
 15
15 -
 16
16 -
 17
17 -
 18
18 -
 19
19 -
 20
20 -
 21
21 -
 22
22 -
 23
23 -
 24
24 -
25
-
26
-
27
-
28
-
29
-
30
-
31
-
32
-
33
-
34
 |
 |
