JVC LT-46SL89 Instructions - Page 46
Connect a Digital Source Device
 |
UPC - 046838034282
View all JVC LT-46SL89 manuals
Add to My Manuals
Save this manual to your list of manuals |
Page 46 highlights
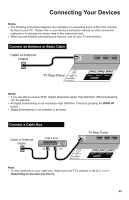
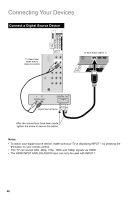
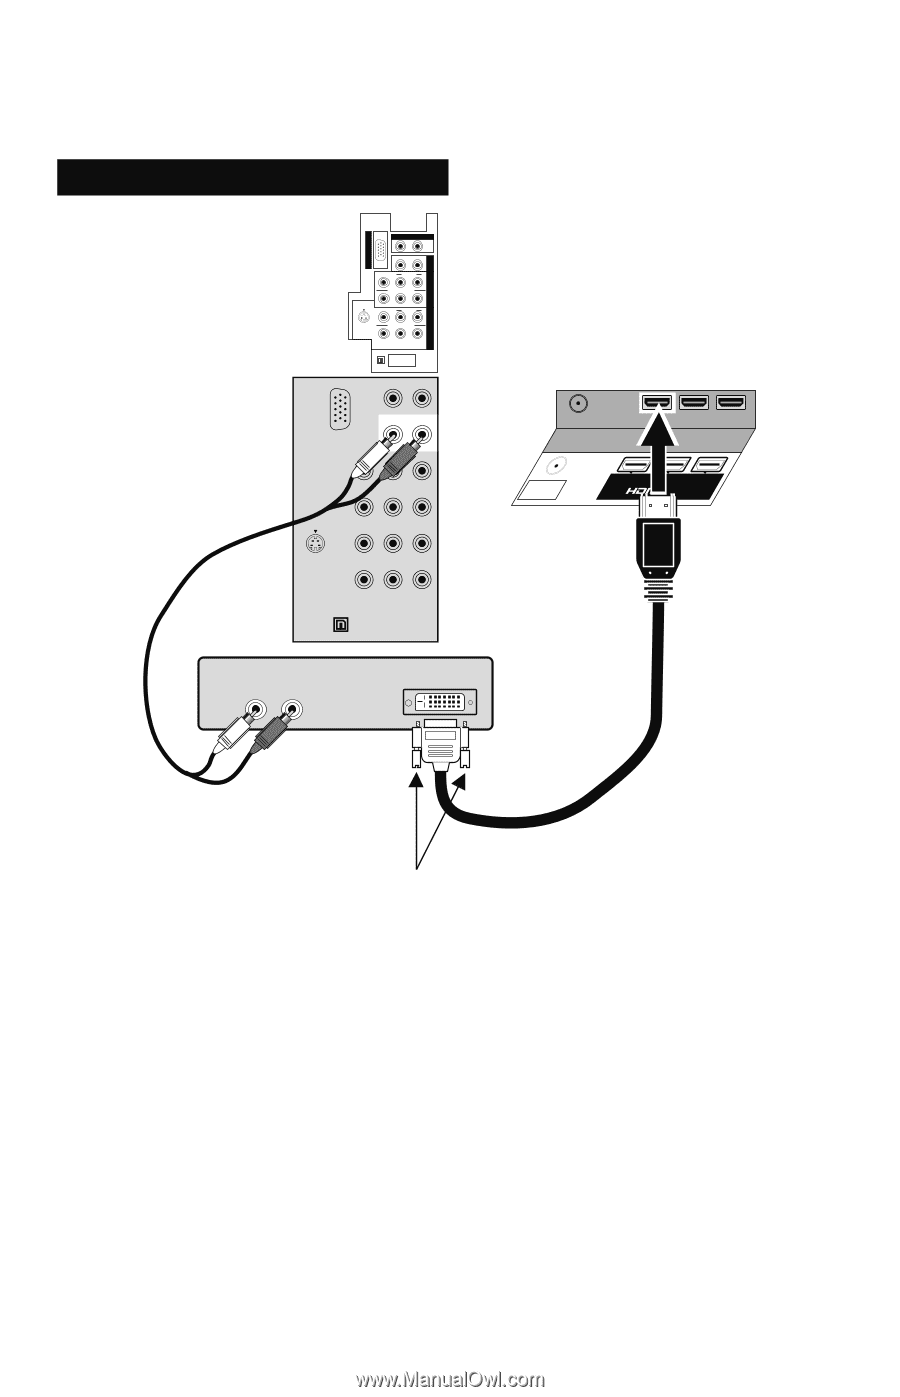
Connecting Your Devices Connect a Digital Source Device TV Rear Panel HDMI INPUT ANALOG AUDIO INPUT 5 (PC IN) AUDIO OUT L R L R VIDEO L AUDIO R COMPONENT Y PB PR L AUDIO R S-VIDEO Y COMPONENT PB PR DIGITAL AUDIO OPTICAL OUT INPUT 4 INPUT 5 HDMI INPUT ANALOG AUDIO TV Rear Panel (INPUT 1) 75 Ω (VHF/UHF) INPUT 1 INPUT 2 INPUT 3 LR AUDIO OUT DIGITAL OUT Digital Source Device After the connections have been made, tighten the screw to secure the cables. Notes: • To watch your digital source device, make sure your TV is displaying INPUT 1 by pressing the V1 button on your remote control. • This TV can accept 480i, 480p, 720p, 1080i and 1080p signals via HDMI. • The HDMI INPUT ANALOG AUDIO input can only be used with INPUT 1. 46
-
 1
1 -
2
-
3
-
4
-
5
-
6
-
7
-
8
-
9
-
10
-
11
-
12
-
13
-
14
-
15
-
16
-
17
-
18
-
19
-
20
-
21
-
22
-
23
-
24
-
25
-
26
-
27
-
28
-
29
-
30
-
31
-
32
-
33
-
34
-
35
-
36
-
37
-
38
-
39
-
40
-
 41
41 -
 42
42 -
 43
43 -
 44
44 -
 45
45 -
 46
46 -
 47
47 -
 48
48 -
 49
49 -
 50
50 -
 51
51 -
52
-
53
-
54
-
55
-
56
-
57
-
58
-
59
-
60
-
61
-
62
-
63
-
64
 |
 |
46
Connect a Digital Source Device
Notes:
•
To watch your digital source device, make sure your TV is displaying INPUT 1 by pressing the
V1
button on your remote control.
•
This TV can accept 480i, 480p, 720p, 1080i and 1080p signals via HDMI.
•
The HDMI INPUT ANALOG AUDIO input can only be used with INPUT 1.
DIGITAL AUDIO
OPTICAL OUT
AUDIO OUT
L
L
L
P
B
R
R
P
R
VIDEO
R
AUDIO
COMPONENT
Y
COMPONENT
L
P
B
P
R
Y
R
AUDIO
INPUT 5 (PC IN)
INPUT 5
INPUT 4
S-VIDEO
TV Rear Panel (INPUT 1)
Digital Source Device
TV Rear Panel
HDMI INPUT
ANALOG AUDIO
After the connections have been made,
tighten the screw to secure the cables.
DIGITAL OUT
L
R
AUDIO OUT
INPUT 1
INPUT 2
INPUT 3
75
Ω
(VHF/UHF)
Connecting Your Devices