JVC RD-N1 Instructions - Page 2
Basic operation, FM radio, Disc/USB, External, device - manual
 |
View all JVC RD-N1 manuals
Add to My Manuals
Save this manual to your list of manuals |
Page 2 highlights
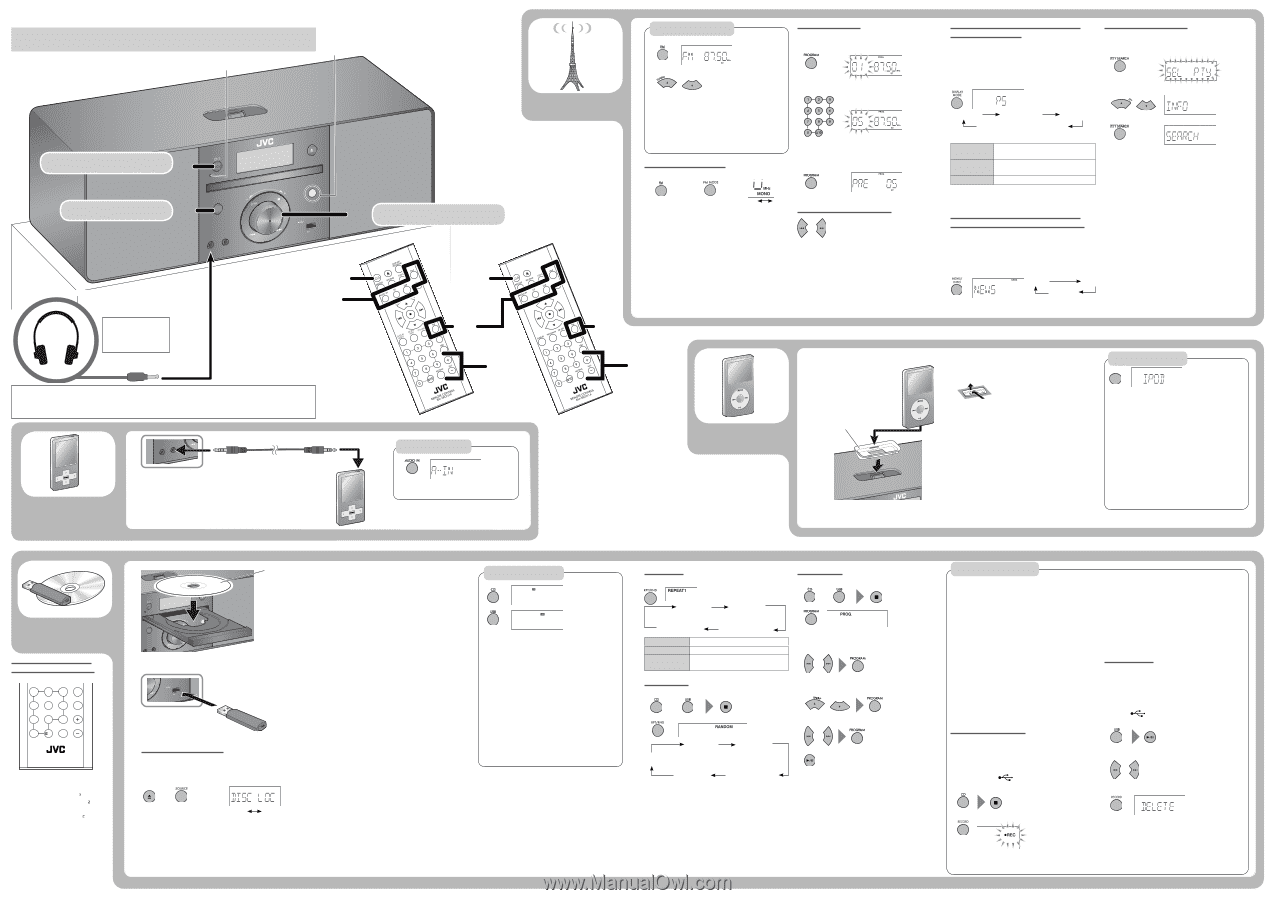
Basic operation STANDBY lamp 5V 500mA Remote sensor 1 Turn on the power. STANDBY VOLUME 2 SOURCE Select a source. PHONES AUDIO IN USB MEMORY 3 Adjust the volume. 5V 500mA Headphones (not supplied) Be sure to turn down the volume before connecting or putting on the headphones. Stereo mini plug cord (not supplied) 1 2 DO NOT turn off the System with the volume set to an extremely high level; otherwise, the sudden blast of sound may damage your hearing, speakers, and headphones when you turn on the System or start playback. PHONES AUDIO IN External device Stereo mini plug cord (not supplied) 1 2 3 (European model) (RM-SRDN1R/RM-SRDN1WR) Playback operation 1 2 Start playback of the external device. FM radio 2 Searching for stations 1 Presetting stations You can preset up to 20 FM stations. While listening to a target station... 1 2 (Hold) (Hold) The station search stops when a station of sufficient signal strength is found. • To manually stop the search, press 5 or ∞. • When you press 5 or ∞ repeatedly, the frequency changes step by step. Improving the reception When an FM stereo broadcast is hard to listen... Preset number 2 Select a preset number. • To select a number, see "How to select a number using the remote control" in the bottom left of the page. 3 (European model) (Other models) MONO ST • When the monaural mode (MONO) is activated, the reception is improved. However, the stereo effect is lost. • When the stereo mode (ST) is activated, you can listen to the radio in stereo when a program is broadcast in stereo. Tuning in to a preset station • You can also use number buttons on the remote control. Receiving FM stations with Radio Data System (Europe only) Radio Data System allows FM stations to send an additional signal along with their regular program signals. • If you want to know more about Radio Data System, visit . To display the Radio Data System information PTY search (Europe only) You can search for a program from the preset stations by specifying PTY code. While listening to a station... 1 2 Select a PTY code. PS (NO PS*) PTY (NO PTY*) RT (NO RT*) Frequency (No-radio Data System signal) * Displayed if related signals are not sent by a station. PS (Program Service) Commonly known station names. PTY (Program Type) Types of broadcast programs. RT (Radio Text) Text messages the station sends. • When a Radio Data System signal is not received, the frequency is displayed. 3 Start searching. When the System finds the one you have selected, that station is tuned in. • To stop searching, press PTY SEARCH. • To search for another station, press PTY SEARCH while the indications are flashing. • If no program is found, "NO FOUND" appears. Switching temporarily to a program of your choice automatically (Europe only) The Enhanced Other Networks function allows the System to switch temporarily to a preset FM station broadcasting a program of your choice (NEWS or INFO). • This function works while listening to the FM station providing the required signals. While listening to the FM station... NEWS INFO Canceled (No indication) 3 (Other models) (RM-SRDN1A) iPod iPod Dock adaptor (supplied with the iPod or sold separately) 5V 500mA Notes on iPod connection • When detaching the dock adaptor from the dock, pull up the dock adaptor with your fingernail or sharp pointed tool using the slot. Be careful not to injure your fingertips or damage the terminal of the direct dock. • DO NOT connect or disconnect the iPod when the System is turned on. • Be sure to reduce the volume on the System to the minimum level before connecting iPod. Adjust the volume after starting playback. • You cannot send any data to the iPod from the System. • Do not carry the System with iPod connected. It might cause damage to the dock or you might drop the iPod. • Do not touch or hit the iPod terminal pins or connector pins in the iPod dock directly. Doing so might cause damage to the connector pins. • iPod is charged through the dock when the System is turned on. Playback operations iPod * Information shown on the display differs depending on the type of the iPod. To play back/pause iPod Press 6. To select a track Press ¢ or 4. To fast-forward a track Press and hold ¢. To fast-reverse a track: Press and hold 4. To play back repeatedly Press RPT/RND repeatedly. To put iPod in sleep mode Press and hold 6. Disc/USB How to select a number using the remote control SOUND MODE 1 2 3 HBS 4 5 6 7 8 9 FADE MUTING VOL 0 10 REMOTE CONTROL Examples: To select number 5, press 5. To select number 20, press 10, 2, then 0 (when "- -" appears), or press 10, 0, 2, then 0 (when "- - -" appears). To select number 125, press 10, 1, 2, then 5. 5V 500mA STANDBY SOURCE VOLUME PHONES AUDIO IN EJECT USB MEMORY 5V 500mA Label side USB MEMORY 5V 500mA USB mass storage class device Notes on USB mass storage class device connection • Connect a USB mass storage class device when the System is turned off to prevent malfunction. • Do not use a USB hub. • When connecting with a USB cable, use a USB 2.0 cable whose length is less than 1 m (39-3/8 inches). • The USB mass storage class device is charged through the USB MEMORY terminal when "USB" is selected as the source. (Some USB mass storage class devices may not be charged through the USB MEMORY terminal even if "USB" is selected as the source.) • You cannot connect a computer to the USB MEMORY terminal of the System. • Electrostatic shock at connecting a USB mass storage class device may cause abnormal playback of the device. In this case, disconnect the USB mass storage class device then reset the System and the USB mass storage class device. • While playing back or recording a file onto a USB mass storage class device, do not disconnect the device. Doing so may cause malfunction on both the System and the device. Prohibiting disc ejection You can lock the disc tray so that no one can eject the loaded disc. While the disc tray is closed... (On the main unit) and (hold for 5 seconds at the same time) DISC LOCKED DISC UNLOCKED • When you lock the disc tray, "DISC LOCKED" is scrolled on the display. "DISC UNLOCKED" is scrolled on the display when you unlock it. Playback operations To open the disc tray Press 0. To play back/pause a disc or USB mass storage class device Press 6. To select a track Press ¢ or 4. To fast-forward a track Press and hold ¢. To fast-reverse a track Press and hold 4. To select a group (MP3/WMA only) Press 5 or ∞. To stop playback Press 7. Repeat Play During playback... Program Play 1 Select a source and stop playback. REPEAT1 REPEAT Canceled (No indication) REPEAT GROUP (MP3/WMA only) REPEAT 1 REPEAT REPEAT GROUP Repeats the current track. Repeats all tracks. Repeats all tracks in the current group (MP3/WMA only). or 2 3 Select a track number (up to 32 tracks). For audio CD: Random Play 1 Select a source and stop playback. For MP3/WMA: (1) Select a group. or 2 (2) Select a track. REPEAT1 REPEAT Canceled (No indication) RANDOM REPEAT GROUP (MP3/WMA only) Playback starts in a random order. Random Play ends when all tracks have been played. • You cannot select a track with the number buttons during Random Play. 4 • To erase the entire program, press 7 repeatedly. Recording operations Before you start recording • It should be noted that it may be unlawful to re-record pre-recorded tapes, records, or discs without the consent of the owner of copyright for the sound or video recording, broadcast or cable program and for any literary, dramatic, musical, or artistic work embodied therein. The use of the files recorded on a USB device with this System, except for personal use, is prohibited. Transferring or selling the files you recorded violates the copyright law and may subject you to civil and criminal penalties for copyright infringement. • The volume and sound adjustments (see page 1) do not affect recordings. • Random Play and Repeat Mode are canceled during recording. • Tracks which are recorded onto a USB mass storage class device will be converted into MP3 format (at a sampling rate of 44.1 kHz and bit rate of 128 kbps.) Recording from a Disc You can record tracks from an Audio CD to a USB mass storage class device. Before recording... Connect a recordable USB mass storage class device to the USB MEMORY ( ) terminal. 1 Select CD as a source and stop playback. • Do not vibrate the System while recording tracks. It may damage the recorded tracks. • The System will automatically create the new group as "CDREC01." • When playback ends, recording automatically stops. • To stop recording manually, press 7. • To record a single track, press RECORD twice during playback of that track. • To record programmed tracks, press RECORD twice while Program Play is stopped. Erasing a track You can erase tracks on the USB mass storage class device. • Once the track is erased, you cannot resume it. Before erasing... Connect a USB mass storage class device to the USB MEMORY ( ) terminal. 1 Select USB as a source and start playback. 2 Select a track you want to erase. 3 Erase the track. 2 Start recording. (twice) (twice) 2
-
 1
1 -
 2
2
 |
 |