JVC TH-A25 Instruction Manual - Page 86
Tuning in Stations, Setting the AM Tuner Interval Spacing, Press and hold
 |
UPC - 046838260377
View all JVC TH-A25 manuals
Add to My Manuals
Save this manual to your list of manuals |
Page 86 highlights
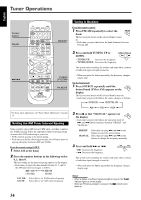
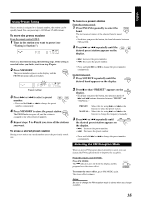
Tuner Operations English Number buttons FM/AM ¢/4 TV AUDIO DIMMER SLEEP 1 2 3 4 5 6 7 8 9 0 MEMORY CANCEL DVD FM/AM AUX SOUND TV CH TV VOL CONTROL TESTTONE TV TV/VIDEO MUTING TOP MENU AUDIO VOL MENU ENTER CHOICE/TIME ON SCREEN / STEP DOWN - TUNING - UP AUDIO SUBTITLE ANGLE ZOOM SLOW RETURN PL REPEAT PROGRESSIVE NTSC/PAL FM MODE RM-STHA25U DVD CINEMA SYSTEM MEMORY TUNING UP/DOWN FM MODE For basic tuner operations, see "Basic Tuner Operations" on page 15. Setting the AM Tuner Interval Spacing Some countries space AM stations 9 kHz apart, and other countries use 10 kHz spacing. Select the appropriate interval spacing setting to receive the AM broadcasting in your area. • 9 kHz interval spacing is the initial setting. • Each time you do the following procedure, the AM tuner interval spacing alternates between 9 kHz and 10 kHz. From the remote control ONLY: 1 Select AM as the band. 2 Press the number buttons in the following order: 9, 1, then 0. The new setting for the interval spacing appears on the display. • Each time you press the three number buttons (9, 1, and 0), the AM tuner interval changes as follows. AM-10K AM-9K (10 kHz) (9 kHz) AM-10K: Select this to set 10 kHz interval spacing. AM-9K: Select this to set 9 kHz interval spacing. Tuning in Stations From the remote control: 1 Press FM/AM repeatedly to select the FM/AM band. The last received station of the selected band is tuned in. • Each time you press the button, the band alternates between FM and AM. 2 Press and hold TUNING UP or DOWN. DOWN - TUNING - UP • TUNING UP: Increases the frequency. • TUNING DOWN: Decreases the frequency. The system starts searching for stations and stops when a station of sufficient signal strength is tuned in. • When you press the button repeatedly, the frequency changes step by step. On the front panel: 1 Press SOURCE repeatedly until the SOURCE desired band (FM or AM) appears on the display. The last received station of the selected band is tuned in. • Each time you press the button, the source changes as follows: DVD/CD DIGITAL IN AM FM AUX 2 Press 7 so that "MANUAL" appears on the display. • Each time you press the button, the operation mode of ¢ and 4 buttons alternates between "PRESET" and "MANUAL." PRESET: MANUAL: Select this for using ¢ and 4 as the buttons to select the preset station. Select this for using ¢ and 4 as the buttons to change the frequency manually. 3 Press and hold ¢ or 4. • ¢: Increases the frequency. • 4: Decreases the frequency. The system starts searching for stations and stops when a station of sufficient signal strength is tuned in. • When you press the button repeatedly, the frequency changes step by step. Notes: • When a station of sufficient signal strength is tuned in, the indicator lights up on the display. • When an FM stereo program is received, the indicator also lights up. 34
-
 1
1 -
2
-
3
-
4
-
5
-
6
-
7
-
8
-
9
-
10
-
11
-
12
-
13
-
14
-
15
-
16
-
17
-
18
-
19
-
20
-
21
-
22
-
23
-
24
-
25
-
26
-
27
-
28
-
29
-
30
-
31
-
32
-
33
-
34
-
35
-
36
-
37
-
38
-
39
-
40
-
41
-
42
-
43
-
44
-
45
-
46
-
47
-
48
-
49
-
50
-
51
-
52
-
53
-
54
-
55
-
56
-
57
-
58
-
59
-
60
-
61
-
62
-
63
-
64
-
65
-
66
-
67
-
68
-
69
-
70
-
71
-
72
-
73
-
74
-
75
-
76
-
77
-
78
-
79
-
80
-
 81
81 -
 82
82 -
 83
83 -
 84
84 -
 85
85 -
 86
86 -
 87
87 -
 88
88 -
 89
89 -
 90
90 -
 91
91 -
92
-
93
-
94
-
95
-
96
-
97
-
98
-
99
-
100
-
101
-
102
-
103
-
104
-
105
-
106
-
107
-
108
-
109
-
110
-
111
-
112
-
113
-
114
-
115
-
116
-
117
-
118
-
119
-
120
-
121
-
122
-
123
-
124
-
125
-
126
-
127
-
128
-
129
-
130
-
131
-
132
-
133
-
134
-
135
-
136
-
137
-
138
-
139
-
140
-
141
-
142
-
143
-
144
 |
 |
