JVC TH-BA1 Instructions - Page 2
Prepare the Remote Control - instructions
 |
UPC - 046838041174
View all JVC TH-BA1 manuals
Add to My Manuals
Save this manual to your list of manuals |
Page 2 highlights
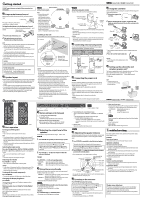
Getting started : Only for TH-BA3 / : Only for TH-BA1 DO NOT connect the power cord until all other connections have been made. Prepare the Remote Control When you use the remote control for the first time, pull out the insulation sheet. Insulation sheet If the range or effectiveness of the remote control decreases, replace the battery. To Replace the Battery in the Remote Control Insert the battery into the remote control by matching the polarities (+ and -) correctly. Lithium coin battery (product number: CR2025) 1 Pinch the side of the battery case. 2 Pull out the battery case and insert the battery by matching the polarities. NOTE • Store the battery in a place where children cannot reach. If a child accidentally swallows the battery, consult a doctor immediately. • To prevent the battery from overheating, cracking, or starting a fire: - Do not recharge, short, disassemble or heat the battery, or dispose of it in a fire. - Do not leave the battery with other metallic materials. - Wrap the battery with tape and insulate when throwing away or saving it. • Do not poke the battery with tweezers or similar tools. • Dispose of the battery in the proper manner, according to federal, state, and local regulations. CAUTION: Danger of explosion if battery is incorrectly replaced. Replace only with the same or equivalent type. For USA-California Only This product contains a CR Coin Cell Lithium Battery which contains Perchlorate material-special handling may apply. See www.dtsc.ca.gov/hazardouswaste/perchlorate Speaker layout Install the speakers on a flat and level surface to ensure the best sound quality. • The sound may be affected depending on the location in which you install them. To avoid such issues, change the location and orientation of the speakers. • Install the speakers leaving an appropriate distance between them. • If you install the speakers near the TV, color distortion may occur. To prevent this, turn off the TV's main power or unplug it before installing the speakers. Wait at least 30 minutes before turning on the TV's main power again. • If the TV is still affected, move the speakers further away. Operations Typical installation Connect the wireless receiver unit to the surround speakers. NOTE • To obtain the best possible sound from the System, install all speakers except the subwoofer at the same distance from the listening position. See the typical installation next. • If your speakers cannot be installed at the same distance from the listening position, you can adjust the speaker distance of each speaker by remote control. See "Adjusting the speaker distance" below. Installing on the wall You can install the center unit and surround speakers* on the wall. Ex.: center unit Wall Screw (not supplied) A: Minimum 6.5 mm B: Maximum 10 mm C: Maximum 6 mm D: φ 4 mm (screw diameter) CAUTION • The center unit weighs approximately 3.5 kg (7.8 lbs) and the surround speakers* weighs approximately 0.6 kg (1.3 lbs) each. Sufficient care must be taken when installing them on the wall to prevent any accidents caused by their falling off. • Use screws which are compatible with the strength and material of the pillar or wall to prevent the center unit and surround speakers* from falling off. • Do not install the center unit and surround speakers* onto a plywood or plasterboard wall; otherwise, they will fall and sustain damage. • When installing the center unit and surround speakers* on the wall; - Be sure to have them installed on the wall by qualified personnel. - Care must be taken when selecting a location for installation on the wall. Injury to personnel or damage to equipment may result if the installed units interfere with daily activities. - AC adaptor should not be hanging/put above of any other items. It is acceptable to place the AC adaptor on the flat floor only. - Recommended mounting surface: Wooden studs. If the mount is to be installed on any surface other than wooden studs, use suitable hardware (which is commercially available). * TH-BA3 only Attaching speaker stands You can use the speaker stands (not supplied) for installation. Use this hole to attach a speaker stand using a screw Connect to RX-THBA3 speaker terminal Stand Screw (not supplied) NOTE • When attaching a speaker stand, refer to the instructions of the speaker stands you purchased. • Refer to the supplied information sheet for wire arrangement and containing the speaker cords. CAUTION • Do not install the surround speakers in a place where they may interfere with daily activities. Injury to personnel or damage to equipment may result if the surround speakers are installed in such a place. Connecting external components You can connect analog components to the ANALOG terminal and digital components to the DIGITAL 1 and DIGITAL 2 terminals. Rear of the center unit Red White RCA pin plug cord (not supplied) Analog component Digital optical cord (not supplied) Digital components Connecting the power cord Connect the supplied AC adaptor to the DC IN jacks on the center unit and wireless receiver unit. Then connect the supplied AC power cord to the AC adaptor, and plug it in a wall outlet. • Plug in the power cord of the subwoofer to a wall outlet. Connect the supplied AC adaptor to the DC IN jack on the center unit. Then connect the supplied AC power cord to the AC adaptor, and plug it in a wall outlet. • Plug in the power cord of the subwoofer to a wall outlet. CAUTION • Disconnect the power cords before cleaning or moving the speakers. Using the core filter Attach the provided core filter to the power cord and the external components cord to reduce interference. 1 Release the stopper of the core filter. Stopper 2 Run the cable through the core filter, and wind the cable firmly once inside the cutout of the core filter as shown in the illustration. Power cord External components cords* Surround speaker cords* * You can wind two external components cords or surround speaker cords together. 3 Close the core filter until it clicks shut. CAUTION • Do not damage the cord by applying excessive force when winding. Setting up the subwoofer and wireless receiver unit* This System is equipped with a wireless subwoofer and receiver unit*. When you use them for the first time, activate the wireless pairing. Refer to the supplied information sheet-"Activate wireless pairing." * TH-BA3 only NOTE • The wireless pairing is not canceled even after the AC plug has been pulled out. : Only for TH-BA3 / : Only for TH-BA1 - INPUT - DIGITAL 1 DIGITAL 2 ANALOG FADE MUTING VOLUME SPEAKER LEVEL ch SPEAKER DISTANCE ch - INPUT - DIGITAL 1 DIGITAL 2 VOLUME ANALOG FADE MUTING - SPEAKER LEVEL - SUBWOOFER CENTER SURROUND SURROUND MODE OFF TEST TONE DIMMER DRC 1 SURROUND MODE OFF 2 DIMMER DRC RM-STHBA3A TH-BA3 RM-STHBA1A TH-BA1 Basic operation Turning on/off the power Press . • You can also use the power button on the front panel. NOTE • A small amount of power is consumed even when the power is turned off (standby mode). During standby mode, the STANDBY lamp on the front panel lights up. Unplug the power cord from the AC outlet to turn the power off completely. • You can also turn on the System by pressing one of the input buttons (DIGITAL 1, DIGITAL 2 or ANALOG). Selecting the input source Press one of the input buttons: DIGITAL 1, DIGITAL 2 or ANALOG. D1 (DIGITAL 1), D2 (DIGITAL 2) or AN (ANALOG) appears on the display for 2 seconds. • You can also use the input button on the front panel. NOTE • The indicator lamp of the selected input source lights. Adjusting the volume Press VOLUME +/- (0 to 40). • You can also use the volume buttons on the front panel. CAUTION • Set the volume to the minimum level before starting any input source. If the volume is set to a high level, the sudden blast of sound may damage your hearing and blow out the speakers. Turning off the sound temporarily Press FADE MUTING. • To restore the sound, press the button again or adjust the volume. Changing the display brightness Press DIMMER. Each time you press the button, the LED brightness changes as follows: normal \ dim \ off Making sound clearer (Only for Dolby Digital and DTS) You can enjoy low level recorded sound clearly even at a low volume level-Dynamic Range Compression. Press DRC. Each time you press the button, the sound is enhanced the effect as follows: OF(off) \ MD (middle) \ MX (maximum) 1 2 3 4 5 The illustration is of TH-BA3. Buttons and lamps on the front panel 1 (power) button and STANDBY lamp Turns on/off the System. • STANDBY lamp lights up while the System is turned off. 2 Input button and input source indicator lamps Selects an input source: "DIGITAL 1," "DIGITAL 2" or "ANALOG." • The indicator lamp for the selected input source lights up. Adjusting the output level of the speakers You can adjust the output level within the range of -6 dB to +6 dB. 1 Press SPK LEVEL ch repeatedly to select the target speaker. Each time you press the button, the speaker changes as follows: FL (Front left surround speaker) \ CT (Center speaker) \ FR (Front right surround speaker) \ SR (Surround right speaker) \ SL (Surround left speaker) \ SW (Subwoofer) \ Back to the beginning 2 Press SPK LEVEL +/- to adjust the output level while the indication is displayed. Press SPK LEVEL +/- for the corresponding speaker. - SUBWOOFER: - CENTER: - SURROUND: Adjusts the output level of the subwoofer. Adjusts the output level of the center speakers. Adjusts the output level of the front surround speakers. Using the surround mode You can listen to a more realistic sound than stereo sound using surround. Available surround modes are as follows: - SURROUND 1: Suitable for the reproduction of multi-channel sources. S1 appears on the display when selected. - SURROUND 2: Suitable for the reproduction of any stereo music sources. S2 appears on the display when selected. • The indicator lamp of the selected mode lights. Press SURROUND MODE repeatedly to select the desired mode. The surround mode changes alternately. • To deactivate, press OFF. OF appears on the display. Press SURROUND MODE 1 or SURROUND MODE 2. • To deactivate, press OFF. OF appears on the display. 6 7 * TH-BA1's display is 2 digit. 3 Surround button and surround indicator lamps Selects a surround mode: "SURROUND 1," "SURROUND 2" or SURROUND OFF. • The indicator lamp for the selected surround mode lights. • The DOLBY PROLOGIC II lamp lights up when: - surround is activated with an ANALOG input source selected. - surround is activated and a DIGITAL input source with 2 channel audio format. 4 Remote sensor Receives the signal from the remote control. 5 Digital signal format lamps Shows the digital signal format of the incoming signal when "DIGITAL 1" or "DIGITAL 2" is selected as the input source. Each lamp lights when: - DOLBY DIGITAL: a Dolby Digital signal comes in. - DTS: a DTS signal comes in. - PCM: a Linear PCM signal comes in. 6 Display Shows the volume level, speaker name and output level of each speaker. Shows the volume level. 7 Volume buttons Adjusts the volume within the range of 0 to 40. Adjusting the speaker distance By adjusting the speaker distance, you can enjoy the optimum surround sound even if it is hard to install the speakers as shown in the typical installation above. 1 Press DISTANCE ch repeatedly to select the desired speaker. The speaker channel has been changed in the following sequence: FT (Front speaker) \ SL (Surround left speaker) \ SR (Surround right speaker) \ SW (Subwoofer) \Back to the beginning 2 Press DISTANCE +/- to adjust the distance from the listening position to the selected speaker. • For the example below, set the speaker distance as follows: Center unit (FT) 2.4 m (8 ft) Subwoofer (SW) 3.0 m (10 ft) 3.0 m (10 ft) 2.7 m (9 ft) 2.4 m (8 ft) 2.1 m (7 ft) Surround speaker (SL) 2.7 m (9 ft) Surround speaker (SR) 2.7 m (9 ft) • You can adjust the speaker distance from 0.3 m to 9.0 m. Each time you press the button, the distance changes by 0.3 m. Troubleshooting If you have a problem with this System, check this list for a possible solution before calling for service. POWER Power does not come on. = The power cord is not inserted securely. Plug it in securely. REMOTE CONTROL The remote control does not work. = The battery is exhausted. Replace the battery. = Sunlight is shining directly on the remote sensor. Hide the remote sensor from direct sunlight. = The path between the remote control and the remote sensor on the front panel is blocked. = Point the remote control at the remote sensor on the front panel. = Signals cannot reach the remote sensor. Move closer to the unit. = Pull out the insulation sheet. SOUND Sounds are sometimes interrupted. = Radio wave connections may be interrupted. Change the location and orientation of the speakers. No sound from speakers. = The wireless connections have not been activated correctly. Check the connection. = The sound has been turned off temporarily. Press FADE MUTING on the remote control or adjust the volume by pressing VOLUME +/-. Listening to the test tone Press TEST TONE to monitor the test tone. The test tone comes out of the speakers in the following sequence: FL (Front left surround speaker) \ CT (Center speaker) \ FR (Front right surround speaker) \ SR (Surround right speaker) \ SL (Surround left speaker) \ Back to the beginning No test tone comes out of the subwoofer. • Press SPK LEVEL +/- to adjust the output level while monitoring the test tone of these speakers. • To stop monitoring the test tone, press TEST TONE. Radio wave reflections The System is connected directly by radio waves which are reflected by walls, furniture and buildings. If the System cannot receive the waves properly, move the System to obtain better reception. Radio wave reception may also be interrupted by people moving between the units.
-
 1
1 -
 2
2
 |
 |