Jenn-Air JED8230ADS Installation Instruction - Page 10
Install Cooktop, Make Electrical Connection - blower
 |
View all Jenn-Air JED8230ADS manuals
Add to My Manuals
Save this manual to your list of manuals |
Page 10 highlights
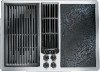
Install Cooktop 1. Using 2 or more people, place cooktop right side up into the cutout. NOTE: Make sure that the front edge of the cooktop is parallel to the front edge of the countertop. If repositioning is needed, lift entire cooktop up from the cutout to avoid scratching the countertop. 2. Connect blower exhaust scroll to ducting. 3. Use vent clamps to secure the ducting to the blower exhaust scroll. 4. Turn tie down bolts clockwise until they contact the bottom side of the countertop, then tighten ¹⁄₄ turn more. 5. Install grease container(s) to bottom of cooktop. 6. Reinstall grease filter. 7. Reinstall vent grille. Make Electrical Connection WARNING Electrical Connection Options If your home has: And you will be connecting to: 4-wire ½" (1.3 cm) A fused disconnect or circuit breaker box 3-wire ½" (1.3 cm) A fused disconnect or circuit breaker box Go to Section: 4-Wire Cable from Power Supply 3-Wire Cable from Power Supply 4-Wire Cable from Home Power Supply to 4-Wire Cable to Cooktop IMPORTANT: Use the 4-wire cable from home power supply in the U.S. where local codes do not allow grounding through neutral, New Branch circuit installations (1996 NEC), mobile homes and recreational vehicles, new construction, and in Canada. Electrical Shock Hazard Disconnect power before servicing. Use 8 gauge copper wire. Electrically ground cooktop. Failure to follow these instructions can result in death, fire, or electrical shock. This cooktop is manufactured with a white (neutral) power supply wire twisted together with a green (or bare) grounding wire connected to the cooktop. Home power supply cable and connectors are not provided. See the "Electrical Connection Options" chart to complete installation for your type of electrical connection. E A B F C G H D A. Green (or bare) ground wires B. White wires C. Black wires D. Cable from home power supply E. Plenum wiring box F. Red wires G. UL listed wire connector H. UL listed or CSA approved strain relief 1. Disconnect power. 2. Remove wiring box cover from the cooktop plenum. 3. Remove the appropriate knockout for the size of the home power supply cable on the bottom side of the cooktop wiring box. Use a UL listed or CSA approved strain relief to connect home power supply cable to cooktop wiring box. 4. Connect the green (or bare) ground wire from the home power supply to the green (or bare) ground wire in the plenum wiring box using the UL listed wire connectors. 5. Connect the 2 black wires together using the UL listed wire connectors. 6. Connect the 2 red wires together using the UL listed wire connectors. 7. Connect the 2 white wires together the UL listed wire connectors. 8. Tighten screws on the strain relief. 9. Install cooktop wiring box cover on plenum wiring box. 10
-
 1
1 -
2
-
3
-
4
-
 5
5 -
 6
6 -
 7
7 -
 8
8 -
 9
9 -
 10
10 -
 11
11 -
 12
12 -
 13
13 -
 14
14 -
 15
15 -
16
-
17
-
18
-
19
-
20
-
21
-
22
-
23
-
24
 |
 |
