Jenn-Air JMC2430IL Owners Manual - Page 6
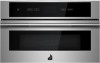
Convection Grid, Coated Crisper Pan and Handle, Microwave Oven Control
 |
View all Jenn-Air JMC2430IL manuals
Add to My Manuals
Save this manual to your list of manuals |
Page 6 highlights
1. From the Microwave Cooking Mode menu, touch TURNTABLE to turn the rotation On or Off. A B C D Defrost Reheat 02 02 01 01 Turntable is ON Cook Popco rn Baked Potato 00 00 START E MIN SEC 89 59 88 58 Power F 100% A. Cooking mode B. Time - minute selection C. Time - second selection D. Turntable on/off menu E. Start cooking cycle F. Power level selection Convection Grid The convection grid provides optimal heat circulation for convection cooking (on some models). It is recommended for convection cooking and for grilling thick pieces of meat such as bone-in chicken. ■■ The grid will become hot. Always use oven mitts or pot holders when handling. ■■ To avoid damage to the microwave oven, do not allow the grid to touch the inside cavity walls, ceiling, or floor. ■■ Always use the turntable. ■■ To avoid damage to the microwave oven, do not store the grid in the oven. ■■ Two-level cooking is not recommended. ■■ For best results, do not place popcorn bags on the grid. ■■ The grid is designed specifically for this oven. For best cooking results, do not attempt to use any other grid in this oven. Coated Crisper Pan and Handle The crisper pan, with its nonstick surface and detachable handle, has been specifically designed for microwave use and is ideal for pan-frying (pan-browning) foods in the microwave oven. ■■ The crisper pan will become hot. Always use the handle and oven mitts or pot holders when handling. Place gripping end on the edge of pan, squeeze handle, and lift pan. ■■ Do not allow the crisper pan or handle to touch the inside cavity walls, ceiling, or floor. ■■ Use the turntable as a support for the crisper pan. ■■ Do not place hot crisper pan on heat-sensitive surfaces. Damage may occur. ■■ To avoid damage to the microwave oven, do not use another metal object with the crisper pan. ■■ The crisper pan is designed specifically for this oven. Do not use it in any other oven. ■■ Use only wooden or plastic cooking utensils to help avoid scratches. MICROWAVE OVEN CONTROL This manual covers several models. Your model may have some or all of the items listed. Refer to this manual or the Frequently Asked Questions (FAQs) section of our website at www.jennair.com for more detailed instructions. In Canada, refer to the Customer Service Section at www.jennair.ca. The microwave oven's controls are accessed through its control panel and interactive touch display. NOTE: Due to the sensitivity of the control panel, we have provided special instructions for cleaning the panel as well as the touch panel. See "General Cleaning" section for cleaning instructions. Combination Oven Models AB C D E F G HI A. Power B. Microwave cancel C. Add 30 Sec. D. Microwave E. Display F. Lower oven G. Oven light H. Oven cancel I. Clean 6
-
 1
1 -
 2
2 -
 3
3 -
 4
4 -
 5
5 -
 6
6 -
 7
7 -
 8
8 -
 9
9 -
 10
10 -
 11
11 -
 12
12 -
13
-
14
-
15
-
16
-
17
-
18
-
19
-
20
-
21
-
22
-
23
-
24
-
25
-
26
-
27
-
28
-
29
-
30
-
31
-
32
-
33
-
34
-
35
-
36
-
37
-
38
-
39
-
40
-
41
-
42
-
43
-
44
-
45
-
46
-
47
-
48
 |
 |
