Jenn-Air JUB24FLECX Use and Care - Page 11
Beverage Center Care
 |
View all Jenn-Air JUB24FLECX manuals
Add to My Manuals
Save this manual to your list of manuals |
Page 11 highlights
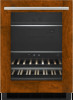
Beverage/Wine Racks Remove and Replace Racks NOTE: When storing large bottles or magnums, remove the rack directly above. 1. Pull the rack forward until it stops. 2. Lift up on the left-hand lever while pressing down on the right-hand lever to release the rack. Pull the rack forward and lift it up and out of the rack supports. To Stock the Beverage Center: 1. Starting on the left-hand side of the bottom rack, place the first bottle with the neck of the bottle facing the front of the beverage center. 2. Place the next bottle on the rack with the neck of the bottle facing the back of the beverage center. Alternate the direction of the bottles, in this manner, until the display rack is full. A A. Lever 3. Replace the rack by inserting the rack into the supports and sliding it toward the rear of the beverage center. 3. Slide the bottom rack into place and pull the next rack forward. Stock the remaining rack as described in the previous steps. 4. Place juices, sodas or other canned beverages on the glass shelves. BEVERAGE CENTER CARE Stocking the Beverage Center NOTES: ■ For optimum wine storage, place white wines on the upper rack of the beverage center and place red wines on the lower rack of the beverage center. ■ The wine racks can be stocked with the bottles facing either direction, however, to optimize storage adjacent bottles should be facing in opposite directions. Base Grille You must remove the base grille to access the condenser coils for cleaning. To Remove the Base Grille: 1. Open the beverage center door. 2. Using a Phillips screwdriver, remove the two screws. 3. Push both tabs in toward the center to release the base grille from the cabinet and remove. A B A A. Tabs B. Screws 11
-
 1
1 -
2
-
3
-
4
-
5
-
 6
6 -
 7
7 -
 8
8 -
 9
9 -
 10
10 -
 11
11 -
 12
12 -
 13
13 -
 14
14 -
 15
15 -
 16
16 -
17
-
18
-
19
-
20
-
21
-
22
-
23
-
24
-
25
-
26
-
27
-
28
-
29
-
30
-
31
-
32
-
33
-
34
-
35
-
36
-
37
-
38
-
39
-
40
-
41
-
42
-
43
-
44
-
45
-
46
-
47
-
48
 |
 |
